This article was co-authored by wikiHow staff writer, Danielle Blinka, MA, MPA. Danielle Blinka is a Writer, Editor, Podcaster, Improv Performer, and Artist currently living in Houston, TX. She also has experience teaching English and writing to others. Danielle holds a Bachelor of Arts in English, Bachelor of Arts in Political Science, Master of Arts in English with a concentration in writing, and Master of Public Administration from Lamar University.
wikiHow marks an article as reader-approved once it receives enough positive feedback. In this case, 85% of readers who voted found the article helpful, earning it our reader-approved status.
This article has been viewed 161,621 times.
Learn more...
While polished silver is beautiful, it may not be your style. If you prefer the look of vintage or antique silver, you may be excited to learn that you can recreate that look you love with newer pieces of silver, meaning that you can create the perfect “vintage” tea service or cocktail ring with a new piece of silver. You can put an antique silver finish on your new silver by using boiled eggs or using liver of sulfur patina.
Steps
Using Boiled Eggs
-
1Boil two eggs. For one piece of jewelry, you will need two boiled eggs. Bring a medium pot of water to a boil, then carefully add your two eggs. Boil the eggs for 10 minutes before removing them from the heat source.[1]
- If you are going to be finishing a large piece or multiple pieces of silver, you will need more eggs.
- Set the eggs aside to cool. You can pour out most of the boiling water and add cool water to speed the process.
-
2Wash the silver pieces. Use liquid dish soap and water to clean the pieces you will be antiquing. Gently scrub them with your fingertips before rinsing away the soap. Dry your silver pieces well to make sure that there is no lingering water in the crevices of the silver.[2]
- The purpose of washing the pieces is to remove oils that can prevent the silver from oxidizing.
- After you wash the pieces, it’s better to wear gloves so that you won’t get finger oils on the silver.
Advertisement -
3Place the eggs in a plastic baggie. Choose a sealable plastic bag that is large enough to hold both the eggs and the silver pieces you want to finish. Without peeling your eggs, add them to the bag, leaving enough room for the eggs to move around some. Ideally, the eggs should not be piled on top of each other because that will make it hard for you to mash them.[3]
- If you have a lot of eggs because you are doing multiple pieces, then you can use more than one bag.
- If your silver piece will not fit in a bag, mash the eggs, then add them to a larger container that fits your item.
-
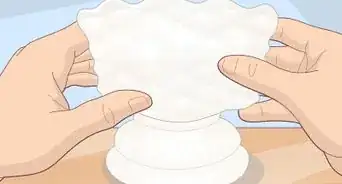
4Mash the eggs. Use your hands to press the eggs, causing them to break up into small pieces. Eggs naturally contain sulfur, which will oxidize the silver. The more you press the eggs, the more sulfur you will release, meaning that the process will work more effectively.[4]
-
5Add your silver pieces to the bag. Place the items in the bag and make sure that they are fully covered with egg. You can roll the silver around in the egg or fold the bag so that the eggs are mashed against the silver.[5]
-
6Allow the pieces to set for several hours. While you will start to see a color change after about 15 minutes, your piece will likely need to set for 5-8 hours, depending on your color preferences. If you just want a light antique finish, then the time will be shorter. For best results, check regularly to see if the color matches your desires.[6]
- Don’t forget about your silver. If you leave it in the eggs for too long, then it may be damaged.
-
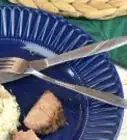
7Remove and clean the silver. Knock off the pieces of egg that are stuck to your silver, then wipe it with a clean cloth or napkin. Thoroughly wash the jewelry with soap and water, making sure that all traces of the egg are gone. If you have egg left on your piece, it will start to smell.[7]
- You can use a toothpick to remove bits of egg from crevices.
- Dry the silver once it’s completely clean.


Using Liver of Sulfur Patina
-
1Wash your silver. Mix liquid detergent and a few drops of ammonia into a bowl of hot water. Immerse your silver and scrub away any dirt, oil, or residue that may be on the item. Use a soft bristle brush, such as a toothbrush, to work in the cleaning solution.[8]
- If you don’t have ammonia, you can still wash your item with just liquid detergent.[9]
-
2Mix liver sulfur patina into water. Add two cups (.5 liters) of water to a large bowl or container. Add ¼ teaspoon (1.25 milliliters) of patina gel to the water. Stir until the mixture is a pale yellow.
- A darker yellow solution will work faster, but a quick finish will not be as strong. It’s better to allow your piece to treat for longer in a weaker solution.[10]
- You can purchase liver sulfur patina gel at craft supply stores or through online retailers.
-
3Dip your silver into the mixture and check the color. Don’t immerse your item. Instead, dip the piece into the solution then pull it out after a few seconds. The patina gel will work quickly. After you dip, check the color to see if it is your preferred finish.[11]
- Wear rubber gloves while you dip the silver to protect your skin.
-
4Continue to dip and check until you reach your desired color. You may need to dip the piece several times to reach your preferred shade, but don’t be tempted to rush the process by immersing it because a rushed process can result in an uneven or damaged finish. Only leave it in the solution for a few seconds at a time.[12] Additionally, allowing the item to oxidize for too long can cause pitting.[13]
-
5Mix baking soda into water to create a neutralizing bath. Your neutralizing bath should contain water and a small amount of baking soda. Sprinkle a few pinches of baking soda over the water, and then stir it. You don’t need much baking soda to create your solution.[14]
-
6Dip your piece into the neutralizing bath. You need to neutralize the patina gel or it will continue to darken your item even after you have removed it from the solution. The baking soda in your neutralizing bath will deactivate the sulfur, stopping the oxidation process. Dip the piece for a few seconds, then remove it to check the finish.[15]
- Don’t allow your items to soak, as this could remove the finish you just added.
-
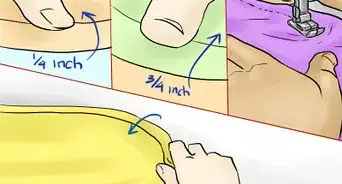
7Rub baking soda onto the high points of the silver. If you want your piece to look natural, remove the finish from the high spots. Rub a small amount of baking soda onto the raised areas of your piece to restore the polish to those areas. This will make your antique finish look more natural.[16]
- If you want a more consistent color or are happy with the look of your piece, you can skip this step.


Community Q&A
-
QuestionWhat effect will the egg have on a stone in the ring?
 Community AnswerNot a lot of anything, for most stones, but there are a few exceptions. If you notice a film on the stone after the process, it's nothing that a buffing cloth and elbow grease won't shine.
 -
QuestionShould the yolk be runny or hard in the egg process?
 Community AnswerHard. It’s the sulfur in gas SO2 that does the trick to the process. If the yolks are are runny, they will push oxygen away and slow the oxidation from SO2 being released.
 -
QuestionIf I use the egg method and have reached the desired patina, what is the best way to polish my silver ring or bracelet? Can I use traditional silver polish on a rag or should I use baking soda?
 Community AnswerA cloth that just hits the highest points is best or you will remove all the patina in the lower areas. Use a thick or stiffer cloth or bag to preserve the lower features.
Warnings
- Make sure these are pieces you want antiqued. Polishing removes a layer of metal, so tarnishing unnecessarily will just speed the wear of your precious silver.⧼thumbs_response⧽
- Don't forget about your tarnishing silver. If left too long the silver could pit! Unfortunately, there's not much you can do to save a pitted piece of silver.⧼thumbs_response⧽
- Allowing your item to oxidize for too long in either the boiled eggs or the patina gel can damage the surface of your silver.⧼thumbs_response⧽
- Be careful when handling the boiled eggs. Wait until they are completely cool before touching them.⧼thumbs_response⧽
Things You'll Need
Using Boiled Eggs
- Silver you want to antique
- Eggs
- A medium to large pot
- Zip-Loc bag(s)
- Toothpick (optional)
Using a Liver of Sulfur Patina
- Liver of Sulfur Patina gel
- Bowl
- Water
- Baking soda


References
- ↑ http://jewelrymakingjournal.com/how-to-oxidize-sterling-silver-and-copper-with-boiled-eggs/
- ↑ http://jewelrymakingjournal.com/how-to-oxidize-sterling-silver-and-copper-with-boiled-eggs/
- ↑ http://jewelrymakingjournal.com/how-to-oxidize-sterling-silver-and-copper-with-boiled-eggs/
- ↑ http://jewelrymakingjournal.com/how-to-oxidize-sterling-silver-and-copper-with-boiled-eggs/
- ↑ http://jewelrymakingjournal.com/how-to-oxidize-sterling-silver-and-copper-with-boiled-eggs/
- ↑ http://jewelrymakingjournal.com/how-to-oxidize-sterling-silver-and-copper-with-boiled-eggs/
- ↑ http://jewelrymakingjournal.com/how-to-oxidize-sterling-silver-and-copper-with-boiled-eggs/
- ↑ http://www.cooltools.us/v/vspfiles/assets/images/article-a_jewelry_artists_guide_to_liver_of_sulfur_patinas.pdf
- ↑ http://jewelrymakingjournal.com/how-to-oxidize-sterling-silver-and-copper-with-boiled-eggs/
- ↑ http://www.cooltools.us/v/vspfiles/assets/images/article-a_jewelry_artists_guide_to_liver_of_sulfur_patinas.pdf
- ↑ http://www.cooltools.us/v/vspfiles/assets/images/article-a_jewelry_artists_guide_to_liver_of_sulfur_patinas.pdf
- ↑ http://www.cooltools.us/v/vspfiles/assets/images/article-a_jewelry_artists_guide_to_liver_of_sulfur_patinas.pdf
About This Article

If you prefer the look of antique silver, you can easily put an antique finish on your new silver using eggs. Start by boiling 2 eggs in a pot of water for 10 minutes. While the eggs are cooling, wash your jewelry with your fingers and soapy water. Then, place the unpeeled eggs in a sealable bag and mash them into small pieces with your hands. Once you’ve crushed the eggs, place your jewelry in the bag and roll it around inside to coat it in egg pieces. Leave it inside for 5 to 8 hours, depending on how dark you want the finish. Finally, wash your jewelry again with soapy water and dry it with a towel. For more tips, including how to give your jewelry an antique finish with liver of sulfur patina, read on!