X
wikiHow is a “wiki,” similar to Wikipedia, which means that many of our articles are co-written by multiple authors. To create this article, volunteer authors worked to edit and improve it over time.
This article has been viewed 47,659 times.
Learn more...
You can remove old Artex by using a wallpaper steamer or a specialty removal product, but either method can be very time-consuming. Before beginning either procedure, you must also make sure that the Artex does not contain any traces of asbestos.
Steps
Before You Begin: Test the Artex
-
1Determine if testing is necessary. Prior to the mid-1980s, Artex was strengthened with asbestos. If your home dates back to that decade or earlier, you may need to test the Artex for asbestos before removing it.[1]
- Do not attempt to remove Artex that may contain asbestos. Doing so could be dangerous to your health and the health of those around you.
-
2Hire someone to test for asbestos. If testing is necessary, you'll need to hire a professional, certified contractor to perform the test.[2]
- The contractor will close off the area and take a sample of the Artex. After testing that sample in a lab, he or she will let you know if it contains asbestos.
- If the Artex does contain asbestos, you'll need to speak with a specialist about removal. Do not attempt to remove it yourself.
- If the Artex does not contain asbestos, you should be able to safely remove it without professional help.


Advertisement
Method 1
Method 1 of 2:
Method One: Steam Removal
-
1Protect the surrounding area. Remove any lightweight furniture and decorations. Cover the remaining furniture, appliances, and floor with a plastic drop cloth.
- Protect yourself by wearing a dust mask and working gloves. You should also wear "junk" clothes that you don't mind dirtying while working on this project.
- Steam removal can be very messy. Artex has a tendency to liquefy when it becomes too hot, and if this happens, the product can easily drip onto other surfaces and create stains.
-
2Fill the wallpaper steamer with water. Fill the steamer canister with hot tap water. Plug the machine into a wall outlet and switch it on, giving it several minutes to heat up.[3]
- Each steamer may work differently, so follow the manufacturer's instructions before use. If the water canister has a fill line, make sure that you do not fill it above that line. Give the machine an adequate amount of time to heat up, too.
-
3Steam an area for several seconds. Press the steam plate over the corner of the Artex-covered area. Hold it in place for several seconds.
- Do not hold the steam plate over one area for more than a few seconds. If you allow the Artex to get too hot, it could liquefy and drip onto other surfaces. Moreover, you may also damage the ceiling or wall beneath the Artex by applying too much steam.
-
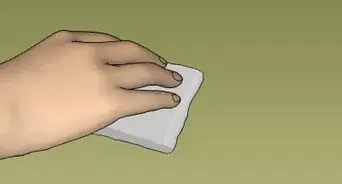
4Test the progress. Lift up the steam plate, then use a scraper tool to test the softness of the Artex.[4]
- Press the edge of the scraper directly to the surface and push into the Artex using firm, controlled pressure. If the Artex feels hard or does not respond to moderate amount pressure, it isn't soft enough to remove yet.
-
5Repeat as needed until you can scrape off the Artex. Continue steaming the same area for several seconds at a time, testing after each press. When the Artex becomes soft enough, use the scraper to ease it off the surface.
- It may take 20 seconds or more before the Artex softens enough to remove, but you should continue testing the area every few seconds with the scraper. Frequent testing will prevent more mishaps.
- Once you can easily scrape away the Artex with the scraper tool, the product is soft enough to work with. Safely set aside the steamer and scrape the product away using straight, overlapping parallel strokes. Apply just enough pressure to ease away the Artex without damaging the surface beneath it.
- As you scrape away the Artex, you can let it drop onto the drop cloth you spread out earlier. Alternatively, you can try collecting it in a large plastic garbage bag as it drops.
-
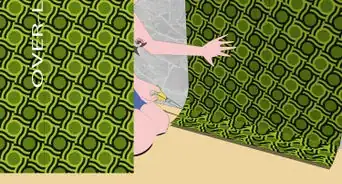
6Gradually work your way over the entire area. Steam and scrape over the entire Artex-covered area. Take your time and remove each patch by following the same technique used on the first patch.
- Work slowly and carefully. Continue testing each area after steaming it for several seconds, and do not assume that each area will take the same amount of time to soften.
- Move in a straight line while working over the area. Each section you work on should slightly overlap the one before it. Working in this manner may prevent you from accidentally leaving gaps or strips of Artex behind.
-
7Examine the area. After peeling away the Artex from the entire area, carefully examine your work to verify that no traces of Artex remain.
- If you do find some remnants of Artex, work over those patches with the steamer and scraper again. Continue doing so until you successfully clear the entire area.
- Once you finish, you can gather the bits of removed Artex into plastic garbage bags and dispose of them. Note that steamed Artex will become dusty once it dries, so you'll need to work carefully to avoid disturbing the dust. Remove the drop cloth, as well, and return the room to normal.
- The project is over once you complete this step.


Advertisement
Method 2
Method 2 of 2:
Method Two: Artex Removal Solution
-
1Protect the surrounding area. Remove as much nearby furniture as possible, then cover the rest of the furniture and any appliances with plastic drop cloths. Lay a drop cloth or newspaper over the floor, as well.
- Wear working gloves to protect your hands. Softened Artex has the potential to create stains, so you should also change into clothes you don't mind dirtying before working on this project.
-
2Obtain an Artex removal solution. There are several products specially formulated for Artex removal, and the application procedure should not vary much between products. For best results, however, choose a "wet working system" solution.
- All Artex removal solutions work by breaking down the structure of the Artex and causing it to soften.
- Working wet systems are water-based, so they tend to be non-flammable and won't create any hazardous fumes.[5] Moreover, they keep the Artex wet at all times, which can prevent dry fibers from becoming airborne.
- Since these products do not allow the Artex to dry out, they may even be safe for use with Artex containing asbestos. Nonetheless, you should still consult with a professional before attempting to remove any Artex that may contain asbestos.
-
3Score the paint, if necessary. Some solutions may have difficulty working through paint, so when removing paint-covered Artex, lightly score the paint with a utility knife to promote easier penetration.
- This is especially important when dealing with vinyl silk paints. The plastic polymers inside of the paint can turn into a thick goo when exposed to the removal solution. Scoring the paint should make it easier for the solution to work through the goo and into the Artex beneath.
- Score the paint lightly, however, since you only need to cut into the paint and not into the Artex beneath it.
-
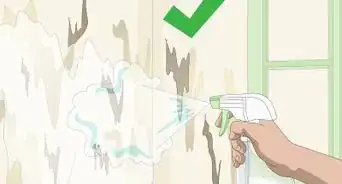
4Paint the solution over the Artex.[6] Use a large, wide paintbrush to slather the removal solution over the entire area. Cover the area as thoroughly and evenly as possible.
- Follow the package instructions to determine the proper application technique. Usually, you'll simply need to apply the solution onto the surface in even, parallel strokes. Thicker formulas may require the use of a putty knife or paint roller, however.
-
5Wait for the Artex to soften.[7] Depending on the product you use and the thickness of the Artex, you may need to wait 30 minutes to 8 hours before the Artex softens enough for removal.
- When dealing with painted Artex or notably thick applications, you may need to cover the area with foil or plastic film and allow it to sit overnight. The film should prevent the solution from drying out, and the prolonged soak time should ensure more thorough softening.
-
6Scrape away the Artex. Use a scraper tool to ease the Artex off the surface. Work your way across the entire area while scraping away the product in this manner.
- When removing painted Artex, use a long-handled blade scraper instead of a standard steel one. This tool will make it easier to cleanly lift the Artex from the surface.
- Press the edge of the scraper directly onto the surface, then push into the Artex with controlled, even pressure. If the Artex is soft enough, it should scrape away without much difficulty.
- Scrape in straight, parallel strokes. Each stroke should slightly overlap the one before it to ensure that no small strips of Artex are left in between patches.
- Let the Artex drop onto the previously covered floor as you scrape it away. Alternatively, you could attempt to scrape it directly into a large plastic garbage bag, but it can be difficult to catch all of the falling pieces.
-
7Examine the area. After removing the Artex, examine the surface more thoroughly. Verify that all traces of Artex are gone.
- If any patches of Artex remain after your initial removal, you could try removing them by applying more removal product. Let the Artex soften for a longer period of time before scraping it away.
- If you are unable to remove the Artex in some places with the removal solution, you could still remove it by using the steamer method.
- Once you scrape away all of the Artex, wrap it up inside the drop cloth and transfer the entire thing into a large plastic garbage bag for disposal.
- Return the room to normal when finished. This completes the entire process.


Advertisement
Warnings
- Some older Artex may contain asbestos and can be extremely dangerous to your health when disturbed. For this reason, you should have older Artex tested before attempting to remove it.⧼thumbs_response⧽
Advertisement
Things You'll Need
Steam Removal
- Drop cloth
- Dust mask
- Working gloves
- Wallpaper steamer
- Scraper tool
- Plastic garbage bags
Artex Removal Solution
- Drop cloths
- Working gloves
- Artex removal solution
- Plastic film or foil
- Long-handled scraper
- Paintbrush
- Plastic garbage bags


References
- ↑ https://www.aic.org.uk/asbestos-in-artex/
- ↑ https://www.aic.org.uk/asbestos-in-artex/
- ↑ https://www.youtube.com/watch?v=L-qHuOOkQpE
- ↑ https://www.youtube.com/watch?v=L-qHuOOkQpE
- ↑ http://www.diydoctor.org.uk/projects/artex.htm
- ↑ https://propertyworkshop.com/painting-decorating/artex-ceiling/#tab-con-17
- ↑ https://propertyworkshop.com/painting-decorating/artex-ceiling/#tab-con-17
About This Article
Advertisement