This article was co-authored by Christopher Lanier. Christopher Lanier is a handyman and the owner and operator of Watson & Company Handiworks, a handyman business in Austin, Texas. With over three years of experience, Christopher specializes in outdoor light installation, furniture assembly, TV mounting, and window treatment installation. Christopher holds a Bachelor’s degree in Business Administration from the University of Texas at Austin. Watson & Company Handiworks is rated as a Top Pro by Thumbtack.
There are 13 references cited in this article, which can be found at the bottom of the page.
This article has been viewed 73,501 times.
A doorbell transformer converts electricity to a lower voltage, then sends the current to the doorbell’s other parts. Often enough, replacing a faulty transformer is a fairly straightforward job. Turn off the power first, disconnect the transformer's wiring, and dismount it. Then bring it to the hardware store and purchase a matching replacement. Since electrical repairs can be tricky, keep in mind it’s usually best to hire a professional, especially if you’re not experienced with home wiring.
Steps
Turning off Power to the Transformer
-
1Rule out issues with the doorbell switch, chime box, and wiring. Before attempting to replace the transformer, ensure the problem isn't with another part of the doorbell. First, remove the wires from the doorbell switch (the button mechanism), and touch them together. If the doorbell rings, the switch needs to be replaced.[1]
- If the switch isn't the issue, head to the chime, or the indoor doorbell mechanism. Remove the cover, have a helper press the doorbell button, and test the chime with a low-voltage meter.
- If the tester lights up, there's something wrong with the chime. Look for buildup in the mechanism, and clean any grime with rubbing alcohol. If that doesn't do the trick, you'll need to replace the chime.
- If the tester doesn't light up, the chime isn't receiving power, which means the issue is either with the transformer or the wiring between the transformer and chime.
-
2Find the transformer in the basement or attic near the electrical panel. Doorbell transformers are usually located on or near the main electrical panel. Look in the area around your panel for a small black or silver metal box attached to a beam or to the panel itself. It’ll have wires leading to the electrical panel on one side, 1 to 3 screws on the opposite face, and thinner wires connected to the screws that lead to the doorbell chime.[2]
- If the transformer isn't near your electrical panel, look around your heating and cooling system. Check behind insulation, especially if you suspect the transformer is in the attic.
- While less common, the transformer may be under or inside the chime, so check there if you can't find it near your electrical panel or heating and cooling system.
- It’s best to have a professional replace a transformer in or on an electrical panel, especially if you don’t have experience with home wiring. If the transformer is attached to the panel itself, it may be trickier to replace or require you to disassemble the panel.
Tip: If you have trouble finding the transformer, remove the chime box (the indoor doorbell unit) from the wall. If the wires that run through a hole in the wall to the transformer lead up, the transformer is in the attic. If they lead down, the transformer is in your basement or crawl space.[3]
Advertisement -
3Shut off the circuit breaker or fuse at the main panel.[4] Before attempting your repair, find the circuit breaker or fuse that supplies power to the transformer. Flip the circuit breaker switch off, or twist and remove the fuse from your fuse box. If you’re not sure which switch or fuse powers the transformer, turn off the main power to cut off the electrical supply to your entire home.[5]
- Look for a double-width main power circuit breaker switch at the top of the panel. If you have a fuse box, pull out the main fuse block, or a large rectangular block with a handle at the top of the panel.
- Before you turn off main power, have a headlamp or flashlight handy so you can find your way to the transformer and make the repair.
-
4Test the transformer to ensure you’ve turned off the power. Hold a no-contact voltage meter to the transformer to make sure you turned off the right circuit.[6] If there’s still a current, try turning off another circuit or just cut off the main power.[7]
- If you turned off main power from the start, it’s still wise to test the transformer, just in case you flipped the wrong switch.
- It’s a good idea to place a strip of electrical tape over the switch you’ve flipped or the fuse you’ve removed. That way, no one will accidentally turn the power back on while you’re working.
- You can purchase a voltage meter online or at your local hardware store.


Removing the Old Transformer
-
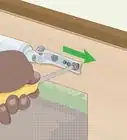
1Remove the transformer junction box cover, if necessary. Doorbell transformers are typically mounted on a silver metal junction box, which will likely have a cover. The cover may snap off, or you may need to loosen screws to remove it.[8]
- After removing the screws, keep them in a safe place so you don’t lose them.
- Inside the junction box, you’ll find wires that run from the transformer and another set that leads through the wall (or through a metal casing) to the main electrical panel. The 2 sets of wires are connected by wire caps, which are plastic cylinder-shaped covers.
-
2Disconnect the wires that supply power to the transformer. Untwist the caps that connect the wires running from the transformer with those that lead to the electrical panel. If there’s electrical tape covering the caps, peel it off first. Once you’ve removed the caps, untwist and separate the ends of the wires.[9]
- Each set of wires is a different color. The transformer’s black wire connects to the black wire that runs to the main panel, and its white wire is connected to a white wire that leads to the panel.
- The green wire is connected either to a green or brown wire or to a metal ground bar or screw. This grounding wire helps prevent electrical overloads.
-
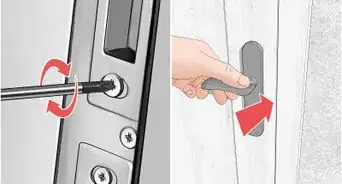
3Unscrew the wires that connect the transformer to the doorbell. On the side of the transformer opposite the black, white, and green wires, you’ll find thinner low-voltage wires. They’re attached to screw terminals on the transformer and lead to the doorbell’s other components. Using a screwdriver, rotate the screws counterclockwise to loosen them, unwrap the ends of the wires, and pull them off of the terminals.[10]
- If you find more than 1 set of wires attached to multiple screw terminals, wrap each set with electrical tape so you don’t mix 1 set up with another.
- For many doorbell transformers, you'll likely need a flat-head screwdriver to tighten and loosen the screw terminals. You'll probably find any screws that hold the transformer in place are Phillips-head, so have both types of screwdriver handy when you make the repair.
- The thicker wires that run to the electrical panel carry a 120-volt current. This is too powerful for doorbells, so the transformer converts the current to 16 to 24 volts. It then sends the current to the doorbell through the thin, low-voltage wires.
-
4Loosen the screws or bolt that hold the transformer to the junction box. After disconnecting the wires on either side of the transformer, check to see how it’s secured to the junction box. If there are screws, grab your screwdriver and remove them. If there’s a bolt, turn it counterclockwise with a wrench. After removing the screws or bolt, take the transformer off of the side of junction box.[11]
- The transformer’s wires enter the junction box through a hole in the side of the box. Gather the wires together and slide them through this hole as you pull the transformer off of the box.
Tip: Transformers have various specifications, so take yours to the hardware or home improvement store after removing it. Ask an employee at the store to help you find a match.


Installing the New Transformer
-
1Screw the new transformer onto the junction box. Start by threading your new transformer’s wires through the hole in the side of the junction box. Then tighten the screws or bolt that came with your new transformer to mount it onto the box.[12]
- Remember to verify the electricity is off before installing the new transformer.
-
2Connect the new transformer’s wires to the ones in the junction box. Match up the transformer’s black, white, and green wires with the corresponding wires that lead to the main panel. Twist the ends of 2 matching wires together, cover the connection with a wire cap, then turn the cap clockwise.[13]
- Be sure to connect black with black, white with white, and green with green, brown, or a grounding bar or screw. For added insurance, wrap a strip of electrical tape around the wire cap and protruding wires.
Safety Precaution: Call an electrician if there is no grounding wire, bar, or screw inside the junction box. You may find online guides that advise simply wrapping the transformer’s green wire with a black or white wire, but this is a safety hazard.
-
3Attach the low-voltage wires to the transformer’s screw terminals. If you taped sets of low-voltage wires together, remove the electrical tape. Wrap the ends of the wires around a terminal, then tighten the screw to hold the wires in place. Repeat the steps, if necessary, to attach a second set of wires to the other screw terminal.[14]
- If you have wired doorbells on your front and back doors, you’ll likely have 2 sets of low-voltage wires to reinstall.
- You can connect the wires to either screw; it doesn’t matter which set of wires connects to which screw. However, keep the sets separate and don’t attach both to 1 screw.
-
4Replace the junction box cover if you needed to remove it. If you removed it, place the cover over the junction box so its pre-drilled holes align with the ones in the box. Turn the screws clockwise until they’re tight, and avoid over-tightening them.[15]
- Always use a manual screwdriver or low-power automatic screwdriver to loosen and tighten screws. Using a drill or other high-powered tool could strip the heads of the screws. Removing stripped screws is a tough, frustrating job!
-
5Turn the power back on and test the doorbell. To restore power, flip the circuit breaker switch back on or insert the fuse back into the fuse box. Head to the doorbell button just outside your door, press it, and listen for the chime. If you have a second doorbell button, remember to test it as well.[16]
- If you hear a chime, congratulations! You fixed your doorbell! If you don’t hear anything, turn off the power and double check that your wiring connections at the transformer are tight.
- If your connections are tight and the doorbell still doesn’t work, call a professional or install a wireless doorbell.


Warnings
- Always turn off power to a circuit and verify the electricity is off before attempting an electrical repair.⧼thumbs_response⧽
- It’s usually best to call a professional instead of attempting electrical repairs yourself, especially if you’re not experienced with home wiring.⧼thumbs_response⧽
Things You’ll Need
- Voltage meter
- Screwdriver (flat-head and Phillips-head)
- Adjustable wrench or vice grips (optional)
- Electrical tape


References
- ↑ https://www.familyhandyman.com/electrical/electrical-repair/repair-a-doorbell-fix-a-dead-or-broken-doorbell/
- ↑ https://www.familyhandyman.com/electrical/electrical-repair/repair-a-doorbell-fix-a-dead-or-broken-doorbell/
- ↑ https://www.youtube.com/watch?v=867nCCONKs4&feature=youtu.be&t=130
- ↑ Christopher Lanier. Handyman. Expert Interview. 25 August 2020.
- ↑ https://www.doityourself.com/stry/how-to-replace-a-doorbell-transformer
- ↑ Christopher Lanier. Handyman. Expert Interview. 25 August 2020.
- ↑ https://www.familyhandyman.com/electrical/electrical-repair/repair-a-doorbell-fix-a-dead-or-broken-doorbell/
- ↑ https://www.youtube.com/watch?v=867nCCONKs4&feature=youtu.be&t=150
- ↑ https://www.youtube.com/watch?v=867nCCONKs4&feature=youtu.be&t=161
- ↑ https://www.youtube.com/watch?v=867nCCONKs4&feature=youtu.be&t=163
- ↑ https://www.youtube.com/watch?v=867nCCONKs4&feature=youtu.be&t=175
- ↑ https://www.youtube.com/watch?v=867nCCONKs4&feature=youtu.be&t=191
- ↑ https://www.youtube.com/watch?v=867nCCONKs4&feature=youtu.be&t=200
- ↑ https://www.youtube.com/watch?v=867nCCONKs4&feature=youtu.be&t=232
- ↑ https://www.youtube.com/watch?v=867nCCONKs4&feature=youtu.be&t=213
- ↑ https://www.youtube.com/watch?v=867nCCONKs4&feature=youtu.be&t=237
About This Article