This article was co-authored by Jacob Pischer. Jacob Pischer is a Home Improvement Specialist and the Owner of Helpful Badger, a home repair service in Portland, OR. With over four years of experience, Jacob specializes in a variety of handyman services including pressure washing, cleaning gutters, repairing drywall, fixing leaky plumbing fixtures, and repairing broken doors. Jacob studied at Madison Area Technical College and has a background in real estate investment.
This article has been viewed 209,294 times.
There are advantages to both wireless and wired doorbell systems. Choose a wireless model for easy installation and a variety of possible chime sounds. Opt for a traditional wired system for a sturdier, more reliable form of doorbell.
Steps
Installing a Wireless Doorbell
-
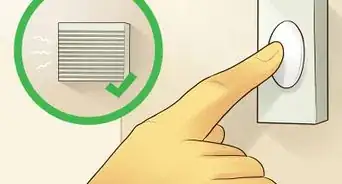
1Find an easy-to-spot location for the doorbell switch. The doorbell switch is the button that is pushed to sound the doorbell. Choose a visible position next to the door for the switch. Visitors should be able to spot it easily when they are standing in front of your door.[1]
- Placing the doorbell switch around eye-level on either side of your door frame is a good bet.
- It is best to opt for a weatherproof model of doorbell that will not be damaged by rain or snow.
-
2Attach the switch with screws or adhesive. The switches for most models of doorbells come with holes at the back to make installation easy. Measure the switch and holes and use an electric drill to mount the switch on your door or wall. Alternatively, apply a strong binding glue to the back of the switch and apply it firmly to the desired surface.[2]
- Wipe the surface you are attaching the switch to with a clean, damp cloth before the installation.
Advertisement -
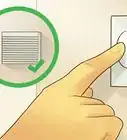
3Choose a central spot to install the chime box. Ideally, the chime box should be mounted somewhere at the center of your home to ensure that everyone hears it. Pick a room that is relatively equal in distance from all the other rooms in your home. Choose a room that you do not usually close the doors to make sure that the sound will carry.
- For instance, you might install the chime box in your living room or dining room.
- Check the range on the chime box to make sure it still connects to the doorbell.[3]
-
4Put batteries in the chime box and mount it. Most wireless chime boxes will take D batteries. Open the unit and put the batteries in as indicated, them close the back panel securely. Choose a spot in your home where you want the sound to come from and attach the box the wall with screws.[4]
- Most chime boxes will have mounting holes on the back.


Installing a Wired Doorbell
-
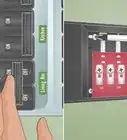
1Cut off power from the breaker or fuse box to avoid injury. Make sure that the circuits that supply electricity to the power sources you are working with are shut off before starting the installation. Turn off the appropriate switches at your breaker panel or fuse box.
- Test light switches or other outlets in the area to make sure the power is off.
-
2Connect doorbell wires to the chimes. Remove the cover on the chimes, and run the wires through the guide channel to the correct terminals. Wrap the ends of the wires around the appropriate terminals. Screw the holding screws into position.[5]
- You can choose from a variety of door chimes with different dimensions and sound options.
- Many models of chimes will include small wiring diagrams printed inside to help with installation.
- The cover should pull off the chimes easily without the use of tools.
- For future reference, label the wires by writing where each one is meant to go (e.g. transformer, doorbell switch) on small pieces of masking tape attached to each one.
-
3Secure the chimes into position. Make sure that you can run the wiring attached to your chimes to your transformer. Hold the new chimes on the spot that you want to attach them and use the screws provided to attach the device to the wall or ceiling. Once the chime plate is secured, fit the cover over the device and gently push until it snaps into place.
-
4Attach the doorbell switch near your door. Choose a location for your doorbell switch near your entrance way. Drill a hole to run the wires coming out of the back of the switch into the wall, toward the chimes and transformer. Most models will have screws included to secure the plate into position.
- Install the screws with an electric drill, then slide the cover over the device until it snaps into position.
-
5Attach the wires so that the transformer is connected to both the chime and the doorbell. Carefully wrap the ends of the wires around the transformer terminals. This small metal device will convert the AC power coming from the door switch to a lower voltage power to power the chimes.Transformers are often mounted directly onto an electrical box to keep high voltage wires enclosed.[6]
-
6Attach the switch and chimes with twist wire connectors. Use plastic twist wire connectors to easily link wires between the switch and chimes. Bring the ends of both wires together and place the cap onto the ends, twisting until the wires are firmly connected. This direct connection will create the signal between the doorbell button and the chimes, while the transformer will mediate this connection to bring it to a safe voltage.[7]
-
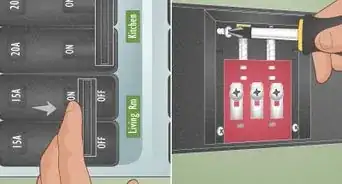
7Restore power and test the doorbell. Restore the power through your power breaker or fuse box. Push the doorbell switch to test the system. If the chimes function properly, the task is complete.
- If the doorbell does not function, turn off the power again and test the wire connections.[8]


Expert Q&A
Did you know you can get expert answers for this article?
Unlock expert answers by supporting wikiHow
-
QuestionHow do I wire up a doorbell?
 Jacob PischerJacob Pischer is a Home Improvement Specialist and the Owner of Helpful Badger, a home repair service in Portland, OR. With over four years of experience, Jacob specializes in a variety of handyman services including pressure washing, cleaning gutters, repairing drywall, fixing leaky plumbing fixtures, and repairing broken doors. Jacob studied at Madison Area Technical College and has a background in real estate investment.
Home Improvement SpecialistCheck the wires with a meter or battery tester to make sure they're conductive. If they aren't, one of the wires might be cut.
Support wikiHow by unlocking this expert answer.
Things You'll Need
Installing a Wired Doorbell
- Doorbell chimes
- Doorbell wire
- A doorbell transformer
- A doorbell switch
- Twist wire connectors
Installing a Wireless Doorbell
- Electric drill and screws
- Batteries
- Strong adhesive
- A clean, damp cloth


References
- ↑ https://www.gearbrain.com/best-smart-wireless-doorbell-tips-2322091094.html
- ↑ https://youtu.be/7iLwPdhuorc?t=253
- ↑ Jacob Pischer. Home Improvement Specialist. Expert Interview. 4 September 2020.
- ↑ https://www.youtube.com/watch?v=7iLwPdhuorc&feature=youtu.be&t=73
- ↑ http://www.nytimes.com/1989/02/26/nyregion/home-clinic-doorbell-problems.html
- ↑ https://www.familyhandyman.com/electrical/electrical-repair/repair-a-doorbell-fix-a-dead-or-broken-doorbell/view-all/
- ↑ http://www.nytimes.com/1989/02/26/nyregion/home-clinic-doorbell-problems.html
- ↑ Jacob Pischer. Home Improvement Specialist. Expert Interview. 4 September 2020.
About This Article

To install a wireless doorbell, start by choosing an obvious location for your bell so it can easily be seen, such as at eye level on either side of your door. Then, attach the switch to your chosen spot using screws or adhesive. Once you’ve installed the switch, pick a central point in your home for the chime box so you can here it from everywhere. For example, you could install it in the living room or hallway. After you’ve chosen a spot, put batteries in the chime box and attach it to the wall with screws. For tips on how to install a wire doorbell, keep reading!