This article was co-authored by wikiHow staff writer, Amber Crain. Amber Crain has been a member of wikiHow’s writing staff for the last six years. She graduated from the University of Houston where she majored in Classical Studies and minored in Painting. Before coming to wikiHow, she worked in a variety of industries including marketing, education, and music journalism. She's been a radio DJ for 10+ years and currently DJs a biweekly music program on the award-winning internet radio station DKFM. Her work at wikiHow supports her lifelong passion for learning and her belief that knowledge belongs to anyone who desires to seek it.
This article has been viewed 33,341 times.
Learn more...
Over time, the bridge on your acoustic guitar can get damaged, warped, or fall right off. Temperature and humidity are often to blame for a damaged bridge, since these factors affect the glue that holds the bridge in place. However, heavy use can also damage the bridge or cause it to pop off. Whatever the reason for your bridge troubles, don’t worry—you can replace the damaged bridge with a brand new one fairly easily at home!
Steps
Taking off the Original Bridge
-
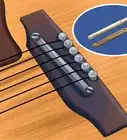
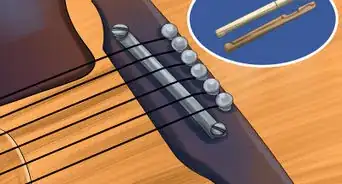
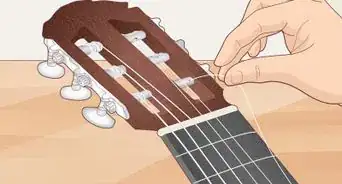
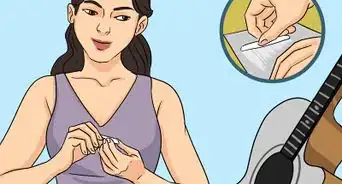
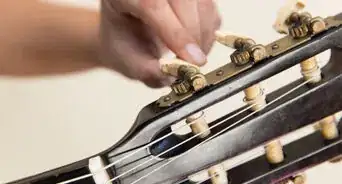
1Unwind and remove the 6 strings from your acoustic guitar. Turn each tuning peg clockwise on the guitar neck to loosen the string attached to it. Once the string is loose, unwind the string from the peg. Then, follow the string down to where it’s connected to the bridge with a bridge pin. Push the string slightly toward the pin to loosen it, then pull the pin straight out.[1]
- Bridge pins are wooden pieces that hold steel guitar strings in place on most acoustic guitars. Some acoustic guitars don't have them, but most do.
- If your acoustic’s strings are threaded through the bridge instead of held in place by pins, you can just pull the string gently to remove it.
- If you plan to reuse your strings, place them carefully to the side. You can toss out the old strings if you plan to install a fresh pair.
-
2Trace around the old bridge lightly with a pencil or X-ACTO knife. Doing this will help you later when you go to position the new bridge in place on the guitar body. All you need to do is lightly trace around the bridge with a regular pencil or gently score around the bridge with an X-ACTO knife to mark the position.[2]
- If your original bridge has already fallen off, that’s okay! You can measure for the perfect placement later on. It’s also quite likely that the original bridge left a vague but visible outline on the guitar body.
Advertisement -
3Place a heating pad over the bridge for 1-2 minutes to loosen the glue. The easiest way to detach a glued bridge is to heat up the glue until it softens so you can pry the bridge off. Place a regular heating pad directly over the bridge and let it for a couple of minutes to get the glue under the bridge nice and soft.[3]
- Avoid heating the bridge for longer than 2 minutes at a time. Prolonged heat exposure can damage the guitar’s finish.
- If you don’t have a heating pad, place a thick towel over the bridge and run a clothes iron over the towel to warm up the glue.
Tip for Vintage Guitars: Most acoustic guitar bridges are glued on, but if you have a vintage acoustic guitar, the bridge may be held in place by screws. You can use a regular screwdriver to remove each screw.[4]
-
4Wedge a putty knife between the bridge and guitar body. Once the glue loosens up, carefully insert a flexible, blunt putty knife between the body and bridge. If you can’t insert the putty knife completely from 1 side of the bridge to the other, apply heat to the area for another minute. Then, continue slowly working the knife under the bridge.[5]
- You may need to apply heat several times to wedge the putty knife completely under the bridge.
- Work slowly and take care not to damage the finish with the putty knife.
-
5Lift the putty knife and pull away the dislodged bridge. Continue wedging the putty knife under the bridge and applying heat until the glue loosens up enough to disconnect the bridge from the body. Then, use the putty knife to lift the bridge away from the body.[6]
- You can set the old bridge aside or discard it. Typically, it can't be reused.
- If the bridge simply popped off by itself and it isn't damaged at all, you can glue it back into place rather than buy a replacement bridge. If the bridge is cracked or warped in any way, you need a new one.


Removing Residue and Positioning the New Bridge
-
1Scrape off the excess glue on the guitar body with a chisel. After you remove the bridge, there will probably be some glue residue stuck to the guitar body. Gently scrape the surface where the bridge was previously glued to get rid of the residue. Wipe the surface with a microfiber cloth to remove any glue bits before you proceed.[7]
- If you don’t remove the old glue from the guitar body, the new bridge won’t adhere well to the surface.
- Be careful not to dig into the guitar finish or accidentally slip with the chisel.
-
2Buy a replacement bridge that is similar in size and shape to the original. For most acoustic guitars, you can buy a pre-made replacement bridge at any music store. There are a few different universal bridge styles, so be sure to buy one with the same dimensions and shape as the original bridge so everything fits correctly, including the bridge pins.[8]
- If the original bridge popped off on its own and isn’t broken or damaged, you can re-glue it in place. Sand the back of the original bridge to remove any glue residue.[9]
Tip for Vintage Guitars: If you have vintage acoustic guitar that wasn't mass-produced, a pre-made replacement bridge may not be an option. You can tell just by comparing the original bridge to replacements on the market. If you can't find a match, pay a qualified repair person to build a new bridge for you. This can be pricey, but it’s worth it to retain the value and quality of a vintage instrument.[10]
-
3Line up the new bridge with the traced outline and clamp it in place. Use the outline you traced earlier as your guide to line up the new bridge in the proper position. Position a deep C-clamp in the guitar’s center hole and clamp the bridge in place. Once everything looks right, release the C-clamp and pull the new bridge away from the guitar body.[11]
- A regular C-clamp is too small for this. You need a deep C-clamp.
- It’s important to do a “dry run” before you glue anything to your guitar. A “dry run” simply means to clamp the bridge in place and make sure everything is just right before applying glue.
- If you want to be extra careful, you can double-check the bridge positioning with a straightedge and a level.[12]


Gluing the New Bridge in Place
-
1Set up a bowl of water, a few rags, and a screwdriver on your work surface. Prepare your space before you start gluing so you don’t run into any issues once the glue starts flowing. Position a small bowl of water off to the side and stack a few rags and extra paper towels nearby. Make sure there’s a small screwdriver within easy reach, as well.[13]
-
2Apply wood glue to the back of the replacement bridge. Flip the new bridge over so the backside is facing up. Remove the cap from the wood glue and apply a thin layer generously over the entire back of the bridge. Don’t skimp on the glue! When you press the bridge into place, excess glue will squeeze out from underneath the bridge, which is normal.[14]
- This is why you have the bowl of water and rags nearby—to wipe that excess glue off.
-
3Press the bridge carefully in place on the guitar body. Hold the bridge around the edges so you don’t disturb the glue or get it on your hands. Flip the bridge back over so the backside with the glue is facing down. Gently place the replacement bridge into position just like you did before.[15]
-
4Use the C-clamp to clamp the bridge into place with light pressure. Move the clamp into the guitar hole just like you did before. Gently clamp the bridge into place. You don’t need to use a lot of pressure on the clamp to get good compression.[16]
-
5Dampen the rag and use it to wipe away excess glue that seeps out. As the clamp presses down on the bridge, wood glue will squeeze out from beneath the bridge. Dampen a clean rag with water and wipe away the excess glue immediately before it starts to set. Then, wrap another dampened rag around the end of the screwdriver. Run the end of the screwdriver along the joint edges to remove excess glue.[17]
- The wrapped end of the screwdriver allows you to get into the joints where the bridge meets the guitar body. You want to bridge to lay flat, so it’s important to remove any excess glue before it sets.
-
6Leave the clamp in place overnight so the glue can cure. Once the clamp is set, leave the guitar alone and avoid moving it. Make sure the guitar won’t be disturbed for the next 8 to 12 hours so the glue has plenty of time to set.[18]
- If possible, let the glue cure for a full 24 hours.
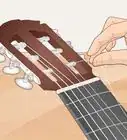
-
7Remove the clamp the next day and restring your guitar. Carefully unscrew and remove the clamp after the glue fully sets. Be careful not to bump the finish with the clamp as you’re removing it—clamps are heavy! After the clamp is out of the way, you can put the strings back on your guitar and test out the sound![19]


Things You’ll Need
- Screwdriver
- Heating pad
- Putty knife
- Chisel
- Microfiber cloth
- Deep C-clamp
- Replacement bridge
- Wood glue
- Small screwdriver
Warnings
- Don't try to repair an old bridge on your own. Once a bridge is cracked or warped, it needs to be replaced with a new one to make your guitar sound good again.⧼thumbs_response⧽
References
- ↑ https://nationalguitaracademy.com/how-to-change-guitar-strings/
- ↑ https://www.guitarrepairbench.com/acoustic-guitar-repairs/bridge-repair/
- ↑ https://www.guitarrepairbench.com/acoustic-guitar-repairs/bridge-repair/
- ↑ https://www.youtube.com/watch?v=lsFBqPsB7VE&feature=youtu.be&t=384
- ↑ https://www.guitarrepairbench.com/acoustic-guitar-repairs/bridge-repair/
- ↑ https://www.guitarrepairbench.com/acoustic-guitar-repairs/bridge-repair/
- ↑ https://www.guitarrepairbench.com/acoustic-guitar-repairs/bridge-repair/
- ↑ http://www.bbmade.com/bridge-replacement
- ↑ https://www.guitarrepairbench.com/acoustic-guitar-repairs/bridge-repair/
- ↑ http://www.bbmade.com/bridge-replacement
- ↑ https://www.guitarrepairbench.com/acoustic-guitar-repairs/bridge-repair/
- ↑ https://magemusiconline.com/acoustic-guitar-bridge-replacement/
- ↑ https://magemusiconline.com/acoustic-guitar-bridge-replacement/
- ↑ https://magemusiconline.com/acoustic-guitar-bridge-replacement/
- ↑ https://magemusiconline.com/acoustic-guitar-bridge-replacement/
- ↑ https://magemusiconline.com/acoustic-guitar-bridge-replacement/
- ↑ https://magemusiconline.com/acoustic-guitar-bridge-replacement/
- ↑ https://magemusiconline.com/acoustic-guitar-bridge-replacement/
- ↑ https://www.guitarrepairbench.com/acoustic-guitar-repairs/bridge-repair/
About This Article