This article was co-authored by Geraldine Grace Johns. Geraldine Grace Johns is a Professional Ballerina and the Owner of Grace Ballet in New York and Los Angeles. Geraldine toured through New Zealand, Australia, Japan, and Korea as Jammes in Ken Hill's Original Phantom of the Opera. She has studied with the Royal Academy of Dance in London to become a teacher and taught for the Kudo School of Ballet in Yokohama. Geraldine also ran her own Royal Academy of Dance School in New Zealand before studying at the Neighborhood Playhouse School of the Theatre in New York City. Geraldine was a guest coach and Master Class teacher in Toronto for the Canadian Royal Academy of Dance's Dance Challenge in 2018, 2019, and 2020. She was also a guest coach and Master Class teacher for the USA Royal Academy of Dance Challenge in Long Beach, California in 2019 and 2020. Grace Ballet Los Angeles has won recognition as one of 13 Best Ballet Schools in Los Angeles since opening her school. Geraldine is a contract Practical Teaching Supervisor for the Certificate in Ballet Teaching Studies for the Royal Academy of Dance.
There are 14 references cited in this article, which can be found at the bottom of the page.
This article has been viewed 21,294 times.
Pointe shoes are a requirement for ballet, and they often come without elastic or ribbons to hold them on your feet. Since a snug fit is essential for dancing in pointe shoes, you will need to sew your own elastic and ribbon onto the shoes. You can secure elastic in a criss-cross or loop fashion. Then, sew the ribbon near the elastic for extra security and style!
Steps
Choosing and Preparing Your Components
-
1Select your elastic. The elastic you choose should be about 0.5 inches (1.3 cm) wide and in the same color as the pointe shoes. You may also want to look for some elastic that will feel comfortable against your skin if you plan to wear the pointe shoes without stockings.
- Visit a craft supplies store to purchase elastic.
- You will need 1 yard (0.91 m) of elastic.
-
2Choose your ribbon. The ribbon should be about 1 inch (2.5 cm) wide and also in the same color as your pointe shoes. Try to find a ribbon type that has a similar finish to your pointe shoes, such as a satin finish ribbon if your pointe shoes have a satin finish.
- You can find ribbon at your local craft supplies store.
- 2 yards (1.8 m) of ribbon should be plenty to sew your pointe shoes.
Advertisement -
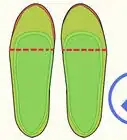
3Designate a right and left shoe. Pointe shoes do not always indicate which side each shoe is meant to be worn on, so you may need to decide that for yourself. Try on the shoes to see which shoe fits best on which foot. Then, mark the bottom of the shoe with an R or and L to indicate the side.[1]
-
4Thread a heavy-duty needle with an 18 inches (46 cm) piece of thread. You will need a heavy-duty needle to ensure that it will be able to penetrate the thick material of the pointe shoes. Insert the end of the thread through the eye of your needle and pull until half of the thread is on either side of the needle. Tie a knot in the end of the thread so that it will stay put when you sew through the elastic and shoe.[2]
- Make sure to choose a thread color that matches your pointe shoes and elastic so that it will blend in with them.


Sewing Criss-Crossed Elastic Bands
-
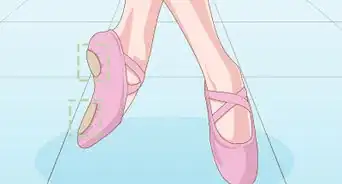
1Wrap the elastic strip from 1 side of your ankle to the other. Put on the shoes and position the elastic so that 1 end starts near your heel and the other end is near the front of your ankle on the side of your foot. There should be about a 0.25 inches (0.64 cm) of elastic overlapping the edge of the shoe. Pin the elastic in place or mark the position on the inside of your shoes to ensure that you sew it into the desired position.[3]
- Try a few different positions to see what feels the most natural to you.
- The ends of the elastic should be on the inside of the shoes, but you can place them on the outside if you are concerned about irritating your feet.
-
2Sew 1 end of the elastic band. Start sewing on the inside of the shoe and sew along the outer edges of 1 of the elastic bands. Insert the needle so it goes all the way through the shoe and elastic and then repeat this on the opposite side of the shoe.[4]
- Make sure you pull the thread all the way through after the first stitch to get the knot up against the elastic and shoe, and do this after each subsequent stitch as well.
-
3Continue sewing all the way around the edges of the elastic band. Sew in a square shape around the edges of the elastic band where it is overlapping the shoe. This will ensure that the elastic is well-secured. You may even sew around the edges of the elastic twice to ensure that it will not budge or break![5]
-
4Tie a knot and cut off the excess thread. After you finish sewing the end of 1 piece of elastic, tie the end of the thread in a knot close to the inside of the shoe. Cut the excess thread that extends from the knot.[6]
- You will need to rethread your needle with a new 18 in (46 cm) strand after sewing each end of the elastic.
-
5Secure the other end of the elastic band in the same manner. When you have finished securing 1 end of the elastic band, do the exact same thing to secure the other end of the elastic band that you have pinned or to secure it where you marked the shoe. You may even want t try on the shoe again to ensure that this positioning will still work and adjust the position as needed.[7]
-
6Repeat the process with the other shoe. Once 1 shoe is complete with criss-crossing elastics, sew elastics onto the other shoe. Repeat the exact same process for the other shoe to ensure that the elastic on the shoes will look and feel the same when you put them on.[8]


Sewing Elastic Bands as Ankle Loops
-
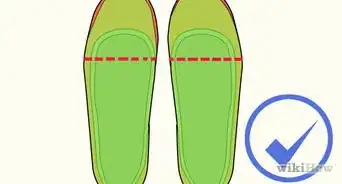
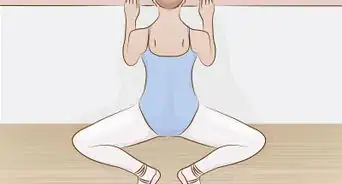
1Measure the elastic around your ankle. Put on your pointe shoes and wrap a piece of elastic from 1 side of your heel to the other so that the ends of the elastic are overlapping the edges of the pointe shoe by about 0.25 in (0.64 cm). The elastic should be snug, but not so tight that it might cut off your circulation. Mark your elastic at the desired length and cut it.[9]
- Repeat this for the other piece of elastic for the other shoe, or use the first piece of elastic to measure out and cut an equal-sized piece of elastic.
-
2Position the elastic on the sides of the heel portion of the shoe. For a loop around the ankle elastic, each end of the loop should be on 1 side of your heel. While wearing the shoe, position the ends so that they are about 1 to 2 inches (2.5 to 5.1 cm) away from each other. Pin them in place or mark the positions on the shoe with a pen.
- You may position the ends of the elastic band on the inside or outside of your shoes depending on where you want them. Some people prefer to have the elastic on the outside of the shoe because it irritates their heels when it is on the inside.
-
3Sew around the elastic in a square shape using a needle and thread. Sew around the edges of 1 end of the elastic where it overlaps the shoe. Sew in a square shape and go over the edges twice to ensure that the elastic is totally secure. Insert the needle in and out of the elastic and shoe and pull the thread taut after each stitch.[10]
- Tie off and cut the thread on the inside of the shoe after you finish sewing the elastic into place.
-
4Repeat for the other side and then sew the elastic to the other shoe. Follow the same process for sewing the other end of the elastic to the other side of the heel. Then, repeat this process for the other shoe.[11]
- Make sure that you sew the elastic to the same positions on both shoes so that they will look and feel the same.


Sewing Ribbons to Pointe Shoes
-
1Measure and cut 4 pieces of ribbon using your forearm. Your forearm is about the ideal length for each of the strands of ribbon. Hold the end of the ribbon with 1 hand and bring it up to your elbow. Then, cut the ribbon at this length. Use the first piece as a guide and cut the other pieces to the same length.[12]
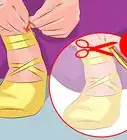
- Make sure that you cut each piece of ribbon cleanly with a sharp pair of scissors and avoid any jagged edges.
-
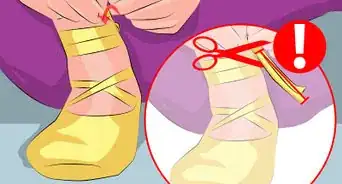
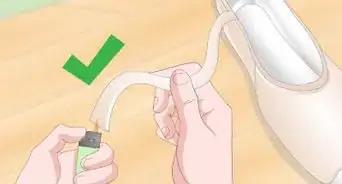
2Move the end of each ribbon over a flame for a few seconds. To prevent the ends from fraying, ignite a lighter or light a candle. Then, move each end of each piece of ribbon over the flame for a few seconds to secure the ends. This will help to prevent the fibers in the ribbon from fraying.[13]
- Make sure that you do not hold the ribbon ends over the flame for too long or you may catch it on fire or melt it too much.
-
3Position the end of the ribbon 2 inches (5.1 cm) from the heel elastic. The ribbon should overlap the edge of the pointe shoe by about 0.5 in (1.3 cm) and be at a slight angle bending in the direction of your toes. You can pin the end of the ribbon where you want it to be and angle it however you like.
- It is a good idea to do this while you are wearing the shoes so that you can get it exactly how you want it to be before you sew it.
- You can also fold the heel of the shoes over while you are not wearing them. Line up the edge of the ribbon with the area where the folded heel meets the side of your pointe shoe.[14]
- The ribbon should come straight up but at an angle, in line with where the back of the pointe shoe has folded.
- You don't want to tie the ribbon straight up vertically, otherwise you're gonna get a bunch or a gap in the ribbon.
-
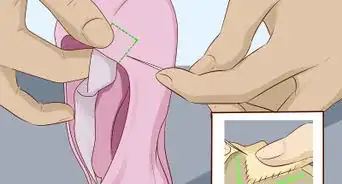
4Sew the edges of the end of 1 ribbon into the inside of the pointe shoe. Insert the threaded needle into the ribbon and pointe shoe near the edge of the pointe shoe. Sew in a square shaped fashion around the edges of the ribbon. Make sure to pull the thread taut after each stitch. Then, cut and tie off the thread on the inside of the shoe to secure the end of the thread.[15]
- You may want to make 2 passes to ensure that the ribbon is secured.
- Only secure 1 end of each piece of ribbon.
-
5Repeat for the other side of the shoe. Do the exact same thing to secure the next strand of the ribbon, but on the opposite side of the shoe. Position this piece of ribbon so that it is the mirror image of the first piece.
- After you finish sewing the ribbons onto 1 shoe, repeat the same process to attach the remaining 2 ribbons to the other shoe.


Community Q&A
-
QuestionHow do I sew lace ribbons on pointe shoes?
 Buggylu25Top AnswererPut on the pointe shoes and place the ribbon in the sides of the shoe, just as a template for where they belong in relation to your foot. Use a pencil to mark the inside of the shoe as a reference point for sewing in the ribbons. Cut the ribbons to the appropriate length and sew, using a sturdy needle and strong thread (specifically pointe shoe thread, if available) to make several tight stitches along the edge of the ribbon to secure it in place. After sewing, double-check they're correct by putting on the shoes and tying the ribbons. If you made a mistake, simply pull the stitches you made out and restart!
Things You’ll Need
- Pointe shoes
- 0.5 in (1.3 cm) wide elastic that matches your pointe shoes
- 1 in (2.5 cm) wide ribbon that matches your pointe shoes
- A spool of thread that matches your pointe shoes
- Needle
- Scissors
- Pen

Expert Interview
Thanks for reading our article! If you'd like to learn more about cleaning and repairing ballet shoes, check out our in-depth interview with Geraldine Grace Johns.
References
- ↑ https://www.youtube.com/watch?v=mxqpb2s1SyI&feature=youtu.be&t=50s
- ↑ https://www.kcballet.org/wp-content/uploads/2015/03/How-to-sew-Pointe-Shoes.pdf
- ↑ https://www.youtube.com/watch?v=mxqpb2s1SyI&feature=youtu.be&t=1m34s
- ↑ https://www.youtube.com/watch?v=mxqpb2s1SyI&feature=youtu.be&t=1m55s
- ↑ https://www.youtube.com/watch?v=mxqpb2s1SyI&feature=youtu.be&t=2m34s
- ↑ https://www.youtube.com/watch?v=mxqpb2s1SyI&feature=youtu.be&t=2m57s
- ↑ https://www.youtube.com/watch?v=mxqpb2s1SyI&feature=youtu.be&t=3m3s
- ↑ https://www.youtube.com/watch?v=mxqpb2s1SyI&feature=youtu.be&t=3m58s
- ↑ https://www.youtube.com/watch?v=mxqpb2s1SyI&feature=youtu.be&t=4m51s
- ↑ https://www.youtube.com/watch?v=mxqpb2s1SyI&feature=youtu.be&t=5m5s
- ↑ https://www.youtube.com/watch?v=mxqpb2s1SyI&feature=youtu.be&t=5m20s
- ↑ https://www.youtube.com/watch?v=mxqpb2s1SyI&feature=youtu.be&t=5m59s
- ↑ https://www.youtube.com/watch?v=mxqpb2s1SyI&feature=youtu.be&t=6m32s
- ↑ https://www.kcballet.org/wp-content/uploads/2015/03/How-to-sew-Pointe-Shoes.pdf
- ↑ https://www.youtube.com/watch?v=mxqpb2s1SyI&feature=youtu.be&t=6m59s
About This Article

To sew your own pointe shoes, first, put on the shoes and position the elastic strip so that 1 end starts near your heel and the other end is near the front of your ankle on the side of your foot. Pin the elastic in place, then sew the end of the band to the inside of the shoe in a square shape. Once the end is secure, sew the other edge of the elastic, then repeat the process from the beginning to make the overlapping band. For the ankle loop, put the shoes on again and wrap a piece of elastic from 1 side of your heel to the other. As you wrap the elastic, make sure the ends overlap the edges of the pointe shoe by about ¼ of an inch. Finsih by cutting the elastic and sewing the edges to the shoe in a square shape. For more help, like how to sew the ribbons to your pointe shoes, read on.