This article was co-authored by Geraldine Grace Johns. Geraldine Grace Johns is a Professional Ballerina and the Owner of Grace Ballet in New York and Los Angeles. Geraldine toured through New Zealand, Australia, Japan, and Korea as Jammes in Ken Hill's Original Phantom of the Opera. She has studied with the Royal Academy of Dance in London to become a teacher and taught for the Kudo School of Ballet in Yokohama. Geraldine also ran her own Royal Academy of Dance School in New Zealand before studying at the Neighborhood Playhouse School of the Theatre in New York City. Geraldine was a guest coach and Master Class teacher in Toronto for the Canadian Royal Academy of Dance's Dance Challenge in 2018, 2019, and 2020. She was also a guest coach and Master Class teacher for the USA Royal Academy of Dance Challenge in Long Beach, California in 2019 and 2020. Grace Ballet Los Angeles has won recognition as one of 13 Best Ballet Schools in Los Angeles since opening her school. Geraldine is a contract Practical Teaching Supervisor for the Certificate in Ballet Teaching Studies for the Royal Academy of Dance.
This article has been viewed 24,854 times.
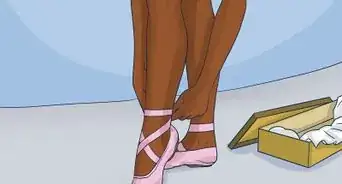
Sewing ribbons to pointe shoes adds not only beauty, but also support. Folding the heel down is the easiest and most popular technique, but some dancers prefer to measure the ribbon against their arch for a more customized fit. If you want additional support for when you wear your pointe shoes, then consider adding elastic straps as well.
Steps
Using the Folded Heel Technique
-
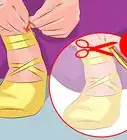
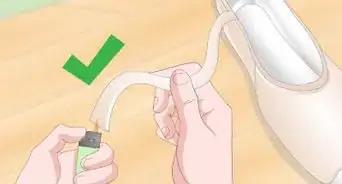
1Cut an 88 in (220 cm) ribbon into 4 equal lengths and singe the ends. Choose a nylon or polyester satin ribbon that is between 7⁄8 to 1 inch (2.2 to 2.5 cm) wide. Cut it into 4 22 in (56 cm) lengths. Singe the ends of each ribbon by holding them near a flame until the material melts or hardens.
- The ribbons can be matte or shiny. The color needs to match your shoes, unless otherwise instructed by your teacher.
- You can use a candle or a lighter to singe the ends of the ribbons. Have a cup of water nearby in case the ribbon burns.
-
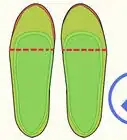
2Fold the heel of your pointe shoe down towards the liner. Use your finger to fold the heel of your pointe shoe inward until it touches the sole inside the shoe.[1] This will create a pocket on each side of the shoe. You will be tucking the ribbons into these pockets.
- You can also put the shoe on and "pointe" your toe. Note where the highest point of your arch is.
Advertisement -
3Tuck the end of your ribbon into 1 of the pockets. Make sure that the right/shiny side of the ribbon is facing away from you and touching the lining. Angle the other end of the ribbon towards the toe of your shoe by about 45-degrees.
- Tuck the ribbon into the crease by about 2 inches (5.1 cm), or twice the width of your thumb. This will ensure that you have enough for the next step.
- If you put the shoe on, keep use a pencil to mark lining where the highest point of your arch is. Do this for both sides of your foot.
-
4Mark the lining to either side of the ribbon. Use a pencil to make a mark on the lining to either side of the ribbon. This way, if the ribbon moves, you can find the placement for the ribbon again.
- If you put the shoe on and marked your arches, take the shoe off.
-
5Fold the end of the ribbon twice to hide the raw, singed end. Unfold the heel so that you can see the end of the ribbon again. Reposition the ribbon, if needed, so that it matches up with your pencil marks. Fold the bottom end over 2 times so that you can't see the raw edge anymore.
- Try to keep the folded part under 1 inch (2.5 cm), or about the width of your thumb.
-
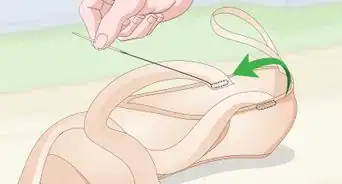
6Sew down the side of the ribbon using a whipstitch. Start sewing just below the drawstring along the top edge of your pointe shoe, and finish sewing at the bottom, folded edge of the ribbon. Keep your stitches small and be careful not to sew through the outer satin layer or through the drawstring.[2]
- Use a strong needle and reinforced thread that matches the satin outer layer. This way, if you accidentally sew through the satin, it won't be as visible.
- If the lining is fused to the outer satin layer, then sew through both layers.[3]
-
7Sew across the bottom of the ribbon using a running stitch. Once again, make sure that you only sew through the lining and not through the outer satin layer. Alternatively, you can continue with a whipstitch along the bottom edge of the ribbon instead.
- A running stitch is where you move the needle up and down through the fabric. It is sometimes called a straight stitch.
-
8Finish sewing up and across the ribbon. Use a whip stitch to sew up the side of the ribbon. When you reach the top edge, finish off with a running stitch. When you are back to where you started, knot and cut the thread.
- Use a running stitch along the top edge, even if you used a whipstitch on the bottom. The ribbon will get in the way otherwise.
-
9Repeat the process for the other ribbons. Working 1 ribbon at a time, fold over the bottom ends twice, then sew them to the inside of your pointe shoes. Make sure that the wrong/matte side of the ribbons is facing the inside of the shoe, and the right/shiny side is facing the outside. When you are done, do the other shoe.
-
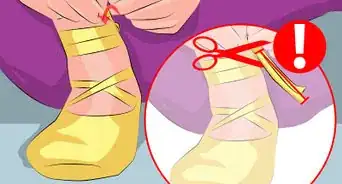
10Cut the ends of the ribbons at 45-degree angles, if desired. You don't have to do this, because you will tuck the ends in when you tie them, but they will look nice when the shoes are untied. If you do decide to do this, you will have to re-singe the cut ends so that they don't fray.


Measuring the Ribbons against Your Arch
-
1Cut an 88 in (220 cm) ribbon into 2 equal lengths and seal the ends. Choose a nylon or polyester satin ribbon that matches the satin outer layer of your shoe. Cut the ribbon into 2 equal lengths, each about 44 inches (110 cm) long, plus the width of your foot. Use a candle flame or a lighter to melt the ends of the ribbons to keep them from fraying.
- Choose a shiny or matte ribbon that is between 7⁄8 to 1 inch (2.2 to 2.5 cm) wide.
- To seal the ribbons: light a candle or a lighter, then hold it need the cut end of the ribbon for a few seconds, or until the end melts and hardens.
-
2Wrap a ribbon under the highest point of your arch. Take 1 of your ribbons and hold it by both ends, with the wrong/matte side facing you. Place your foot against the ribbon so that it fits against the highest point of your arch.
-
3Step into your shoe and adjust the ribbons as needed. Keeping the ribbon against your arch, slip your foot into your pointe shoe. Stand up, keeping your foot flat on the floor; do not stand in pointe. Move the ribbon forward and back until it feels comfortable.
-
4Mark the sides of the ribbon against the liner with a pencil. Note where the side edges of the ribbon are touching the liner. Mark the liner to either side of the ribbon with a pencil. You can do this step yourself or find someone to help you.
-
5Step out of the shoe and center the ribbon inside the shoe. Take the shoe off and place the ribbon back inside of the shoe. Make sure that the center of the ribbon is touching the inside sole. The side edges of the ribbon should be aligned with your pencil marks from the previous step.
- Make sure that the wrong/matte side of the ribbon is facing you. The right/shiny side should be touching the lining.
-
6Sew the sides of the ribbon into place. Thread a strong needle with reinforced thread that matches the outer satin layer on your shoes. Use a whipstitch to secure the side edges of the ribbon to the lining of the shoe. Do not sew through the outer satin layer or the drawstring.
-
7Trim the ends at 45-degree angles, if desired. You don't have to do this, but it will give your shoes a nice touch. If you decide to do this, however, make sure that you seal the ends with a lighter or candle flame.


Sewing on Elastic Straps
-
1Decide where you want the elastics. Some dancers like to sew the elastics just behind the ribbons. This way, once the ribbons are tied, the elastic won't be as visible. Other dancers prefer to sew the elastic about a thumb's width from the back seam.[4]
- Be aware that sewing the elastic to the heels may give you blisters.
-
2Measure your shoe and foot for the elastic strap. Put your shoe on. Wrap a measuring tape over the top of your foot, from 1 side of the shoe to the other. Make sure that you measure all the way down to the inside sole. Where you measure from depends on where you will be sewing the elastic.
-
3Cut 2 pieces of 3⁄4 in (1.9 cm) wide elastic. Choose elastic that is about 3⁄4 inch (1.9 cm) wide. Match the color either to your tights or to your ribbon. Cut 2 pieces that match your measurements. You will have 1 piece for each shoe.
-
4Pin the elastics to the inside or outside of the shoe. Pin your elastic to your shoes based on your desired placement. Again, if you will be sewing the elastic to the inside, make sure that the ends touch the inside sole. If you will be sewing the elastic to the outside, place the ends at the lowest part of the heel.
-
5Try the shoes on and adjust the fit. Put your shoes on and stand up flat-footed, not in pointe. If the elastic feels too tight or uncomfortable, take the shoes off and adjust the elastic. You may have to make the elastic tighter, looser, or angled in a different way.
- The elastic should be flat against the top and sides of your foot when you are wearing the shoe. Adjust the angle, if needed.
-
6Sew the elastic to the inside of the shoe. Use a whipstich on the sides of the elastic, and a running stitch on the bottom edge. Continue with a running stitch along the top edge, just below the drawstring. Do this for both ends of the elastic on both sides of the shoe.
- Be careful not to sew through the outer satin layer or the drawstring.
- Thread a strong needle with reinforced thread that matches the outer satin layer.
- A running stitch is also called a straight stitch. It is where you pull the needle up and down through the fabric.


Expert Q&A
-
QuestionWhere do you sew ribbons on pointe shoes?
 Geraldine Grace JohnsGeraldine Grace Johns is a Professional Ballerina and the Owner of Grace Ballet in New York and Los Angeles. Geraldine toured through New Zealand, Australia, Japan, and Korea as Jammes in Ken Hill's Original Phantom of the Opera. She has studied with the Royal Academy of Dance in London to become a teacher and taught for the Kudo School of Ballet in Yokohama. Geraldine also ran her own Royal Academy of Dance School in New Zealand before studying at the Neighborhood Playhouse School of the Theatre in New York City. Geraldine was a guest coach and Master Class teacher in Toronto for the Canadian Royal Academy of Dance's Dance Challenge in 2018, 2019, and 2020. She was also a guest coach and Master Class teacher for the USA Royal Academy of Dance Challenge in Long Beach, California in 2019 and 2020. Grace Ballet Los Angeles has won recognition as one of 13 Best Ballet Schools in Los Angeles since opening her school. Geraldine is a contract Practical Teaching Supervisor for the Certificate in Ballet Teaching Studies for the Royal Academy of Dance.
Professional Ballerina & Ballet InstructorFold the back of your ballet shoe inward. Then, draw a line on the angle of the fold using a pencil. This is where you will sew your ballet ribbons onto your shoes. -
QuestionCan I tie ribbon around my pointe shoes?
 Karen RekdalCommunity AnswerIf you mean wrapping the ribbon around the bottom of the shoe, you shouldn't do it. Just tie it the way your ballet teacher taught you to.
Warnings
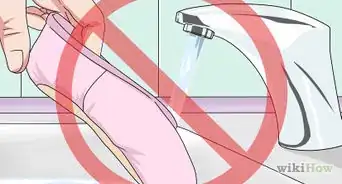
- Be careful when singeing the ends of the ribbons. Have a cup of water handy to put out any potential flames.⧼thumbs_response⧽
Things You'll Need
Using the Folded Heel Technique
- 7⁄8 to 1 in (2.2 to 2.5 cm) wide satin ribbon
- Reinforced thread
- Strong, short needle
- Scissors
- Pencil
- Pointe shoes
Matching the Ribbons against Your Arch
- 7⁄8 to 1 in (2.2 to 2.5 cm) wide satin ribbon
- Reinforced thread
- Strong, short needle
- Scissors
- Pencil
- Pointe shoes
Sewing on Elastic Straps
- 3⁄4 in (1.9 cm) elastic
- Reinforced thread
- Strong, short needle
- Scissors
- Pencil
- Sewing pins
- Pointe shoes
References
- ↑ Geraldine Grace Johns. Professional Ballerina & Ballet Instructor. Expert Interview. 20 May 2021.
- ↑ Geraldine Grace Johns. Professional Ballerina & Ballet Instructor. Expert Interview. 20 May 2021.
- ↑ https://dancer.com/ballet-info/about-pointe-shoes/sewing-ribbons/
- ↑ https://dancer.com/ballet-info/about-pointe-shoes/sewing-ribbons/
- ↑ https://dancer.com/ballet-info/about-pointe-shoes/sewing-ribbons/
- ↑ https://dancer.com/ballet-info/about-pointe-shoes/sewing-ribbons/
- ↑ https://dancer.com/ballet-info/about-pointe-shoes/sewing-ribbons/
About This Article