This article was co-authored by wikiHow staff writer, Jessica Gibson. Jessica Gibson is a Writer and Editor who's been with wikiHow since 2014. After completing a year of art studies at the Emily Carr University in Vancouver, she graduated from Columbia College with a BA in History. Jessica also completed an MA in History from The University of Oregon in 2013.
There are 7 references cited in this article, which can be found at the bottom of the page.
This article has been viewed 28,631 times.
Learn more...
While the saree and petticoat are usually the first things you notice about traditional Indian dress, the blouse underneath is equally important. If you have moderate sewing skills, you can create a custom blouse using an existing pattern. The saree blouse is essentially just a short, close fitting blouse, so if you have experience making other types of blouses or shirts, you'll have no trouble at all!
Steps
Cutting the Saree Blouse Pieces
-
1Buy a basic saree blouse pattern in the style that you want. Although you could draft your own pattern, it's easy to buy a pattern, online or in a craft shop. Look for any close fitting blouse pattern or find one specifically designed to be worn under your saree. Pick a pattern that has a back and neckline style that you want to wear. Choose a pattern that contains:[1]
- 2 to 3 bodice pieces, usually 2 fronts and a back
- 2 sleeve pattern pieces
- 4 yoke or belt pieces, which are optional
-
2Take your own measurements to choose a size for your saree blouse. Most patterns are multi-sized, so they give pattern pieces based on a few different measurements. To determine which size to follow, use a measuring tape to find the following measurements and choose a size range that includes your measurements:[2]
- Bust: Wrap the measuring tape around the widest part of your chest.
- Shoulder: Stretch the measuring tape from the end of each shoulder.
- Armhole depth: Divide the bust measurement by 6 to find the armhole depth.
- Waist circumference: Wrap the tape around your waist to see where the blouse will end.
Tip: Read through the measurements listed for each size and choose the size that matches your measurements the most closely. If some of your measurements fall between different sizes, follow the largest size of the pattern. For example, if your shoulder measurements fall within a small size, but your bust measures large, follow the large pattern.
Advertisement -
3Cut out the pattern along the lines that match your size. Once you've chosen a size to follow, use scissors to cut out each pattern piece along the lines for that size. Disregard the lines for other sizes since you won't be using them. Depending on the style of your blouse, you should have at least 4 pieces.[3]
- If you're using a pattern that you printed at home, you might have to tape the pages together before you cut out the pattern pieces.
-
4Select about 1 yard (0.91 m) of fabric for your saree blouse. Most saree blouses are made with cotton, since it's a soft material that breathes. If you'd like a slightly shinier blouse, choose a shinier fabric, like silk or synthetic fabric. You'll need about 3⁄4 to 1 yard (0.69 to 0.91 m) of fabric for 1 saree blouse.[4]
- Choose a solid print if your saree has a detailed pattern or feel free to pick a detailed fabric for a solid saree.
-
5Lay the pattern pieces on fabric and pin them in place. Spread out the amount of fabric called for in your pattern and iron it so it lies flat. Arrange the pattern pieces on the fabric so they all fit and cut along the edges of the pattern pieces. Then, insert sewing pins along the edges of the pattern so they go into the edge of the fabric.[5]
- Depending on your pattern, you might need to fold the fabric and cut the front and back pieces along the fold. Check the pattern before you begin cutting.
- Pinning the pattern to the fabric helps you keep track of which pieces you're working with, so don't take the pattern pieces off after you've cut the fabric.
-
6Cut out each of the fabric pieces. Use a sharp pair of scissors to carefully cut along the edges of the pattern pieces. If the pieces don't include the seam allowance, remember to cut about 1⁄2 inch (1.3 cm) beyond the edge of the pattern.[6]
- Try to make smooth cuts so you don't make jagged edges on the fabric.


Assembling the Saree Blouse
-
1Straight stitch along dart lines if you'd like the blouse to hug your figure. Many saree blouse patterns include triangular lines on the blouse pieces that are darts. To sew these optional darts, fold the fabric along the triangle's lines and straight stitch the wrong side of the fabric. Then, repeat this for any other darts on the pattern.[7]
- If your pattern calls for yoke pieces, straight stitch them along the bottom of the front pieces. Remember to work on the wrong side of the fabric so the stitches aren't visible on the front of your blouse.
- You can trim the excess fabric that's left on the wrong side of the blouse, or leave it if it doesn't bother you when you wear the blouse.
-
2Stack the front and back pieces so the right sides touch. Lay the back piece so it's right side facing up. Then, arrange the front pieces on top so the edges line up and the wrong side faces up. Ensure that the sides of the front and back pieces line up so the shoulder line is straight. Then, pin the pieces together so they don't slide around.[8]
-
3Sew the top of the shoulders to join the front and back pieces. Take the project to your sewing machine and straight stitch along the top of the shoulders on both sides. Leave a 1⁄2 inch (1.3 cm) seam allowance as you go.[9]
- This creates a single fabric piece that's only connected at the shoulders.
-
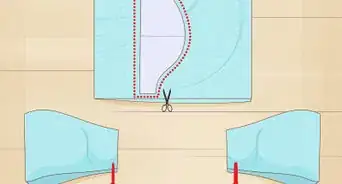
4Spread the fabric out right side up and sew each sleeve to the armhole curve. Open the fabric piece and lay it flat so the pattern faces up. Lay each full sleeve flat on top of the body pieces so each curved edge touches the side of the shoulder line that you stitched. The straight edge of the sleeve should cross vertically through the neck. Begin straight stitching near the center of the sleeve and curve the fabric down to the edge of the shoulder. Sew all the way around each sleeve.[10]
- Lay the sleeve pieces wrong side up so when you fold the sleeves down the pattern faces out.
-
5Turn the pieces wrong side out and straight stitch along the side seams. Line up the front and back pieces again and locate the side of the blouse where it meets the armhole. Begin stitching from this point straight down the side to the bottom of the saree blouse. Leave a 1⁄2 inch (1.3 cm) seam allowance and repeat this for the other side seam.[11]
- If you're worried the fabric will slip around as you sew, you can pin it in place before taking it over to your machine.
-
6Attach hooks or a placket with hooks to the center of your front pieces. Some patterns have a built-in placket for the front pieces while others call for sewing a separate piece of fabric vertically to the center of the saree blouse. Either way, sew hook and eye enclosures onto both sides of the front pieces so you'll be able to close the saree blouse.
- Remember to line up both parts of the hook enclosure before you secure them.
-
7Finish the edges of the saree blouse. Keep the blouse turned inside out and fold the bottom edge of the fabric over by about 1⁄2 inch (1.3 cm). Then, fold it again by the amount called for in your pattern. Straight stitch all the way around the bottom of the blouse to finish the hem. Repeat this for the sleeves and neckline.[12]
Tip: Some people prefer to hand stitch the hemlines in order to create topstitches that really stand out. If you prefer to do this, try a whipstitch or blind stitch.
-
8Add embellishments to give the blouse a unique look. Although your saree will draw a lot of attention, you can make the blouse stand out too. Consider hand-embroidering details, sewing piping along the neckline, or attaching beads onto the blouse.[13]
- To add interest to the back of the saree blouse, attach tassels so they hang near the center of your back.


Things You'll Need
- Fabric
- Measuring tape
- Sewing machine
- Thread
- Scissors
- Sewing pins
-Step-24-Version-5.webp)
References
- ↑ https://sewguide.com/stitch-a-sari-blouse/
- ↑ https://www.varnatantu.com/2014/01/22/diy-sari-blouse-basic-pattern/
- ↑ https://youtu.be/5xG6270f0ac?t=210
- ↑ https://sewguide.com/stitch-a-sari-blouse/
- ↑ https://youtu.be/5xG6270f0ac?t=314
- ↑ https://youtu.be/EJfrjYvq79U?t=433
- ↑ https://sewguide.com/stitch-a-sari-blouse/
- ↑ https://sewguide.com/stitch-a-sari-blouse/
- ↑ https://sewguide.com/stitch-a-sari-blouse/
About This Article