This article was co-authored by wikiHow Staff. Our trained team of editors and researchers validate articles for accuracy and comprehensiveness. wikiHow's Content Management Team carefully monitors the work from our editorial staff to ensure that each article is backed by trusted research and meets our high quality standards.
The wikiHow Video Team also followed the article's instructions and verified that they work.
This article has been viewed 87,005 times.
Learn more...
Winter is one of the best times of the year. Hot chocolate, sledding, and fireplaces are all symbols of the season, but there is one problem that can get on the nerves of many people all across the globe: cold feet. Slippers are a great way to keep your feet warm, but they can wear out quickly. Luckily, it is easy to make a pair of inexpensive, soft, and warm slippers out of felt that will go perfectly with your fireplace. Best of all, there are several different ways of making felt slippers, each with their own style.
Steps
Making a Basic Slipper
-
1Stack two sheets of felt, one on top of the other. This will create the sole of your slipper. Both sheets can be the same color, or two different colors. You can use plain felt from the arts and crafts store, but you'll get a nicer-looking and longer-lasting slipper if you use 5-millimeter thick felt from the fabric store instead.
-
2Trace your foot onto the felt, using a ¼-inch (0.64-centimeter) seam allowance. Make sure that you don't trace too far under your arch. To prevent this from happening, look down at your foot while you are tracing it. If you can't see what you are drawing, you are going too far under the arch. Make the lines and curves as neat as you can.Advertisement
-
3Cut out your foot shape. Instead of tracing your foot again for the other slipper, simply trace the sole you just cut out onto more felt, and cut that out too. You want to end up with four foot shapes, two for each sole.
-
4Place a sheet of felt over the top of your foot, and trace your toes. Start tracing from the inside of your arch, all the way around your toes, and finishing at the other side of your foot. Remember to draw over the top of your foot as well.
-
5Cut the toe piece out, leaving a ¼-inch (0.64-centimeter) seam allowance for the seams. If you'd like to save some time, cut two pieces of felt at the same time. This will give you the toe piece for your other slipper.
-
6Pin the toe piece between the two sole pieces. Pin the toe piece to one of the sole pieces first, making sure that the edges meet up; the toe piece will bubbly up a bit. Next, pin the other sole piece on top, sandwiching the toe piece in between.
-
7Sew around the slipper using a ¼-inch (0.64-centimeter) seam allowance. Leave a 2-inch (5.08-centimeter) wide hole at the bottom of the heel so that you can turn the slipper.
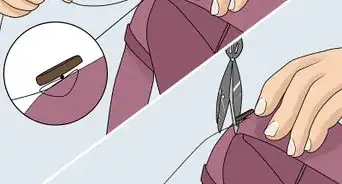
- To prevent bunching, cut little notches or slits into the toe area of your slipper. Be careful not to cut through the stitching, however.
-
8Turn the slipper inside out through the 2-inch (5.08-centimeter) hole you left. If you need to, use a long, thin tool, like a knitting needle, to push out the curves and seams.
-
9Stuff the slipper with stuffing or batting. If you'd like to use batting, cut a sole-shape out of polyester quilt batting, and slide it into the sole. If you are using stuffing, simply fill the slipper with it, making it fuller in the arch area.
-
10Sew the hole shut. You can do this using a sewing machine and a straight stitch for something quick and simple. You can also fold the edges in by ¼-inch (0.64-centimeter), and sew them shut with a ladder stitch for a seam-less finish.
Making a Rustic Slipper
-
1Place your foot down on a piece of paper, and trace around it using a pencil. When you are done, take the paper away, and set it aside. You only need to trace one foot, because you can easily flip the pattern over.
- Avoid going too far under your arch. To prevent this from happening, look down at your foot while you are tracing it; if you can't see what you are drawing, you are going too far under your arch.
-
2Place a sheet of paper or fabric down on top of your foot, and conform it to the shape of your toes. Use a thin, flexible piece of paper for this; a cheap fabric, such as muslin, would also work.
-
3Use a pencil to trace around your toes and over the top of your foot. Start tracing at the arch, and finish tracing on the other side of your foot. This will create the top pattern piece.
-
4Trace around your patterns with a pen, leaving a ¼-inch (0.64-centimeter) seam allowance. Your original pattern lines probably look very sketchy, especially for the top pattern piece. This won't give you very nice slippers. Smooth and straighten your paper out, then carefully trace around the lines you drew, leaving behind a ¼-inch (0.64-centimeter border). Make the curves as neat as possible.
- If you added bumps for your toes, be sure to omit them for the final pattern.
-
5Cut your pattern pieces out, pin them together, and try them on. This is your chance to make any necessary changes. If the pattern is too small, or doesn't fit right, you will need to make another one. If the pattern is too big, cut it down a little bit smaller, and try it again. If the pattern fits just right, you are ready to move on!
- Pin the pattern together ¼-inch (0.64-centimeters) from the edge.
-
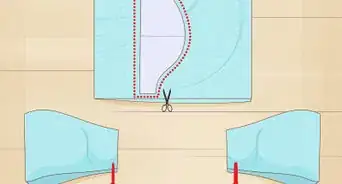
6Pin the patterns to your felt and cut out the pieces. You can use plain felt from the arts and crafts store, but nice, 5-millimeter thick felt will not only last longer, but it will look and feel better too. Remember to reverse the pattern for your other foot. Here's what you need to cut:
- Sole: 2 pieces per slipper. They can be the same color or contrasting colors.
- Toe: 1 piece per slipper If you used two different colors for the sole, consider matching the toe piece to one of them.
-
7Stack the two sole pieces one on top of the other. If you used two different colors, put the contrasting color on top, so that it will stand out against the toe piece.[1]
-
8Pin the toe piece to the sole pieces. Start by pinning the top-center of all three pieces together. Next, pin the bottom corners of your toe piece down to the inner and outer arch of your sole pieces.
-
9Stitch around the slipper using a ¼-inch (0.64-centimeter) seam allowance. You can do this by hand or on the sewing machine. If you are doing it by hand, consider using a heavy-duty thread, or even embroidery thread. You can use a thread color that matches the felt, or even a contrasting color.
- If you are using a sewing machine, you can use a basic stitch for something plain and simple, and a zigzag stitch for something fancier.
- If you are doing this by hand, you can use a straight stitch for something easy, and a blanket stitch for a nice, rustic touch.
-
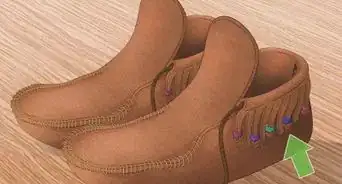
10Dress it up, if desired. Your slipper is officially complete. Now, all you have to do is repeat this method for the other one. You can leave your slippers as they are, or embellish them further with small decorations, such as:
- Add some simple embroidery to the toe piece using embroidery thread in a contrasting color.
- Stitch some designs onto the toe piece using seed beads.
- Add a blanket stitch to the raw edge of your toe piece. This will look great if you used a blanket stitch on the rest of your slipper.
- Stitch or glue on felt shapes or appliqués.
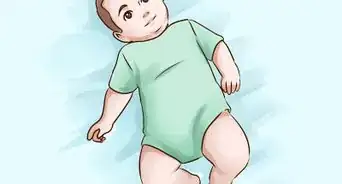
Making a Wrapped Baby Slipper
-
1Trace your baby's foot using a pencil to make the sole. You only need to trace one foot, because you can simply flip the pattern over for the other slipper. If your baby moves around too much, you can use a slipper or shoe that fits him or her well instead.
-
2Neaten your pattern up, and add a ¼-inch (0.-64-centimeter) seam allowance. Go around your pattern again, but this time, add a ¼-inch (0.64-centimeter) border. Make sure that the curves are nice and neat, and not "sketchy." You can do this with a pen to distinguish it from the original pattern.
- It might still be a good idea to do this if you used a slipper to trace the pattern. Remember, it is always easier to cut down something that's too big than the other way around.
-
3Measure the circumference of the sole you just drew. Start at the pinkie area, and wrap over the toes, around the heel, and back towards the pinkie. Next, overlap towards the big toe, and record your number. This extra measurement is important; it will help create that wrapped, crisscross look for your slipper.
-
4Measure up from your baby's heel up to his or her ankle, then add ¼-inch (0.64-centimeters). This will give you the height of your slipper. Again, if your baby moves around too much, use shoe that fits him or her well. Choose a shoe that ends either at the ankle or just below it; do not use a bootie.
-
5Draw a rectangle with rounded edges according to your two measurements. Start by drawing a long, skinny rectangle based on your circumference and heel-to-ankle measurements. Next, orient the rectangle landscape-fashion, and use the toe part of your sole to sketch out the curves. Make sure that the pinkie part of the sole touches the top, long edge of the rectangle on each side.
-
6Pin your patterns to the felt, then cut them out. You will need to cut out each pattern once. Flip one set over for the other slipper, and set it aside for now.
-
7Pin the rectangle piece to the sole piece. Find the center of the rectangle, and pin one of the long edges to the center of the sole's heel. Your rectangle may have an edge that's move curved than the other one. Keep this edge against the edge of the sole.
-
8Wrap each side of the rectangle around the sole. Start by wrapping one of the flaps around the inside of the heel, over the big toe area, and towards the pinkie, pinning it as you go. Next, wrap the other flap around the other side of your slipper, pinning as you go.
- Remember to reverse the flaps for your other slipper. This way, they both wrap towards each other.
-
9Stitch around the edge of the slipper. You can do this using a simple straight stitch, or you can use a blanket stitch for something fancier. Remember to pull the pins out as your sewing.
-
10Cut a 1-inch (2.54-centimeter) piece of elastic, and stitch it to the inside of your slipper. Place the elastic behind the crossed-over flaps. Pin the left side of the elastic to the left flap, and the right side to the right flap. Avoid stretching the elastic if you can. Next, stitch the elastic in place using a some X-shaped stitch. This will allow the slipper to pull open and close.[2]


Warnings
- If you have wool allergies, make sure that the felt is not made out of 100% wool.⧼thumbs_response⧽
Things You'll Need
Making a Basic Slipper
- Pen
- Felt
- Scissors
- Stuffing or batting
- Sewing machine
- Straight pins
Making a Rustic Slipper
- Paper
- Pencil
- Pen
- Scissors
- Felt
- Straight pins
- Embroidery needle and embroidery thread or sewing machine and thread
Making a Wrapped Baby Slipper
- Paper
- Pencil
- Scissors
- Felt
- Straight pins
- Embroidery needle
- Embroidery thread
- Elastic
-Step-24-Version-5.webp)


References
About This Article

To make felt slippers, start by stacking 2 sheets of felt and tracing your feet onto the felt with ¼ inch added for the seam allowance so you have 2 pieces of felt for each sole. Then, put a sheet of felt over your foot, trace from the inside of your arch around your toes to the other side of your foot, and cut out 2 pieces of felt for the tops of your feet. Next, pin each of the toe pieces between 2 of the sole pieces, then sew around the slipper, leaving a 2-inch gap at the heel. After that, turn the slippers inside out through the gaps, fill them with stuffing, and sew the hole shut. To learn how to make rustic slippers or wrapped baby slippers, scroll down!