This article was co-authored by wikiHow Staff. Our trained team of editors and researchers validate articles for accuracy and comprehensiveness. wikiHow's Content Management Team carefully monitors the work from our editorial staff to ensure that each article is backed by trusted research and meets our high quality standards.
There are 8 references cited in this article, which can be found at the bottom of the page.
The wikiHow Video Team also followed the article's instructions and verified that they work.
This article has been viewed 12,996 times.
Learn more...
Swaddle blankets are soft, stretchy, lightweight blankets popularly used to swaddle newborns, though they are super versatile and can also be used as burp cloths or nursing covers. They’re fairly simple to make—all you need is fabric, scissors, an iron, and a sewing machine. Whether you make them for yourself or as a gift for someone else, these beautiful blankets are bound to be useful for years to come.
Steps
Buying and Cutting the Fabric
-
1Purchase 2.5 square yards (23 sq ft) of muslin or cotton gauze fabric. This length of fabric will produce 2 swaddles that measure 44 by 44 inches (110 by 110 cm). Look online or go browse the options available at your local craft store. There are hundreds of colors and patterns you can choose from.[1]
- Fabric made of muslin or cotton gauze is soft, stretchy, and lightweight, which makes it the perfect choice for a swaddle blanket.
- If you want to make larger swaddles, you’ll need to buy extra fabric. To make 2 swaddles that are 60 by 60 inches (150 by 150 cm), you’ll need about 3.5 square yards (32 sq ft) of material.
-
2Put the fabric through the washer and dryer before cutting it. This type of fabric tends to shrink a little the first time it’s washed, so it’s a good idea to cut it afterward so it stays the size you want. Run a small load with cold water, then tumble-dry it on low.[2]
- Some fabrics come pre-washed, but it’s not going to hurt anything to put it through the washing machine and dryer again.
Advertisement -
3Iron the fabric to smooth out any wrinkles or creases. Turn the iron on to its highest heat setting and use the steam function to help with tough wrinkles. Repeat the process 2-3 times if the fabric still looks wrinkly after your first attempt.[3]
- Part of the appeal of muslin and gauze swaddles is that they are soft and look good even when they’re wrinkled. But to cut and sew your blanket, it’s best to work with smooth, wrinkle-free fabric.
Warning: Never leave your iron unattended or set it face-down and walk away. This could burn the surface or even start a fire.
-
4Cut out 2 squares that measure 44 by 44 inches (110 by 110 cm) each. You have enough fabric to make 2 swaddles. If you want smaller ones, just decrease the size by a few inches. If you want larger ones, you can increase the size up to 60 inches (150 cm), but keep in mind that you’ll only be able to make 1 swaddle then instead of 2 unless you purchase more fabric.[4]
- If you do increase or decrease the size, just make sure to still cut out a square rather than a rectangle.
- It’s okay if the edges aren’t perfectly straight. They’ll look alright once you’ve sewn the hems in place.


Creating the Hem and Sewing the Swaddle
-
1Fold the edges of the fabric over 1⁄2 inch (1.3 cm). Because the material is so lightweight, you shouldn’t need to use sewing pins to keep your folds in place. Simply fold the edges by hand and smooth them down as you move your way along the blanket.[5]
- If you find the corners keep coming undone, try putting a heavy book or paperweight on top of them.
-
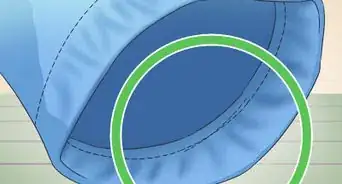
2Finish the hem by folding the edges over another 1⁄2 inch (1.3 cm). Try to keep the sides as straight as possible, but don’t worry too much if they aren’t perfect. Smooth down each section you fold over to create a crease in the fabric.[6]
- Even if the fold comes undone, it will be really easy to put it back in place because of the crease and the nature of the fabric.
-
3Iron the folded edges down so they stay in place. As you iron, keep straightening out the hem so that it gets pressed down along the crease line. If you make a mistake, simply refold the hem and iron that section again.[7]
- Be careful to not get your fingers too close to the iron as you could accidentally burn them.
-
4Sew around the edges, leaving a 1⁄2 inch (1.3 cm) seam. Take your swaddle blanket to your sewing machine and use a simple straight-stitch to finish the hem. Place the needle right along the edge of the hem so there isn’t excess fabric sticking out.[8]
- If you don’t have a sewing machine, you could also hand sew the hem.
Tip: Use thread that matches the main color of the fabric for a classy, monochrome style. Or, use a different colored thread that will pop against the fabric for a more eclectic and whimsical blanket.
Using a Swaddle Blanket
-
1Wrap your baby in the swaddle for naps and nighttime. Fold the swaddle into a triangle and place the baby so their shoulders are even with the fold. Bring the left corner over the baby and tuck it under their body between their side and right arm. Bring the bottom up over their feet and tuck in the tip. Fold the right corner over the baby and wrap it underneath of their body.[9]
- Babies love being swaddled and often sleep better that way because it feels similar to being in the womb.
Warning: Once babies start to roll over they should no longer be swaddled. If they roll over onto their stomach, they need their arms to move around and reposition their head.
-
2Use your swaddle blanket as a burp cloth or nursing cover. Swaddle blankets don’t just have to be used as a blanket. They are thin and lightweight, which makes them easy to take along in a diaper bag. Just make sure to wash them when they get dirty.[10]
- Because muslin and gauze fabrics are so lightweight, you won’t need to worry about your baby overheating if you use one as a nursing cover.
-
3Protect your baby from rain and wind by putting one over the car seat. When you’re going from the car to a store or taking a quick walk and encounter inclement weather, simply drape a swaddle blanket over the top of the car seat or stroller. It’ll keep your baby dry for a few minutes until you can get inside.[11]
- To dry out a swaddle blanket, simply hang it up somewhere or toss it in the dryer for 10 minutes.
-
4Put the blanket down on the ground for the baby to lay on top of. They also come in handy if you’re out somewhere and need to change a diaper. Instead of placing your baby on the ground, lay the blanket down first to protect them from dirt and germs.[12]
- Wash the blanket as soon as possible and don’t use the same one as a burp cloth, traditional swaddle, or nursing cover if it was on the ground at some point.


Things You’ll Need
- 2.5 square yards (23 sq ft) of fabric
- Iron
- Ironing board
- Scissors
- Sewing machine
- Thread


References
- ↑ https://youtu.be/nD3IeTCLr5k?t=68
- ↑ https://www.aliceandlois.com/diy-baby-swaddle-blanket/
- ↑ https://www.aliceandlois.com/diy-baby-swaddle-blanket/
- ↑ https://www.aliceandlois.com/diy-baby-swaddle-blanket/
- ↑ https://youtu.be/nD3IeTCLr5k?t=126
- ↑ https://youtu.be/nD3IeTCLr5k?t=126
- ↑ https://youtu.be/nD3IeTCLr5k?t=203
- ↑ https://youtu.be/nD3IeTCLr5k?t=234
- ↑ https://youtu.be/df-IlXrY7GQ?t=52
About This Article