This article was co-authored by wikiHow Staff. Our trained team of editors and researchers validate articles for accuracy and comprehensiveness. wikiHow's Content Management Team carefully monitors the work from our editorial staff to ensure that each article is backed by trusted research and meets our high quality standards.
This article has been viewed 54,267 times.
Learn more...
Stone used in building or decorating often has an attractive, if understated, texture. Applying a stain to the stone can help bring out this natural texture and add to the stone’s visual appeal. Be aware that staining stone can only darken the color; you cannot lighten a dark-colored stone by applying stain. With either water-based or acid stain, be sure to apply a sealant afterwards to keep the stained stone from becoming discolored over time.
Steps
Cleaning the Stone Before Staining
-
1Clean the stone with a stiff wire brush. Take a wire brush and thoroughly scrub the entire surface of your decorative stone. Pay special attention to any areas that are coated in dust or grime, or that have collected debris.[1]
- If you try staining the stone before it’s been cleaned, you’ll only end up staining the dirt on the stone, which will inevitably fall off.
-
2Rinse the interior stone off with a damp rag. Once you’ve finished cleaning interior stone with the brush, remove all of the loosened dirt and debris by wiping the stone surface down with a damp rag.
- After this wipe-down, give the damp stone at least 1 hour to dry.
Advertisement -
3Pressure wash outdoor decorative stone. If you’re cleaning off exterior decorative stone, you can use a pressure washer for a hands-off cleaning. Pressure washing should easily blast off all of the dirt and grime.[2] Make sure to work methodically by spraying each section of the outdoor stonework in turn.
- If there are any hard-to-reach spots in the stonework that the pressure wash can’t reach, scrub them clean with a stiff wire brush.
- If you cleaned outdoor decorative stone with a wire brush, you can just rinse it off with spray from a hose. Or, toss a couple of buckets of water over the stone.


Applying Water-Based Stone Stain
-
1Select a color of stone stain. Water-based stone stains come in a variety of colors. Before selecting a color, look at several and decide which will be most complementary to the shade, type, and texture of stone in your home.
- You can buy water-based stone stain and sealant at your local hardware or home and garden supply store.
- Make sure that the type of stain you select clearly states that it’s made for use on stone. Never apply wood stain to stone.
-
2Pour the stone stain into a plastic spray bottle. If you’re covering a large area of stonework—and especially if the stone is outdoors—it’s most efficient to put the stone stain into a plastic spray bottle. Use a funnel if needed, to avoid spilling stain.
- You can usually purchase these at any kind of grocery store, drug store, or dollar store.
-
3Spray a small area of stone at a time. Spray a thick, even coating of the stain over about 1 foot (30 cm) of the stone at a time. Or, if your stonework comprises large stones with mortar between each, spray 1 stone at a time.
- Be sure to spray the mortar between the stones with stain, too. If it’s not stained, it will look out of place. The mortar will not be damaged by the stain.
- Working slowly to cover the entire surface of the stonework will ensure an even coverage and similar color.
-
4Use a bristle brush to work the stain into the stone. Work the liquid into the stone with a bristle brush. Move the brush in a circular direction in order to work the stain deeper into the stone. Help the stone maintain a natural look by smoothing out any obvious spray lines from when the spray was applied.
- Using a bristle brush will also help you make sure that the stain is applied consistently and evenly over all the stones.
-
5Let the stain dry overnight. The stain needs to work into the stone and dry before it’s touched or sealed. Give the stone at least 8-10 hours to dry.
- Once the stain has dried, you’re ready to move on and seal it.
-
6Apply a second coat if you’d like a darker color. In general, a single coat of stain is enough to visibly alter the color of each section of stone. However, if you’d like a darker, more pronounced color, apply a second coat using the same techniques that you used for the first coat.
- When moving from section to section of the stone, try to overlap the stain by about 1 inch (2.5 cm) so that the lines between sections are not visible.


Applying an Acid Stain
-
1Select a color of acid stain. Like water-based stains, acid stains come in a wide variety of tones. You can also find colored stains (e.g., green, red, yellow), if you’d like to add color as well as texture to your stone. You can find acid stains at your local hardware store, or at most home and garden stores.
- Acid stain may be marked “for concrete,” but it can be applied to stone as well.
-
2Pour the acid stain into a plastic spray bottle. As when applying water-based stain to stone, it’s easiest to apply it with a plastic spray bottle.[3] Avoid getting any stain on your hands by wearing safety gloves or pouring the stain through a plastic funnel.
- The acid stain is not corrosive enough to eat through the plastic. Wash out the spray bottle with soap when you’re finished staining. It can then be used for other purposes.
-
3Spray the acid stain evenly over a 2 ft (0.61 m) section of stone. Apply a thick, even layer of the stain over the stone. Avoid leaving any patches bare, or they may appear discolored once the stain has dried. As when applying a water-based stain, be sure to apply the stain to the mortar between stones as well. The acid stain will not damage the mortar.[4]
- For visual variety, you can make a small “puddle” of stain in a 6 inches (15 cm) area. This area will appear darker than the rest once the stain has dried.
-
4Work continuously to ensure good visual results. Avoid taking a break while you’re staining a single section of stone. If you stop and give the stain time to dry, you’ll end up with an unsightly line where the initial layer of stain dried.
- When moving on from a section to the next, overlap the stain by about 1 inch (2.5 cm) so that there aren’t visible lines between the sections you’ve stained.
-
5Let the stain dry overnight. An 8–12-hour period of rest will give the acid stain time to dry and fully work itself into the permeable stone.[5] Do not touch the stone surface during this time. If the stone is outdoors, cover it with a tarp to keep it dry from rain or snow.
- If you’d like the color of the stone to be darker than it is after a single application of the acid stain, apply a second coat. Then, give this second layer 24 hours to dry as well.
-
6Neutralize the acid residue with baking soda and water. The acid-based stain needs to be neutralized in order to not eat through the stone. In a bucket, mix 2 tablespoons (16 grams) of baking soda with 1 gallon (3.8 L) of water. Then use a nylon scrub brush to coat the surface of the stained stone with the neutralizing mixture.
- Instead of baking soda, you can use spray-on ammonia to neutralize the acid. Be careful when handling ammonia; it’s highly caustic.


Sealing the Stain
-
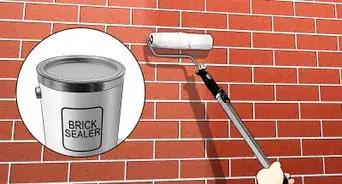
1Paint the sealant onto the stained stone with long, horizontal strokes. Dip a large bristle paintbrush directly into the sealant, and apply a thick, even layer over the entire stone surface. Using long strokes will ensure that the sealant itself won’t be visible. If you see any bubbles form in the sealant while you’re painting it on, run the paintbrush over that section a second time.
- If you’re working on a vertical surface, stain from top to bottom so that no drip lines will be visible in the finished product.
-
2Add a second coat of sealant after 24 hours. Once the first coat of sealant has dried, the stone will be ready for a second coat. As you did with the first coat, move the paintbrush in long, horizontal brushstrokes to maximize coverage over the stained stone.
- The double layers of sealant will ensure that the stain isn’t damaged or discolored by rain or snow (if it’s outdoors) or by spills or accidents (if it’s indoors).
-
3Let the sealed stone dry for at least 24 hours. If the stone is indoors, this means that you shouldn’t touch it, or set any objects on it, for a full day. If the stonework is outdoors, also avoid touching or walking on it. If you’re expecting precipitation, cover the sealed stone with a large tarp to prevent it from getting wet in rain or snow.[6]
- Once the stonework has dried for a full 24 hours, it can be touched and used as usual.


Warnings
- Take certain safety precautions when working with acid-based stain. Wear plastic or canvas gloves to cover your hands, and safety goggles to protect your eyes in case the acid-based stain splashes towards your face.⧼thumbs_response⧽
Things You’ll Need
- Stiff wire brush
- Pressure washer (optional)
- Damp rag
- Stone stain
- Sealant
- Plastic spray bottle
- Large bristle paintbrush
- Nylon scrub brush
- Large plastic bucket
- 1⁄2 pound (230 g) baking soda
- 5 gallons (19 L) water
- Ammonia (optional)


References
- ↑ https://www.msistone.com/blogs/post/2017/08/16/tips-from-the-trade-can-stacked-stone-panels-be-painted-or-stained.aspx
- ↑ https://www.msistone.com/blogs/post/2017/08/16/tips-from-the-trade-can-stacked-stone-panels-be-painted-or-stained.aspx
- ↑ https://www.youtube.com/watch?v=lFDrEWMRPMs&feature=youtu.be&t=39s
- ↑ https://www.youtube.com/watch?v=lFDrEWMRPMs&feature=youtu.be&t=50s
- ↑ https://youtu.be/lFDrEWMRPMs?t=1m54s
- ↑ https://www.msistone.com/blogs/post/2017/08/16/tips-from-the-trade-can-stacked-stone-panels-be-painted-or-stained.aspx
- ↑ https://www.youtube.com/watch?v=lFDrEWMRPMs&feature=youtu.be&t=2m19s
About This Article