X
wikiHow is a “wiki,” similar to Wikipedia, which means that many of our articles are co-written by multiple authors. To create this article, volunteer authors worked to edit and improve it over time.
This article has been viewed 62,640 times.
Learn more...
Taping sheetrock is a basic task that helps give a room a more finished look. By taking the time to tape sheetrock prior to priming and painting the wall surface, the seams between sections of the sheetrock become very difficult to detect. Fortunately, the process requires nothing more than a few basic tools and a little patience to achieve that professional look.
Steps
-
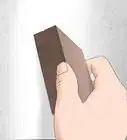
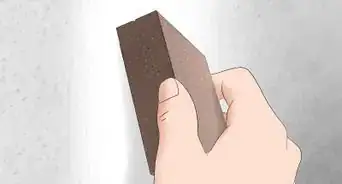
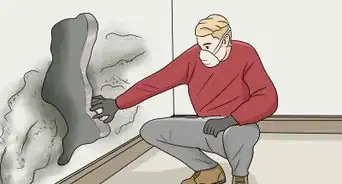
1Brush the area around the seam between the 2 sections of sheetrock. This will remove any dust or particles that may be lingering on the surface, making it easier for the sheetrock tape to adhere properly. If a brush isn't handy, a clean dry cloth or even a whisk broom will also remove the dust particles with ease. Wear a face mask during this process.[1]
-
2Mud the joint. Using the drywall knife, fill in the small seam between the 2 sections of sheetrock. Apply small amounts of the mud at a time, making sure that there is as little extra mud left on the surface as possible. Spread the mud as evenly across the surface of the seam and the immediate area, helping to ensure there are no raised areas or clumps of mud along the surface of the drywall. Clean the knife after the mud is in position.[2]Advertisement
-
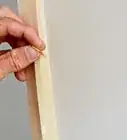
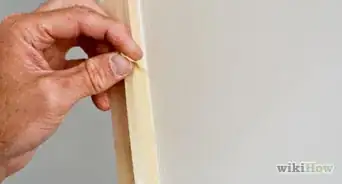
3Prepare the sheetrock tape for installation. Using the tape measure, determine the length of the seam between the 2 sheetrock sections, and then cut the correct length of tape with the cleaned drywall knife. When taping a wall seam in a room with a high ceiling, it is fine to cut 2 sections of tape, if that will make the task more manageable.
-
4Apply the sheetrock tape. Starting at the top of the seam, gently maneuver the tape into position, pressing lightly on the tape surface with 1 hand while using the other to guide the tape as you move downward. This will squeeze a small portion of the mud from under the tape while leaving the area underneath smooth and flush with the surface of the sheetrock sections. If using 2 pieces of tape to cover a seam in a wall that is taller, make sure that the edge of the second piece laps under the first piece, as this will minimize the chances of the tape being noticeable.[3]
-
5Cover the sheetrock tape with additional mud. Use the blade of the drywall knife to apply a thin layer of mud to the surface of the tape, helping to hide the edges of the taped seam. Smooth the area so that the mud blends into the sheetrock surface with ease.[4]
-
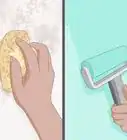
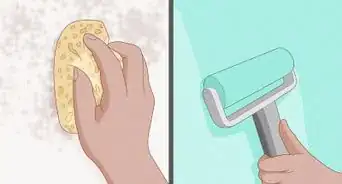
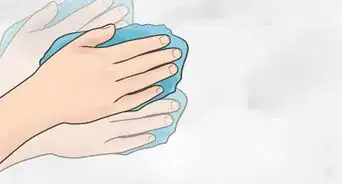
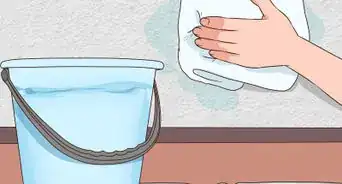
6Clean up. Wet the sponge with a little water and gently wipe away any excess mud from the surface of the sheetrock. After allowing the seam to dry, lightly go over the area with a piece of sandpaper, creating a smooth surface. Brush the area to remove any lingering particles before painting.[5]


Advertisement
Community Q&A
-
QuestionMy tape is coming undone from the sheetrock. What could be the problem? I followed your directions precisely.
 Community AnswerIt could be that you need to leave a bit more mud under the tape. Aim for about 1/8 inch on the crack, then lay down the tape, then mud over it.
Advertisement
Things You'll Need
- Face Mask
- Brush or Whisk Broom
- Sheetrock Tape
- Tape Measure
- Drywall Knife
- Mud or Joint Compound
- Sponge
- Bucket with water
- Sandpaper


References
- ↑ https://www.popularmechanics.com/home/interior-projects/how-to/a2163/4224995/
- ↑ https://www.naturalhandyman.com/iip/infdrywall/infdrywalltape.html
- ↑ https://www.bobvila.com/articles/how-to-finish-drywall-joints/
- ↑ https://www.thisoldhouse.com/how-to/how-to-finish-drywall
- ↑ https://www.constructionprotips.com/jobsite-tips/interior/create-smooth-walls-a-mudslingers-guide/
About This Article
Advertisement