This article was co-authored by wikiHow Staff. Our trained team of editors and researchers validate articles for accuracy and comprehensiveness. wikiHow's Content Management Team carefully monitors the work from our editorial staff to ensure that each article is backed by trusted research and meets our high quality standards.
There are 9 references cited in this article, which can be found at the bottom of the page.
This article has been viewed 22,104 times.
Learn more...
Oxygen is an essential component of life, and testing for it can reveal important information about the air and liquids around you. Testing an air sample for oxygen in a lab is simple. Placing a glowing splint in a vial of oxygen will cause it to re-light. Testing a water sample for oxygen can also be quite simple if you use a handheld, digital meter, or you can manually calculate oxygen concentration using a colorimetric kit or the Winkler Method. These are laboratory experiments that require professional equipment and should only be performed under the supervision of a teacher or scientist.
Steps
Using a Splint Test
-
1Light a wooden splint. A splint is a long, thin strip of wood around 6 in (150 mm) long and ¼ inch (6 mm) wide. Light the splint with a lighter or match. Ask a teacher or lab assistant if you need help lighting the splint.[1]
- Using a splint allows you to safely do experiments involving fire since it is longer than a match and keeps your hand at a distance. If you are at all worried about handling one, wear gloves.
- Always wear safety goggles when you are conducting experiments with unknown gasses.
-
2Blow out the flame so that the splint glows. In order to test for oxygen, the splint will need to be freshly blown out so that it is still glowing. You can't test for oxygen if the splint is still lit or if it is completely extinguished.[2]
- Move quickly after blowing out the splint. Keep the gas sample close by.
Advertisement -
3Place the splint in a sample of gas. Use an unknown sample of gas provided to you by a teacher or laboratory in a glass reaction vessel, likely a test tube. Sometimes the splint will relight as soon as you bring it close to the mouth of the vessel.[3]
- You can also place the splint at the mouth of the tube containing the gas sample without putting it all the way in.
-
4Watch for the splint to re-ignite. If the splint re-lights, the sample is oxygen.[4] The splint re-lights because the concentration of oxygen in the test sample is higher than in the air around you.[5]
- Sometimes the splint can re-ignite with a pop, which you may mistake for a hydrogen pop. However, a hydrogen pop is more violent and can extinguish a splint, like a mini explosion.


Measuring Oxygen in a Liquid
-
1Use a colorimetric test to get a basic approximation of oxygen levels. Fill a vial with 25 milliliters of the liquid you want to test for dissolved oxygen. Place one of the glass ampules that comes with the colorimetric testing kit into the water and snap it to break it. Let it fill with water and react for around 2 minutes. Compare the result with the color chart that came with the kit to get an approximation of the oxygen levels.[6]
- Rinse the vial before collecting a sample for more accurate results.
- Gently shake the sample in the ampule to see the color more evenly.
-
2Measure oxygen levels with a meter and sensor for accurate results. There are several different kinds of dissolved oxygen (DO) sensors, including the optical DO sensor, electrochemical DO sensor, polarographic DO sensor, pulsed polarographic DO sensor, and galvanic DO sensor. Generally, you place the sensor into the liquid you want to measure and read the results on a handheld meter. Depending on the liquid, you may have to take temperature, salinity, and pressure into account to get an accurate result. Some meters automatically sense these and make the adjustments for you.[7]
- Follow any directions that come with your particular sensor for the most accurate results.
-
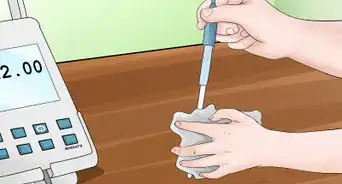
3Calculate oxygen levels using the Winkler Method for a manual exercise. Purchase a kit specifically used to test oxygen concentration using the Winkler Method.[8] Collect a water sample using the vial included with the kit. Fixate the oxygen levels right away using the included solutions of manganous sulfate and alkaline potassium iodide azide. Cap the solution until you can take it back to the lab. Finally, titrate the solution using an indicator solution and one mL of sodium bisulfate at a time. When the solution turns clear, note how many milliliters of sodium bisulfate you added. Each 0.1 mL of sodium bisulfate is 1 part per million of dissolved oxygen.[9]
- Make sure the sample vial is completely filled with water. If there is any air trapped in the bottle or lid, the results could be skewed.
- For example, if you added 1.4 mL of sodium bisulfate to the solution before it turned clear, the concentration of oxygen was 14 ppm in the original water sample.


Things You'll Need
Testing a Gas Sample
- Unknown gas sample
- Reaction vessel (test tube)
- Wooden splint
- Match or lighter
- Safety goggles and gloves
Measuring Dissolved Oxygen in a Liquid
-
Colorimetric test kit:
- Collection vial
- Glass ampule of indigo carmine
- Color chart
- Dissolved oxygen sensor
- Optional: temperature, salinity, and pressure measuring instruments
-
Winkler Method test kit:
- Collection vial
- Manganous sulfate
- Alkaline potassium iodide azide
- Eye dropper
- Test tube
- Indicator solution
- Sodium bisulfate


References
- ↑ https://chemstuff.co.uk/analytical-chemistry/tests-for-gases/
- ↑ https://youtu.be/_GqBl83Koig?t=66
- ↑ https://youtu.be/_GqBl83Koig?t=61
- ↑ https://manoa.hawaii.edu/exploringourfluidearth/sites/default/files/M2U1-Table%201.6%20Splint%20test%20for%20gases.pdf
- ↑ https://youtu.be/_GqBl83Koig?t=71
- ↑ https://youtu.be/9Jk0AmmuLSY?t=117
- ↑ https://www.fondriest.com/environmental-measurements/measurements/measuring-water-quality/dissolved-oxygen-sensors-and-methods/
- ↑ https://serc.carleton.edu/microbelife/research_methods/environ_sampling/oxygen.html
- ↑ https://youtu.be/FKdzbgHaQQM?t=85


Medical Disclaimer
The content of this article is not intended to be a substitute for professional medical advice, examination, diagnosis, or treatment. You should always contact your doctor or other qualified healthcare professional before starting, changing, or stopping any kind of health treatment.
Read More...