This article was co-authored by Homer Flores and by wikiHow staff writer, Janice Tieperman. Homer Flores is an Appliance Repair Specialist and Training Manager at PreFix, a home maintenance company out of Austin, Texas. With over 15 years of experience, Homer specializes in home improvement, remodeling, and construction. Homer’s dedication to the PreFix mission of providing hassle-free one-stop-shop service for home care, in addition to their completion of the Capital Factory and Techstars Accelerators, has contributed to their growth of service to over 50 zip codes throughout the greater Austin area.
There are 10 references cited in this article, which can be found at the bottom of the page.
This article has been viewed 37,118 times.
As convenient as dryers are, it can be a pain when they suddenly stop doing their job. While it’s always best to contact a professional when dealing with faulty appliances, there are a few ways you can test the heating element in your dryer from home. If you have an electric dryer, use a multimeter to examine the heating coils and thermostat. If you have a gas dryer, you can use the same tool, but instead check the igniter, thermal fuse, and radiant sensor. If any of these tests indicate any broken elements, try replacing the parts to get your dryer up and running again!
Steps
Examining an Electric Dryer
-
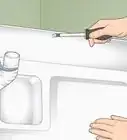
1Unplug your electric dryer before performing any tests. Go to the back of your appliance and unplug the large wire that’s connected to a wall socket. When you’re testing different components of the dryer to see if they work, you don’t want to get a shock in the process! Keep in mind that laundry machine electrical sockets are shaped differently from traditional sockets.[1]
- If you want to be extra safe, switch off your circuit breaker.
-
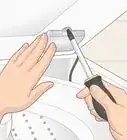
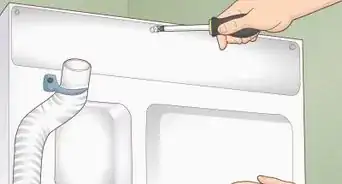
2Remove the heating coil panel with a screwdriver. Take a screwdriver and remove all of the screws lining the side of the coil panel, which looks like a metal box. You can find the heating element in the back of the dryer, flush with the right side of the appliance. Remove the 2 screws attaching the heating element to the dryer before sliding the panel out.[2]
- There should be 3 red wires, otherwise known as leads, attached to the bottom left area of this panel.
Advertisement -
3Attach the black and red multimeter probes to the leads on the heating coils. Take your multimeter and set it 200 ohms of resistance as this is the most accurate way to test continuity in an electric dryer. Start by taking the metal ends of the multimeter leads and pressing them on top of the 2 leads positioned in the top of the heating coil. Keep an eye on your multimeter’s screen—if you get a numerical reading, then your leads are functioning and don’t need to be replaced.[3] [4]
- If you’re unsure of where certain parts should go, check the manufacturer’s guide for the appliance. If you don’t have a print copy of this manual, search online for a digital file.
-
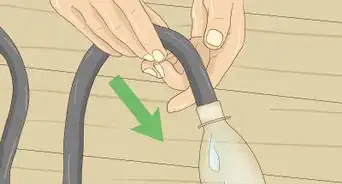
4Use a nut, bolt, and 2 washers to connect any breaks in the heating coils. Pinch the 2 broken ends of the wires together and sandwich them between 2 metal washers. Next, place a small, round screw through these washers and secure it tightly with a bolt. Tighten it enough so that the wires are snugly touching one another.[5]
-
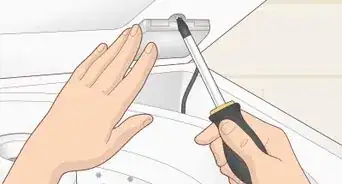
5Test the thermostat to see if it’s giving a proper reading. Remove the back panel of the dryer to find the thermostat, which looks like a pronged, circular piece of metal with a rectangle going down its middle. First, remove any wires and leads from the thermostat with a firm tug. Next, set your multimeter to the lowest ohms setting and place both the black and red probes on the edge of the prongs. If the reading comes up as a 0, then you need to replace the part.[6]
- Most exterior dryer panels can be removed with a Phillips or flathead screwdriver or electric drill.
-
6Put the dryer back together and plug it in. Once you've repaired breaks in the heating coils or replaced the thermostat, you're ready to use the dryer again. Reassemble it by reversing the steps you took to take it apart. Finish by plugging in the electrical cord and turning the circuit breaker back on, if necessary.


Inspecting a Gas Dryer
-
1Turn off the valve that supplies gas to the dryer. Look behind your dryer to find the gas line that powers your dryer. Before doing any diagnostic work on a gas dryer, switch off the valve so that no gas is flowing through this line. If you don’t turn off the gas, you could be setting yourself up for a potential leak.[7]
- Since this dryer is powered by a gas line, there isn’t a cord to unplug.
-
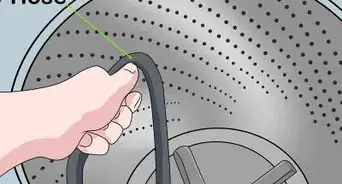
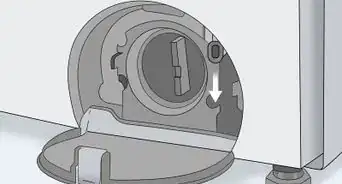
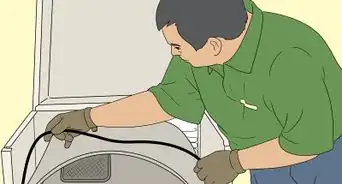
2Access the igniter, thermal fuse, and radiant sensor within the machine. Look toward the front of the machine to access the main components that provide the dryer with heat. Find the thermal fuse by locating the blower housing, which is a large cylinder. Look for a second large cylinder next to the blower housing that has a small black box, or radiant sensor, attached the side along with pipe and wiring coming through the bottom. You can find the igniter attached at the bottom of this cylinder, connected to 2 thin wires.[8]
- If you aren’t sure which parts are which, look at your dryer’s manufacturing guide. If you don’t have a copy on hand, look up the model of your dryer online to find a digital copy.
-
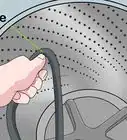
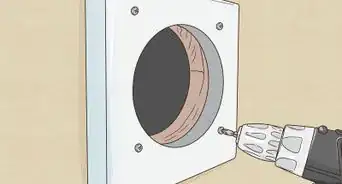
3Unscrew the thermal fuse from the exhaust vent in the back of the dryer. Find the thermal fuse at the rear of the dryer, which looks like a flat, curvy piece of metal with a metallic cylinder sticking out of the center. Next, switch on your multimeter so it’s set to ohms, a continuity measurement. Take the red and black probes attached to your multimeter and set them on the 2 thermal fuse switches. If your device gives a reading other than 0, then your thermal fuses are functioning.
- Unfortunately, you can’t reset or fix a thermal fuse once it breaks. In this case, search online to purchase a replacement for your dryer model. Use the screws provided with the replacement to attach the new thermal fuse to the exhaust vent of your dryer.
- Continuity is measured through electric resistance. On some models, this is represented by a series of curved lines next to one another.
-
4Disconnect the radiant sensor and test it to see if there’s continuity. Unscrew the radiant sensor, which looks like a metal rectangle with a pronged black cube attached to the surface. You can find it attached to a large metal cylinder on the far right side of the dryer. Set your multimeter to the lowest setting of ohms and attach the red and black probes to both prongs on the sensor. If the reading ends up as zero, or doesn’t move past 1, then there’s no continuity in your sensor.[9]
-
5Examine the igniter to determine if it has continuity. Remove the small wires connecting the igniter to the dryer and unscrew it from the base of the large, metal cylinder. Next, set the multimeter to the lowest ohms setting and place both probes along the 2 terminals of the igniter, which are found at the end of the 2 connecting wires. If you don’t get a numerical reading from this test, then you need to replace the part.
- The igniter looks like a long, thin piece of metal attached to a plastic rectangle.
-
6Install new gas valve coils if everything is functioning correctly. If all other elements of your gas dryer are working properly, then you need to get new gas valve coils. Use an electric drill to remove the top and front sections of your dryer. Pull out the existing coil wires with a firm tug, and use the drill to unscrew the 2 gas valve coils, which look like small black cylinders. After setting the new gas valve coils in place, screw them back in. Replace the other panels on the dryer when you’re finished.[10]
- If you have any difficulty locating anything on your appliance, feel free to call the manufacturer or a local repair person for assistance.
-
7Replace any faulty parts and reconnect any wires. Find replacement sensors, thermal fuses, or igniters online or at an appliance store. Make sure that they match the model of your dryer. Screw the thermal fuse into the exhaust duct and attach the radiant sensor next to the igniter. Check that all leads are connected securely before reattaching the back dryer panels. Then, turn the gas valve back on and use the dryer as usual.[11]


References
- ↑ https://www.familyhandyman.com/appliance-repair/washer-and-dryer-repair/clothes-dryer-repair-guide/
- ↑ https://m.youtube.com/watch?v=qp57q9C4gR8&feature=youtu.be&t=1m8s
- ↑ https://m.youtube.com/watch?v=qp57q9C4gR8&feature=youtu.be&t=2m24s
- ↑ Homer Flores. Appliance Repair Specialist. Expert Interview. 14 April 2021.
- ↑ https://m.youtube.com/watch?v=qp57q9C4gR8&feature=youtu.be&t=3m16s
- ↑ https://m.youtube.com/watch?v=ZLWPrU9qhNQ&t=2m4s
- ↑ https://www.familyhandyman.com/appliance-repair/washer-and-dryer-repair/clothes-dryer-repair-guide/
- ↑ https://www.familyhandyman.com/appliance-repair/washer-and-dryer-repair/clothes-dryer-repair-guide/
- ↑ https://m.youtube.com/watch?v=BHDFeNrZ98U&t=1m51s
About This Article