This article was co-authored by wikiHow Staff. Our trained team of editors and researchers validate articles for accuracy and comprehensiveness. wikiHow's Content Management Team carefully monitors the work from our editorial staff to ensure that each article is backed by trusted research and meets our high quality standards.
This article has been viewed 27,149 times.
Learn more...
The dropper loop is a type of knot commonly used in fly fishing. You can tie one or more dropper loops in the middle of your fishing line, and use each loop that you tie to attach an additional fly to the line. To tie a dropper loop, you’ll need a length of fishing line. It’s helpful to tie this knot when you’re near water (e.g. a river or lake) since a dropper loop needs to be moistened before it can be pulled tight.
Steps
Tying the Knot
-
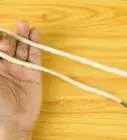
1Hold two points on the line about 12 inches (30 cm) apart. Use your thumb and index finger to pinch these two points on the line. Choose the knot’s location based on where you would like to add additional lures on your fly line.[1]
- Although the “loop” of the dropper loop will only end up being 2–3 inches (5–7.5 cm) long, you need much more line than that to tie the entire knot.
-
2Bring the points together to form a loop. At this point, it doesn’t matter if the side of the line in your right or left hand is placed on top. Once you’ve brought the two points together to form a loop, pinch the points firmly together using one of your hands.[2]
- Make sure that the portion of the line which comprises the loop is not twisted. If you’re tying the knot on a flat surface, the loop should lie flat.
Advertisement -
3Pass the bottom of the loop over the top. To begin wrapping the dropper loop around itself, use your free hand to grasp the bottom of the large loop. Pass this over the top of the loop. At some point, you’ll need to release the fingers pinching the top of the loop together while you pass the bottom of the loop over the top.[3]
- Be sure not to lose track of which part of the knot you were pinching, though, and to grasp it again once you’ve wrapped the loop around itself.
-
4Wrap the loop around itself 5 more times. Once you’ve wrapped the bottom of the loop over the top, repeat this step until there are 6 loops total.[4]
- If you’re using a heavy, thick monofilament fishing line—e.g. 100 lb or thicker—you can stop at 3 loops.
-
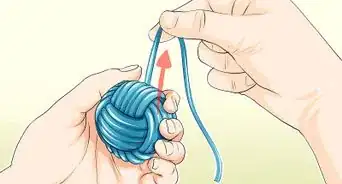
5Pass the loose line through the gap at the top of the loop. Separate the initial two points on the line that you’ve been pinching together. This will open up a gap between the two wrapped sides of the line. Once you’ve completed the 6th wrap and the bottom of the loop is beneath the wrapped portion of the line, use your free hand to pass the loose line up through the hole at the top of the loop.[5]
- Continue passing loose line through the gap until you have a sizeable loop and no loose, dangling line.


Tightening the Knot
-
1Hold the top of the loop and tighten the knot. Use two fingers to hold the top of the loop. With your remaining fingers, tighten the two sides of the knot by pulling on the loop and the two sides of the fishing line.[6]
- Tightening the dropper loop needs to be done in steps, so that you don’t distort the knot’s shape.
-
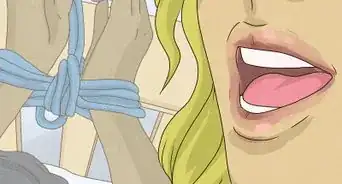
2Moisten the line. A dropper loop will not tighten completely unless it’s wet. This will help the threads of the fishing line grip one another better. If you’re by a river or lake, you can dip the knot under the water for a second.
- Otherwise, use your mouth. Put the knotted part (not the loop) of the dropper knot into your mouth and suck on it for a second to dampen the line.[7]
-
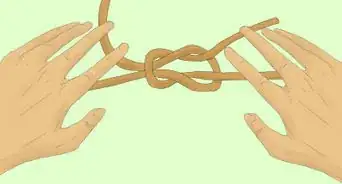
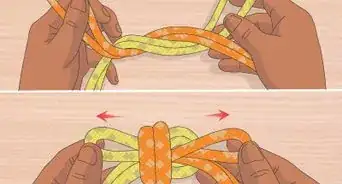
3Slide the two looped sides of the knot together and finish tightening. As you continue to tighten the dropper knot, the two sides of the knot will slide together and meet in the middle. Tug on all of the individual portions of the line to make sure that the knot is tight. See that the looped portions of the line do not overlap; keep them separately layered as the knot tightens.[8]
- If you’re struggling to tighten the knot, try this trick. Hold the loop in your mouth and one side of the line in either hand. Then slowly tug on both sides of the line, and the knot will come together.


References
- ↑ https://www.youtube.com/watch?v=N3cGhPWRJI0&feature=youtu.be&t=20s
- ↑ https://www.youtube.com/watch?v=N3cGhPWRJI0&feature=youtu.be&t=27s
- ↑ http://leadertec.com/tipsandtechniques/fishing_knots/knots_dropper_loop.html
- ↑ http://leadertec.com/tipsandtechniques/fishing_knots/knots_dropper_loop.html
- ↑ https://www.youtube.com/watch?v=N3cGhPWRJI0&feature=youtu.be&t=55s
- ↑ https://www.youtube.com/watch?v=N3cGhPWRJI0&feature=youtu.be&t=1m4s
- ↑ http://www.animatedknots.com/dropperloop/
- ↑ http://leadertec.com/tipsandtechniques/fishing_knots/knots_dropper_loop.html
- ↑ http://leadertec.com/tipsandtechniques/fishing_knots/knots_dropper_loop.html
About This Article

To tie a dropper loop, start by holding 2 points on a fishing line that are 12 inches apart. Then, bring the 2 points together to make a loop, and hold them together with your fingers. Next, pass the bottom of the loop over the top, and wrap the loop around itself 5 times. Finally, release the 2 points you've been holding together, and pass the loose line through the hole at the top of the loop. To learn how to tighten a dropper loop, scroll down!