This article was co-authored by wikiHow Staff. Our trained team of editors and researchers validate articles for accuracy and comprehensiveness. wikiHow's Content Management Team carefully monitors the work from our editorial staff to ensure that each article is backed by trusted research and meets our high quality standards.
There are 8 references cited in this article, which can be found at the bottom of the page.
wikiHow marks an article as reader-approved once it receives enough positive feedback. In this case, 84% of readers who voted found the article helpful, earning it our reader-approved status.
This article has been viewed 229,339 times.
Learn more...
Crimp beads help secure a loop on a piece of jewelry so that the finished piece can be attached to other components of jewelry. If you’re making your own beaded jewelry, you’ll probably need to crimp the wire on both ends to make sure the beads don’t fall off. For best results, you should invest in a pair of crimping pliers, but a regular pair of pliers will work, too. To use crimp bead, string on the crimp beads, form the bead, and complete the process by securing the decorative beads with one more crimp bead.[1]
Steps
Stringing the Crimp Bead
-
1Gather your supplies. First, determine what size wire you have. Use an online chart to make sure you have the right size crimp beads for your wire. Take into consideration how many strands of wire or thread you will be crimping at once, as this will increase the size of bead you’ll need.[2]
- For example, if you are using one 0.020” (0.51 mm) piece of wire, you will need a bead with a diameter of 0.04” (1.02 mm). But, if you are using two strands of wire, you will need a bead with a diameter of 0.08”.
-
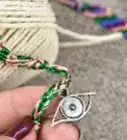
2Add an end piece to your wire. To secure one end of the wire so that your beads don’t fall off, you’ll need some sort of an end piece, such as a clasp. When you are ready to attach a clasp, first thread the end of your beading wire (jewelry cable) through a crimp bead and then through the eye of the clasp.[3]
- Your design might call for other kinds of end pieces, such as a closed or solid jump ring or extender chain. The same methods apply for these as for clasps.
Advertisement -
3Form a loop. Form the loop through the clasp and crimp bead. After threading the crimp and clasp, feed the wire back through the crimp bead, forming a loop. It is a good idea to leave a tail of wire a couple of inches longer than you think you need so you will have some wire to work with.[4]


Forming the Crimp Beads
-
1Slide the crimp bead down the wire. Move the crimp bead close to the end of the clasp or end piece. Check the crimp bead and make sure it is not too close to the clasp or end piece. You want to have a small loop around the clasp or end piece, but not so small that it holds the clasp so tightly that it cannot move freely. [5]
-
2Flatten the bead. Use crimping pliers to flatten the bead. Squeeze the beads with the flatter back channel of the crimping pliers that is closest to the handle. Gently but firmly squeeze the pliers closed. This will both flatten and place a dent in the middle of the crimp bead so that it resembles the letter “C”.
-
3Round the bead. Round it with crimping pliers. Place the dented crimp bead in the front, rounder channel of the crimping pliers, closest to the tip. Position the “C” upright so that when you close the pliers and squeeze, the bead will be folded closed right on the dent (closing the “C” into an “O”). Squeeze gently but firmly and until the crimp bead has closed tightly around the wire.[6]
- Tug gently to make sure the wire doesn't pull free. If necessary, use pliers to make it close tighter.
-
4Use chain or needle nose pliers. If you don’t have a pair of crimping pliers, you can use regular pliers. They get the job done, but they won’t give you the same round, uniform crimps that crimping pliers will. To use these pliers, simply grasp the crimp bead with the flat section of the pliers and squeeze gently but tightly to smash the crimp bead flat onto the wire.
- Only use flat pliers or the flat section of pliers. The teeth in these pliers will also leave grooves on the surface of the crimp bead.


Completing the Beading
-
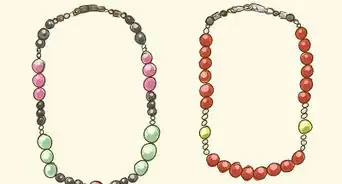
1String your decorative beads. Use whatever beads you are designing your bracelet, necklace, or other piece of jewelry with. Thread your first bead onto the wire. Thread the extra tail of wire through the bead hole. Use your flush cutters to cut off the loose end of the cord as close as possible to the bead. Thread the rest of your beads according to your design until you reach the other end.[7]
-
2Tighten your beads. When you are ready to attach your final clasp to the end of your piece, thread the crimp bead and clasp just like before, but now you will want to tighten all of your beads by pulling on the tail end of the loose wire. This will snug all your beads up together, leaving no gaps in your design.[8]
- You will need to leave a small, finger-nail length gap between the beads if you have long tube beads in your design.
- You need to make sure the beads and wire make the small circumference around a wrist if you are making a bracelet.
- If you need more leverage to pull the wire tight, use your pliers; one to hold the clasp and the other to grasp and pull the wire.
-
3Add a crimp cover for a nice touch. If you want to hide your crimp beads, you can get crimp covers. A crimp cover looks like a larger, round bead that goes on top of the crimp bead or tube to give it a professional finish. To add a crimp cover, simply slide it over the crimp bead and squeeze it shut with a pair of pliers.[9]


References
- ↑ http://www.stitchdiva.com/tutorials/knit-and-crochet-with-wire/how-to-use-crimp-beads
- ↑ http://www.firemountaingems.com/resources/encyclobeadia/charts/e94n
- ↑ http://www.rings-things.com/Learn/Suggested-Clasp/
- ↑ http://www.stitchdiva.com/tutorials/knit-and-crochet-with-wire/how-to-use-crimp-beads
- ↑ https://www.youtube.com/watch?v=-pHk64psvss
- ↑ http://www.firemountaingems.com/resources/videos/691h
- ↑ https://www.youtube.com/watch?v=-pHk64psvss
- ↑ https://www.youtube.com/watch?v=-pHk64psvss
- ↑ https://www.youtube.com/watch?v=eZkyCCN-1d8
Community Q&A
-
QuestionWhat can I use to secure the ends of my bracelets if thread slips through the crimp bead?
 Community AnswerThat means that you need to use a crimp bead of a different size. This chart will help you figure out the appropriate size for your wire: http://www.firemountaingems.com/resources/encyclobeadia/charts/e94n
 -
QuestionWhat do I do if I've already threaded all the beads?
 Community AnswerYou will have to take them off of the wire, start with a crimp bead, and then add the beads on again.
 -
QuestionHow can crimp beads be used with earrings?Community AnswerYou can make earrings using stringing wire, and you can crimp just like you would a bracelet or necklace.
Warnings
- Wear safety goggles when cutting beading wire. Steel beading wire can snap and fly around.⧼thumbs_response⧽
Things You'll Need
- Two Crimp Beads
- Choice of Clasp
- Length of Flexible Jewelry Wire (also known as beading cable or stringing cable)
- Beads
- Crimping Tool or Chain Nose (Flat Nose) Pliers
- Crimp Bead Covers (optional)

About This Article

To use crimp beads, thread a piece of jewelry wire through a crimp bead and a clasp, then feed the wire back through the crimp bead to form a loop. Move the crimp bead close to the end of the clasp. Next, use crimping pliers to flatten the bead in the middle to form a "c" shape and round out the shape. Thread the rest of your beads onto the wire according to your design until you reach the other end. Then, tighten your beads and add a crimp cover as a final touch to make your beading look professional! For more tips on shaping crimp beads with pliers, read on!