X
wikiHow is a “wiki,” similar to Wikipedia, which means that many of our articles are co-written by multiple authors. To create this article, 13 people, some anonymous, worked to edit and improve it over time.
This article has been viewed 44,932 times.
Learn more...
Pixilart is an online drawing and social platform, free for all ages to use. The platform is especially known for giving you the ability to create your own pixel art creations, along with GIFs that can be shared with other people online. With this wikiHow, you'll be able to use Pixilart and join the community of other blooming artists out there.
Steps
Part 1
Part 1 of 3:
Creating an Account
-
1Go to Pixilart's website. Visit https://www.pixilart.com by clicking on the link in order to be directed to it.
-
2Select the button to create an account. Once you are on the site, you will see two options that will allow you to create an account. Click the orange button that says "Create Account," which is right next to "Start Drawing". You can also click the "Login - Sign Up" option at the top right of the page.
- Creating an account is not a must to start drawing, but it is recommended in order to save your artwork.
Advertisement -
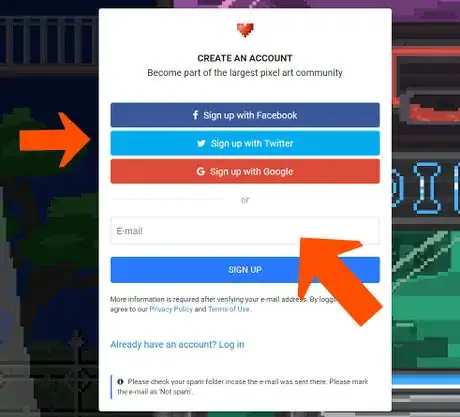
3Insert your email to sign up. In order to create an account, you will need to insert your email. You have the option to connect with your Facebook, Twitter, or Google account if that is something you want to do. If not, type in your email and select the blue button that says "Sign Up".
- If you decide to connect with a Facebook, Twitter, or Google account you will not need to create a password. However, you will be asked to grant permission to Pixilart to access your account. Select "Yes" in order to log in.
-
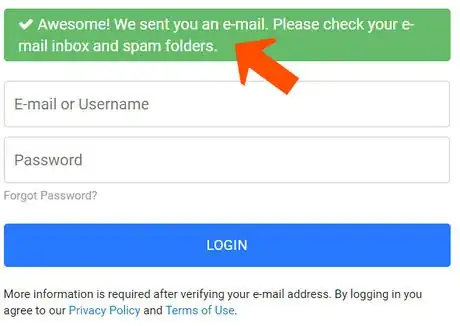
4Verify your email. You will receive an automatic email to confirm your Pixilart account. Check your inbox or spam folder for the link to verify it.
-
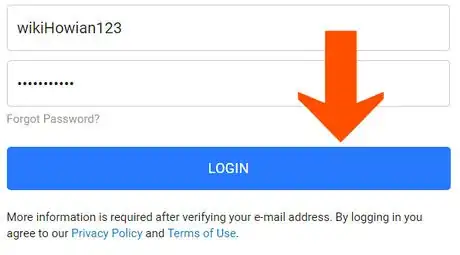
5Create a username and password. Type a username that has not been used by others before and enter a secure password that you will remember. Click the blue button that says "Login".
-
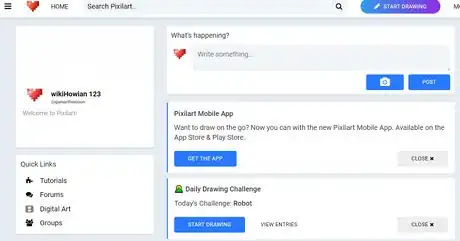
6Log in. When you log in, you agree to Pixilart's Terms of Use and Privacy Policy. After doing so, you will automatically be signed into your account and will have access to your home page.
Advertisement
Part 2
Part 2 of 3:
Creating Artwork
-
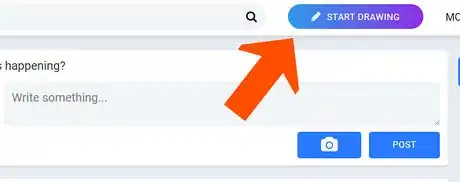
1Click the "Start Drawing" button. At the top of the home page, you will see a colored button that says "Start Drawing" with a pencil next to it. Select this option to begin making pixel art.
-
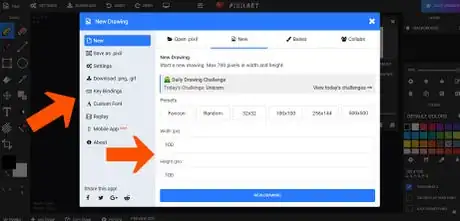
2Know your options before beginning to draw. The sidebar has many settings and functions that you may find useful while drawing or after drawing when saving your artwork. Before beginning to draw, decide on the width and height of your board and type it in. You are also offered presets, which are options you can click instead of typing them out.
- The max number of pixels your width and height can reach up to is 700. Make sure you use a valid size when typing in your width and height.
- Pixilart offers daily challenges every day that provide an idea for what to create. These challenges are optional, but will show up whenever you open a new drawing. Click on the option "View today's challenges" if you would like to see other entries people have created for the challenge.
-
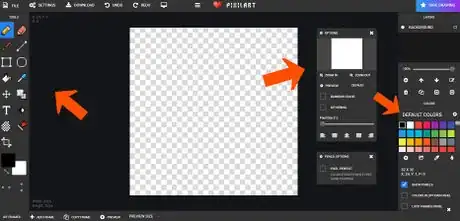
3Understand the format of the platform before starting. Seeing the variety of tools and options on Pixilart may be confusing and intimidating at first, but they get easier to navigate over time with practice and usage.
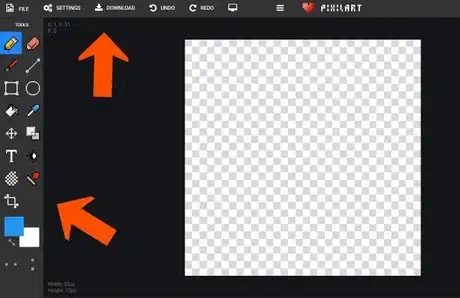
- The left side of the page has a list of tools used for drawing. Your board is where you will be drawing and doing your art on. The right side of the page has options to change the position of your board and the objects on it. You will also have options to change the color of your pixels.
- The options on the top page allow you to check the settings, save your artwork, redo or undo it, and download it on your device. You also have the ability to make your board full screen.
-
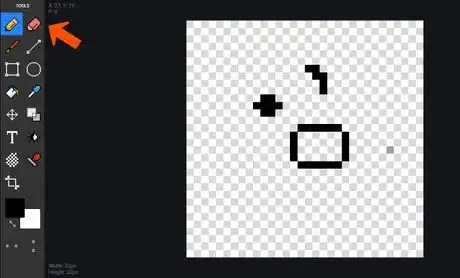
4Use the Pencil and Eraser tools. The Pencil tool is one of the main tools for creating pixel art. Click on the pencil and tap on an empty pixel box to fill it in. You can press and drag the cursor around to create multiple pixels at the same time. To erase what you've made, click on the Erase tool right next to the pencil. Tap on a pixel to remove it. Just like with the Pencil tool, you can press and drag on the erase to remove multiple pixels at once.
- Increase and decrease the size of your work if desired. The right side of the screen will have an option box that states the pixel size. Use the slider to increase your pixel size and make it bigger. This can also be used with the eraser to remove a bigger portion of your pixel art.
-
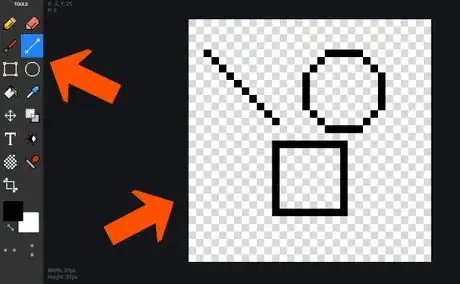
5Understand how the Line, Square, and Circle tools work. The Line tool creates a line that can be stretched diagonally, vertically, and horizontally. The Circle tool is used to make a circle that can be stretched to form the desired shape. The same applies to the Square tool with the only difference being a square or rectangle.
-
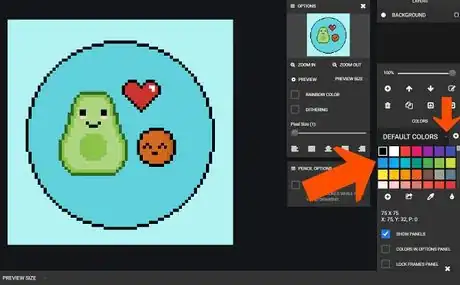
6Change the color of your pixels. The right side of the page will have a list of colors you can use to change the color of your pixels. The default colors are listed first, but there are a list of other color palettes you can choose from such as the most common colors used, skin tones, the metro UI set, and the rainbow dash set. Those are the ones listed, but you can also make your own color set by clicking the plus button next to "Default Colors".
- You can add a new color by entering its hex code. Click on the plus button near the bottom of the sizing of your board to insert the color desired.
- Click the "Export Colors" button to add multiple colors at once.
- Selecting the Color Picker tool water drop button will bring colors from the current frame to the current color presented on your list of colors.
- On the sidebar, there is a Color Picker tool that allows you to click on a colored pixel on your board that will switch your color instantly to the one that you clicked.
-
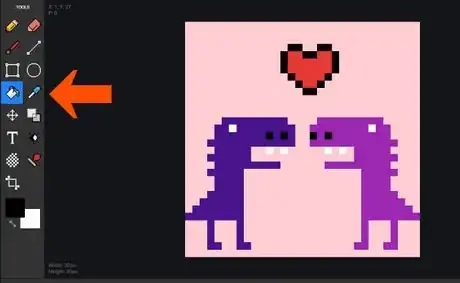
7Use the Bucket tool for filling. The Bucket tool is used to fill an entire area of space with one color. You can click on the Bucket tool and tap on the board to change its color completely. Certain spaces and shapes can also be filled in with the Bucket tool.
-
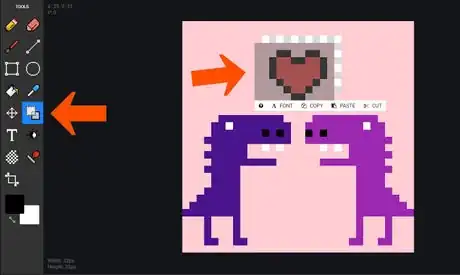
8Position your drawing by using the Move and Select tools. The Move tool carries your entire artwork from the page so it becomes moveable on wherever you place it. The Select tool allows you to snip a certain section off from your drawing and to move it around as desired. You also have the options to copy, paste, and delete the section you snip.
- Using the Select tool gives you more control over what to position on your board since the Move tool positions the entire board.
- You can use keyboard commands instead of the button options to copy, paste, and delete. Click Ctrl+C for copying, Ctrl+V for pasting, and Ctrl+X for deleting.
- While snipping using the Select tool, you will notice an option that says "Font". You can select this to assign a selection for a custom font.
-
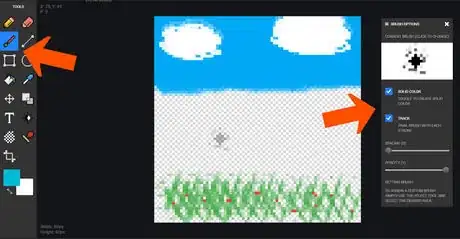
9Use the Brush tool to create brush strokes that are pixelated. Click and drag the tool around to apply it on your drawing. Use the Spacing and Opacity sliders to increase and decrease the position and opacity of the brush strokes you apply on your drawing.
- To assign a custom brush, you can use the Select tool to select the desired area that you would like to customize.
- Uncheck the box with the solid color option if you do not want to create a solid color for your drawing.
- Your brush automatically trails your brush with each stroke, but if you do not want that to happen, uncheck the box that says "Track".
-
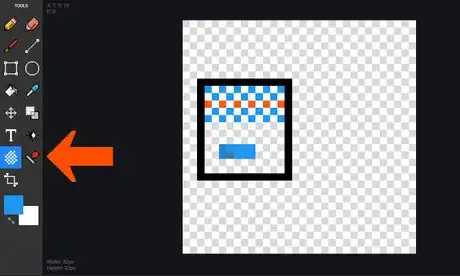
10Understand how to use Dithering tool and Lighten/Darken tool. The Dithering tool creates a pixel effect that skips some pixels to create a pattern. Click on the tool and use it to draw on the board. The Lighten and Darken tool changes the lighting of your pixel art, darkening it into another shade that gives it a new effect. Click on the tool and tap or drag it around to use it just like you would with any other tool.
-
11Experiment with the other tools on the side and top bar. Pixilart offers a variety of tools to use and experiment with when it comes to your pixel art. Check out the Stamp tool, the Resize Drawing Canvas feature, Layer Background feature, undo/redo buttons, full screen, and download option. You can also click on settings to see the other ways you can change or improve your experience while doing pixel art.
- The Stamp tool allows you to post pixel art stamps that may help you create your drawing. Search through them and click the one you would like to place on the board.
- Clicking the Resize Drawing Canvas button gives you the ability to change the sizing of your pixel board if you decide it needs to be switched.
-
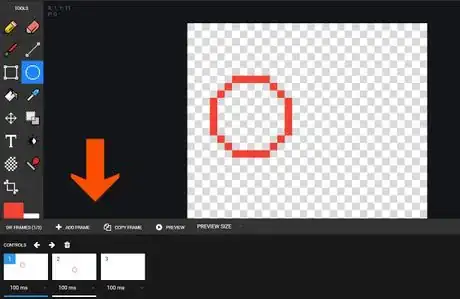
12Create GIF frames. The bottom of the screen will have the option to turn your pixel art into a GIF. Click the "Add Frame" button to add a new board. A slightly shaded sketch of your drawing will appear on the next slide, which can be used to redraw if needed. Multiple boards can be added to create the GIF you desire. Change the frame speed and size to match the action and position of what's taking place on your artwork.
- Click the "Copy Frame" button to duplicate and copy onto another slide.
- Use the arrow keys to go through each slide and the trash can button to delete a slide.
- The "Preview" button will allow you to see your GIF being played in action and get a better idea on how it's turning out while being created.
-
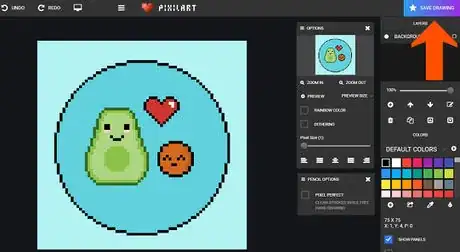
13Save your drawing when you are done. You will notice there is a colored button with a star that says "Save Drawing" on the top right side of the screen. This can be used to save your drawing when you are finished with it. Give your artwork a title and add a description to it if desired. Decide on your settings by selecting who can edit your drawing and who can view it. Once that's decided, click the blue "Save" button to confirm you are saving it.
- You will only have the ability to save your drawings if you are signed into your account.
- If you plan on editing your drawing later, save your drawing as .pixel to save it as a file. When you are ready to edit it again, find the file and transfer it back to Pixilart. Drawings never automatically save so make sure you save your artwork often.
- If your drawing is part of one of the daily challenges, hashtag it #challenge in your description box so it can be listed in all the other challenge drawings.
Advertisement
Part 3
Part 3 of 3:
Exploring Pixilart Further
-
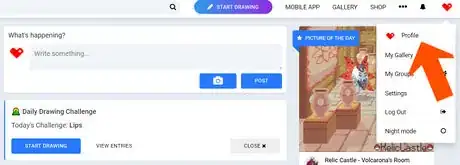
1Set up your profile. Go to your profile by clicking your user image and selecting the option "Profile". You will have the ability to change your profile photo and cover photo to whatever image you like as long as it follows Pixilart's Terms of Use.
- Although optional, you can also type your first and last name, write a description about yourself, and list your website if you have one. Click "Save Changes" when you are finished setting up your page.
- You have the option to wall post on your profile page which means you can post whatever you desire - whether it's about your artwork, pixel creations in progress, or personal life. Click on the area that says "Write something…" if you would like to post on your page. An image can also be attached to your post by clicking the camera right next to "Post".
- Remember that everything on your profile page is public and cannot be hidden. Post wisely and don't share information you wouldn't want others to know about.
-
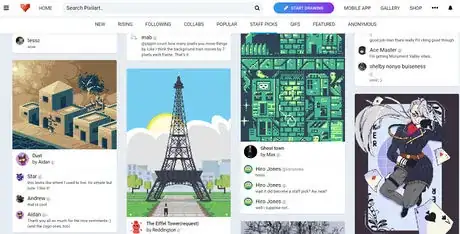
2Browse pixel artwork from other artists. Not only is browsing pixel art fun, but looking at others' work gives you inspiration for your own. Your homepage will always show artwork for you to browse. Look at the "Picture of the Day," which changes daily. Scroll down to see artwork that was chosen by staff to be posted. On the right side, you can find undiscovered pixel art to go through as well.
-
3Follow other artists. When you follow other artists, you get updates on their newest artworks and wall posts. To follow an artist, click on the name of an artist in order to be brought to their user page and click on the blue button that says "Follow".
-
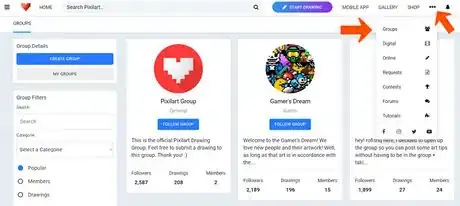
4Join or create a group. Groups give you the option to connect with other pixel artists that have similar styles or interests as you. Check out the groups there are available and follow the ones you have interest in to get updates on what's new.
- You can also make your own group by clicking the blue button that says "Create Group" and filling in the details about what your group is about.
-
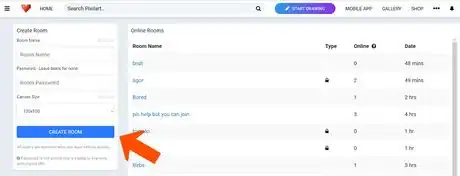
5Do a pixel art collaboration. Collaborations allow you to work with other pixel artists on a piece of artwork. Make an online room or join one with a friend if you plan on working together.
- You can also mark the collaboration option when you save a drawing so the user can edit the image with collaboration features.
-
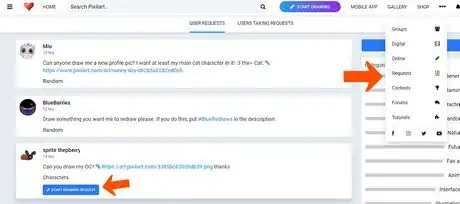
6Draw or make a request. There is a page open where you are welcomed to leave requests if you want someone to make a certain type of pixel artwork you have in mind. You may also answer someone's request by making the artwork they are requesting. Browse through the list of requests and check out the categories to find an artwork you would like to make.
- If you would like to make a request, click on the blue button that says "Create Requests".
-
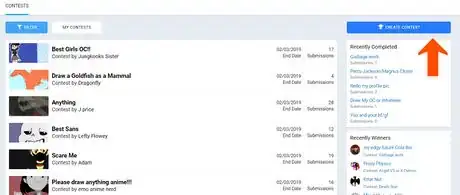
7Enter or create a contest. Contests allow you to bring your pixel art skills to a whole new level. Browse through the contests page and join a contest that interests you. They're a fun way to practice your skills in a challenging yet motivating way.
- If you would like to create your own contest, click the blue button that says "Create Contest". Decide on the details of your contest by filling in the entry and submitting it when you have completed it.
-
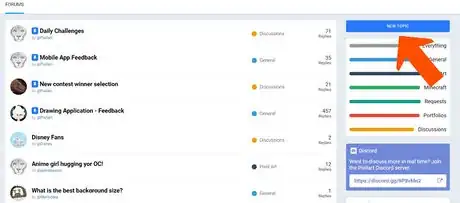
8Participate in the forums. The forums allow you to participate in art collabs, daily challenges, feedback on your work, and pixel art contests you may be interested in joining. You will be able to connect with other pixel artists and may be able to form friendships in some of the forums.
- Feel free to create your own forum as well by clicking the blue button that says "New Topic". Fill in the entry and then post it when you are done.
-
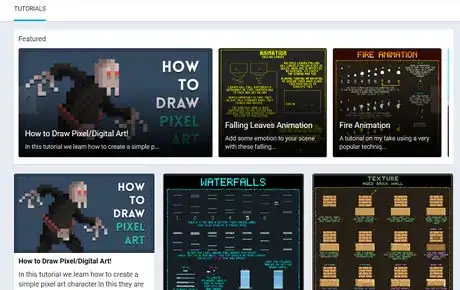
9Go through some pixel art tutorials. Pixilart gives you the option to look at art tutorials that offer tips on improving your pixel, digital, and traditional artwork. These tutorials can help improve your artwork and give you ideas for what to create.
- You can even add your own tutorial if you have art tips and techniques up your sleeve. Simply click on the blue button that says "Add Tutorial" and submit your entry for it to be added.
-
10Check out the pixel art shop. Discover the pixel art shop where people use their own pixel art creations to make their own merchandise such as shirts, mugs, bags, towels, wall art, phone cases, and much more.
- You can create your own product to sell or you can browse the store and buy items you like.
-
11Access the Pixilart mobile app. On your homepage, the top right side of the page will have an option that says "Mobile App". Learn more on how you can get access to the mobile version of the app by downloading it on Google Play or the App Store.
- The app is free and gives you the ability to use Pixilart whenever you carry your device around.
Advertisement
Community Q&A
-
QuestionHow do I change my profile picture?
 Ella CutburthCommunity AnswerIf you are using Google, you move your cursor onto your profile pic and then click. A little box should appear and a little thing on your profile pic should say "Change." After you hit that, your file tab should open. Select the photo you want and hit "Select."
 -
QuestionHow can I add a friend to my group?
 Community AnswerGo to Settings, Click "Friends" and then click "Add new." Enter the email address of the person you want to friend and then their username.
 -
QuestionI could go on someone's home page before, but now I can't! I can when logged in but not logged out. Did I do something wrong?
 Geoffrey TrevenaCommunity AnswerUnless someone has specifically blocked you or that person has deleted their account, there should be no reason that you can’t access someone else’s home page.
Advertisement
Warnings
- If you are under the age of 13, then you will be required to ask a parent or guardian for permission to use Pixilart.⧼thumbs_response⧽
- Please read the Terms of Use that Pixilart has on their website. This is so you can prevent accidentally getting into trouble.⧼thumbs_response⧽
Advertisement
About This Article
Advertisement

