This article was co-authored by Agustin Renoj. Agustin Renoj is a Home Improvement Specialist with Renoj Handyman based in the San Francisco Bay Area. With over 18 years of construction experience, Agustin specializes in carpentry, painting, and exterior, interior, kitchen, and bathroom renovations. Renoj Handyman is a family-owned business that consists of craftsmen trained in all areas of construction.
This article has been viewed 53,854 times.
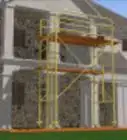
Masonry scaffolds make brick or block laying safer and more efficient when working higher than a mason can easily reach from the ground. Erecting and using scaffolds takes planning and careful implementation to make the work safe and productive. Here are some steps to help you to understand how it is done.
Steps
-
1Plan the scaffold project so that sufficient materials will be available for the job. Scaffold can be rented, or purchased if you will be able to use it for numerous projects. The basic parts of a scaffold system include these items:
- Scaffold jacks
- Stacking pins
- Leveling legs or base plates
- Braces
- Access ladders
- Scaffold boards
- Outriggers
- Various clamps and pins for assembly.
-
2Rent or purchase the items you will need for your project. There are a number of specialty rental companies that engineer and even assemble and disassemble scaffolding for projects. Having skilled workers erect the scaffolding is critical for safety and productivity, not to mention avoiding a possible fine by safety authorities like the OSHA (USA) or similar safety regulators.Advertisement
-
3Prepare the area where the scaffolding will be erected. The ground or surface it will be erected on should be as level as possible, and soils should be compacted and have sufficient drainage to support the scaffold, even in wet weather.
-
4Lay out the jacks according to the manufacturer's spacing, using adjustable support legs to make sure the first lift of jacks are level and plumb. Installing the first level of scaffolding correctly will make completing the scaffold easier, and ensure the finished scaffold system will provide a safe, stable work platform when it is finished.
-
5Install all braces and connectors prior to proceeding to the next tier of jacks. Ladders should be furnished for access to each scaffold level, and workers should be provided with personal safety equipment such as gloves, safety glasses, and fall protection during the erection process.
-
6Use scaffold boards to deck each level of scaffold before installing the next level. You may find you are able to install scaffold jacks with a minimal number of boards at each level, but since in normal masonry work there will be work to be performed from each level, having a complete deck will make stocking materials and accessing the work area safer and easier. Some things to consider when installing scaffold boards are:
- Use appropriate boards. Usually, scaffold boards are 2X10 (5x25cm) planks either grade-stamped number 1, laminated veneer lumber, or pinned scaffold boards.
- Lap scaffold planks 6 inches (15.24 cm) on each side crossing the top rail of the jacks. Standard jacks are spaced 7 feet (2.1 meters) on center, so 8 foot (2.4 meters) or 16 foot (5.33 meters) boards are standard.
- Cleat or nail boards together if necessary, to ensure they do not shift or slip during use.
- Discard any split, rotted, or damaged scaffold boards.
- Fit scaffold boards as tightly together as possible so that the materials will not fall through cracks to lower scaffold levels during use.
-
7Install safety features as soon as possible at each level of scaffold construction. Handrails, toe-boards, and access gates should be installed before workers are allowed to work without fall protection, and materials are stocked on the scaffold deck.
-
8Tie off tall scaffold structures to the adjacent structure to prevent the scaffold from falling. Depending on your location and work situation, government regulations may require scaffolds to be braced or supported before use. In the United States, the OSHA requires such bracing when a scaffold's height to width ratio 4 to 1 or greater. For example, a scaffold that is 5 feet (1.5 meters) wide has to be secured if it is 20 feet (6.09 meters) tall, or higher.
-
9Have the person responsible for overseeing the erection and use of the scaffold (under OSHA guidelines, this is the competent person) inspect the scaffold prior to use. Tags should be affixed at access locations and should include a daily inspection log that is signed and dated each day. Here are a few of the items which should be checked daily:
- Check the scaffold support sills for erosion, undermining, and other deterioration.
- Look for braces and support members which are damaged or have been removed during the previous shift.
- Check the condition of the scaffold planks, handrails, and toe boards.
- Make sure the work areas are clean and clear of debris.
- Look for any other obvious signs of damage or broken clamps, braces, or pins.
-
10Install outriggers and other accessories necessary for the work to be performed when needed. This will allow the workers to adjust the working height between each level, and enable them to work more efficiently.
-
11Stock the materials to be used from the scaffold on the scaffold deck. Large projects, and projects where large amounts of materials will be loaded at intervals, should have an access tower attached to the main scaffold system so that the weight of these materials will not be a hazard, and access for workers can be maintained on the scaffold deck. Avoid overloading scaffold decks. As a rule of thumb, any time the scaffold boards sag more than an inch (2.5 cm) or so, it is likely that they are overloaded.
-
12Perform the job the scaffold has been built for, whether laying brick or block, installing insulation, waterproofing, or stucco, painting and/or caulking.
-
13Dismantle the scaffolding when the job is finished. This is generally done in the reverse order of the assembly, and care should be taken to manage all materials so that they can be lowered safely to the ground. Cleaning loose debris and using buckets or bags to contain the small parts will help prevent items from being dropped where they may be damaged or lost, or workers could be injured.
-
14Clean up the area where the scaffolding was used and store the scaffold until it is needed again. Rented scaffold should be counted and returned to the company it was rented from, and any damaged or missing items should be reported.


Community Q&A
-
QuestionCan the masonry contractor use scaffold that only has 2 planks to stock materials on when the employees are working off an outrigger?
 Community AnswerTheoretically yes, but you're exposing workers as well as passersby to the risk of a fall. For safety's sake, it would be best not to.
 -
QuestionHow can you build scaffold on a steep pitch parking garage floor?
 Community AnswerGet the right scaffold from a scaffold company or renter. Or you'll need to cable around support columns if the garage won't let you screw into the floor.
Warnings
- The erection and disassemble of scaffold systems is dangerous, and should be done by experienced persons with qualified supervisory skills.⧼thumbs_response⧽
- Be especially careful when erecting and using scaffolds near areas where public traffic may be expected.⧼thumbs_response⧽
-
⧼thumbs_response⧽

Things You'll Need
- Scaffold jacks, braces, planks, and misc. pins and connectors.
- Ladders, safety gates, handrails, and toe boards.
- Shovels, hammers, tape measure, and carpenter's level.
- Anchoring wires or straps.
- Safety equipment such as fall protection, hard hats, gloves, and eye protection.


About This Article