This article was written by Chai Saechao and by wikiHow staff writer, Hunter Rising. Chai Saechao is the Founder and Owner of Plant Therapy, an indoor-plant store founded in 2018 based in San Francisco, California. As a self-described plant doctor, he believes in the therapeutic power of plants, hoping to keep sharing his love of plants with anyone willing to listen and learn.
There are 9 references cited in this article, which can be found at the bottom of the page.
Is your snake plant starting to look a little cramped inside its pot? Snake plants (sansevieria) are great low-maintenance plants for beginners since they don’t need a lot of light and water. Plus, you only need to repot them every few years so they’re a breeze to take care of. There are some tell-tale signs that your snake plant is ready to repot, and we’ll help you recognize them all. Keep reading for everything you need to know about when and how to repot your snake plants so they keep thriving.
This article is based on an interview with our plant specialist, Chai Saechao, owner of Plant Therapy. Check out the full interview here.
Things You Should Know
- Repot your snake plants every 3–5 years.
- Look for roots growing out of the drainage holes or cracks in the pot, which are signs that it’s time to repot your snake plant.
- Use a pot that’s 2 in (5.1 cm) bigger than the old one. Fill in around the roots with cactus potting mix.
Steps


Repotting
-
1Use a pot with drainage holes that’s 2 in (5.1 cm) larger than the old pot. You can use any type of pot as long as it has holes for water to drain out of the soil. Pick one that’s at most 2 inches (5.1 cm) larger than your last pot since adding more soil than that could hold too much moisture for the roots.[5]
- Snake plants grow snugly in their containers after a few years, so ceramic or clay containers may develop small cracks. As long as you repot your snake plant when it’s ready, your pots won’t break.
-
2Fill the bottom of the pot with cactus potting mix. Use a well-draining potting mix made for cacti and succulents so it doesn’t hold water. Pour in about 1–2 inches (2.5–5.1 cm) of the potting mix into your pot so your snake plant’s roots have some room to grow in.[6]
- If you don’t have cactus potting mix, make your own by combining 1 part standard potting mix and 2 parts perlite or orchid bark to help improve drainage.
- Avoid using soil from your garden or yard since it can contain bacteria or fungi that kill your plant.
-
3Pull your snake plant gently out of its pot. Run a blunt butter knife or trowel around the edge of the pot to help loosen up the roots and soil. Hold the base of your snake plant and gently pull it up and out of the pot. Brush off any loose potting mix that’s stuck in the roots.[7]
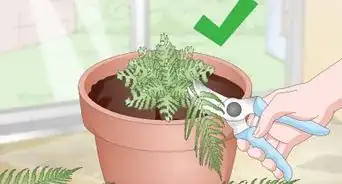
- If you want to propagate your snake plant, separate 1–2 of the plant’s rhizomes, which are the underground stems connecting to the leaves, and pot them separately. Otherwise, you can leave them attached to your snake plant so it grows larger.
-
4Put your snake plant in the new pot with more soil. Set the snake plant’s root ball in the middle of the new pot so the bases of the leaves are just below the rim. Fill in around the snake plant with more potting mix, leaving about 1 inch (2.5 cm) of space between the surface and the top of the pot.[8]
-
5Water your snake plant. After your snake plant is happy in its new pot, use a watering can to lightly wet the soil so it makes good contact with the roots. When you see the water coming out from the drainage holes in the bottom of the pot, let it drain out completely.[9]
- After that, keep your snake plant in bright indirect light during the day to help it thrive.


Warnings
- Snake plants are sensitive to overwatering, especially after you repot them. Only water your plant every 2 weeks or so when the soil feels dry.⧼thumbs_response⧽


References
- ↑ https://extension.psu.edu/snake-plant-a-forgiving-low-maintenance-houseplant
- ↑ https://youtu.be/mvNYP_5y8ps?t=212
- ↑ https://hortnews.extension.iastate.edu/growing-succulents-indoors
- ↑ https://extension.psu.edu/repotting-houseplants
- ↑ https://extension.psu.edu/snake-plant-a-forgiving-low-maintenance-houseplant
- ↑ https://youtu.be/mvNYP_5y8ps?t=359
- ↑ https://youtu.be/fgkE45Q0W5w?t=165
- ↑ https://extension.psu.edu/repotting-houseplants
- ↑ https://youtu.be/mvNYP_5y8ps?t=604
About This Article