X
wikiHow is a “wiki,” similar to Wikipedia, which means that many of our articles are co-written by multiple authors. To create this article, volunteer authors worked to edit and improve it over time.
This article has been viewed 75,469 times.
Learn more...
As temperatures outside drop below the freezing point of water, water in your sprinkler system pipes can freeze into ice and expand, causing your pipes to burst as a result. You need to winterize your sprinkler system to prevent this from happening.
Steps
Method 1
Method 1 of 3:
Blow Out
-
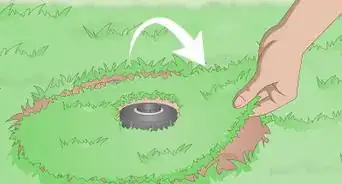
1Shut off the water supply. Turn the water supply off at the main water valve to prevent more water from entering the system. After completing this step, all you need to do is drain the water already inside the system.
- The shut off valve for your sprinkler system should be located in an area that is unable to freeze over. Usually, it will be located inside the home, in a basement, garage, or utility closet.
- In some cases, a stop and waste valve will be located underground. It can be as deep as 5 feet (1.5 m) down, so you may need a long key to turn it.
-
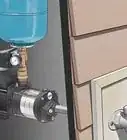
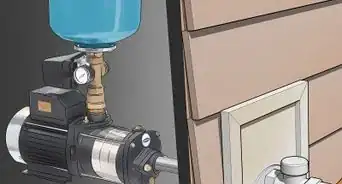
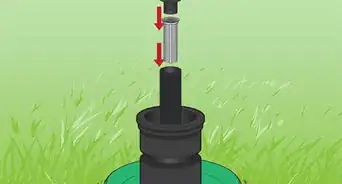
2Attach a compressor to the mainline. Hook up a small compressor to the mainline with a quick coupler, hose bib, or other type of connection, as determined by the connection located after the backflow device.
- You will need a compressor with a CFM (cubic foot per minute) rating of 80 to 100 for any mainline with a diameter of 2 inches (5 cm) or less.[1] Rent the equipment at an equipment rental yard.
- Note that a small shop compressor will not have enough air to do the job right.
- If you have the original layout for your sprinkler system and it shows the GPM (gallons per minute) running through each sprinkler head, divide the total GPM of each section or zone by 7.5. This calculation will give you the exact CFM you need to blow the system out.[2]
- Do not fully charge the holding tank before releasing the pressurized air into the compensator as a way of compensating for less CFM. Only perform this method if you find a compressor with the right amount of CFM.
- Make sure that the compressor valve is in the closed position as you attach the hose to the fitting. Both valves on the backflow preventer should be closed, as well.
- Do not blow compressed air through the backflow device.
- Take extra precaution when using highly compressed air. Compressed air can lead to injury and damage, especially if used improperly.
Advertisement -
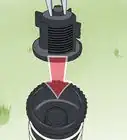
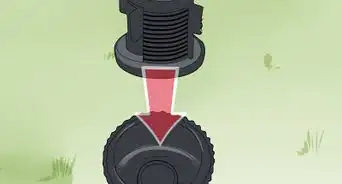
3Activate the furthest station. This station should be on the controller that is in the zone furthest away from the compressor, or the sprinklers at the highest elevation away from the compressor.
-
4Close the backflow isolation valves and open the compressor valve. Once the backflow valves are closed, slowly open the valve on the compressor to slowly allow air to fill the sprinkler system.
- The blow out pressure should always remain below the maximum operating pressure of the lowest pressure rated component in your system. It should also never exceed 80 PSI for PVC pipe systems, or 50 psi for flexible black polyethylene pipe systems.
-
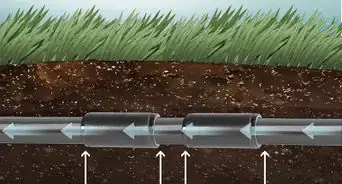
5Activate the remaining stations. Work your way along the system, slowly activating each station or zone. Activate the stations furthest from the compressor first before working your way to the closest station.
- You should activate each station until no additional water can be seen draining from the sprinkler heads. This can take about two minutes, if not longer, per station.
- Consider using two or three short cycles per station rather than one long cycle. If it seems to take longer than two minutes to drain the water for each station, you may need to deactivate the stations early and repeat the procedure two or three times.
- As soon as a station is dry, you should stop blowing air through the pipe. Blowing compressed air through a dry pipe can create friction and heat, which could damage the pipe.
- Never run the compressor without having at least one station valve open.
- You should only run air through one zone or section at a time. If you attempt to do more than that, the excess velocity of the air can add friction and heat to the pipe and fittings, which could cause them to melt.
-
6Shut off the compressor. As soon as the systems have all been dried, disconnect the compressor from the system. Delaying can cause damage to your pipes.
- Open the valves on the system to release any excess air pressure.
-
7Remove excess water from the system. If the sprinkler system has a backflow device with ball valves, open and close the isolation valves on the device a few times to force any trapped water to escape.
- Leave these isolation valves open at a 45 degree angle and open the test cocks on the system.


Advertisement
Method 2
Method 2 of 3:
Manual Drain
-
1Shut off the water supply. Head to the main valve and turn the water supply off at the source. This will prevent more water from entering the system so that all you need to do is drain the water already inside.
- The shut off valve for your sprinkler system should be located in an area that will not be able to freeze over. Oftentimes, the valve will be located inside, in a basement, garage, or utility closet.
- In some cases, a stop and waste valve will be located underground. It can be as deep as 5 feet (1.5 m) down, so you may need a long key to turn it.
-
2Open the manual drain valves. These valves should be located at the end points and low points of your sprinkler system's piping. After opening the valves, the water in the mainline of the system should drain out on its own.
-
3Drain the remaining water between the shut off valve and backflow device. After the mainline finishes draining, open either the boiler drain valve or the drain cap on the stop and waste valve. Open all the test cocks on the backflow device, as well.
- Your system will either have a boiler drain valve or a drain cap on a stop and waste valve. It will not have both. The option it does have will vary depending on which option is used in your area, so you can check with neighbors or a local professional to find out which you can expect to find.
-
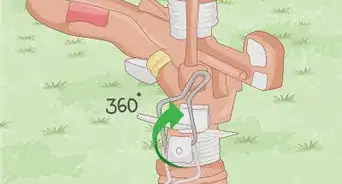
4Pull up on the sprinklers. If the sprinklers in your system have check valves, you will need to pull up on the sprinklers so that the water can drain out of the bottom of the sprinkler head.
- Most sprinklers will have check valves. If yours does not, however, you will need to hope that the water can completely drain out of the other valves along the system instead.
-
5Watch out for excess water. If the location of your drain valves are not positioned well, there could be some water remaining in the backflow, piping, or sprinklers even after you complete this method.
- If you want to get at any remaining, trace amounts of water, you could try to suck the water out with a wet/dry shop vac.
-
6Close the manual drain valves after draining the water. It may take several minutes for the water to completely drain out of the backflow, piping, and sprinklers. Once the water finishes draining, you should close all the drain valves you opened previously.


Advertisement
Method 3
Method 3 of 3:
Automatic Drain
-
1Shut off the water supply. Locate the main valve of the system and turn the water supply off from there. Doing so prevents more water from entering the system, so all you need to do is drain the water already inside.
- The shut off valve for your sprinkler system should be located in an area that is not prone to freezing. Oftentimes, it will be located inside, like in a basement, garage, or utility closet.
- The valve will either be a gate/globe valve, ball valve, or stop waste valve.
- In some cases, a stop and waste valve will be located underground. It can be as deep as 5 feet (1.5 m) down, so you may need a long key to turn it.
-
2Activate a station. Turn one of the systems or sprinkler heads along the mainline. This will relieve the pressure within the system, thereby preventing any pipes from bursting or cracking.
- Note that this method is used when automatic drain valves are located at the end points and low points of your system's piping. These valves automatically open and drain water once pressure in the piping is less than 10 PSI. As such, you need to prompt the pressure to drop before the valves will open, which is another reason for activating one of the systems along the mainline.
-
3Drain the remaining water between the shut off valve and backflow device. When the mainline finishes draining, you will need to open either the boiler drain valve or the drain cap on the stop and waste valve. Open all the test cocks on the backflow device, too.
- Your system will either have a boiler drain valve or a drain cap on a stop and waste valve, depending on the type usually installed in your area. It will not have both. Check with neighbors or a local sprinkler installation professional to find out which you can expect to find.
-
4Pull up on the sprinklers. The sprinklers in your system may have check valves, and if they do, you will need to pull up on the sprinklers so that the water can drain out of the bottom of the sprinkler body.
- Most sprinklers will have check valves. If yours does not, however, you will need to hope that the water can completely drain out of the other valves along the system instead.
-
5Be aware of possible remaining water. If the location of your drain valves are not positioned well, there could be some water remaining in the backflow, piping, or sprinklers even after you complete this method.
- If you want to get at any remaining, trace amounts of water, you could try to suck the water out with a wet/dry shop vac.


Advertisement
Community Q&A
-
QuestionI have been told I have automatic drains. I shut off the main water supply to the system. Then, I was told to go to the sprinkler box with all the valves and solenoids, and to open up the small plugs and allow the water to flow out. Is this correct?
 Community AnswerYep, it should be. Try it and see if what you were told happens. If someone knows all about your exact system, it seems best to take their advice.
Advertisement
Warnings
- If you do not know which type of water removal system your sprinkler system was installed with, it is best to use the blow out method to winterize the system. This method is the most thorough.⧼thumbs_response⧽
- Do not stand over irrigation components, like the pipes, sprinklers, or valves, while using the blow out method.⧼thumbs_response⧽
- If you do choose to winterize your sprinkler system on your own, wear ANSI-approved safety eye protection, especially if using the blow out method.⧼thumbs_response⧽
- It is strongly advised that you consult or hire a professional to winterize your sprinkler system. The intense pressure involved can cause serious injury or damage if something goes wrong during the process, and a professional is less likely to make a mistake than a novice.⧼thumbs_response⧽
Advertisement
Things You'll Need
- Air compressor
- Safety goggles


References
About This Article
Advertisement