This article was co-authored by Christopher Lanier. Christopher Lanier is a handyman and the owner and operator of Watson & Company Handiworks, a handyman business in Austin, Texas. With over three years of experience, Christopher specializes in outdoor light installation, furniture assembly, TV mounting, and window treatment installation. Christopher holds a Bachelor’s degree in Business Administration from the University of Texas at Austin. Watson & Company Handiworks is rated as a Top Pro by Thumbtack.
This article has been viewed 110,235 times.
From humidity, to loose screws, to a settling foundation, a variety of factors can cause a sagging door.[1] A sagging position can create gaps, allowing drafts to blow through, or prevent it from lining up with the latch plate and closing correctly. The typical fix for a sagging door is to remove it from the frame, sand or plane, then refinish and repaint. However, this solution can be time consuming and a lot of work. Worse, if you sand or saw too much of the door during a humid season, you could be stuck with large gaps when it becomes less muggy. Before taking your door off its hinges, try some tricks to fix a sagging door, and potentially save time, work, and frustration.
Steps
Inspecting the Door, Hinges, and Frame
-
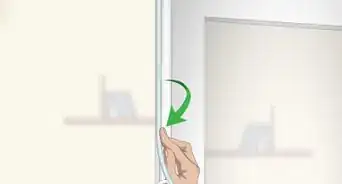
1Find the sagging door’s cause. Inspect the door from inside, or the side from where you can see the hinges. Locate the gaps and where the door is tight. It’s common in sagging doors for the hinge side at the bottom to be tighter against the frame. The opposite side, or strike side, is often gapped at the top and tight where the door meets the sill.[2]
-
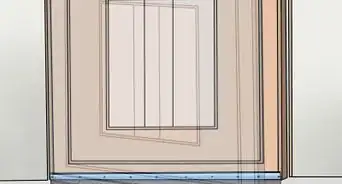
2See if the door and frame are level. Use a bubble level and carpenter’s square to determine if the door frame itself is level. Hold the bubble level against the door jamb’s left and right sides and top, and check to see if the bubble settles between the viewer’s two lines. You can hold the carpenter’s square, or steel square, to the door jamb’s four corners to determine if they deviate from 90 degrees.
- You might find that the door is level, but the frame is off square. If the frame is out of square, you might have other problems, like a shifted wall or settling foundation.
- In this situation, you might find planing to be your only solution.
Advertisement -
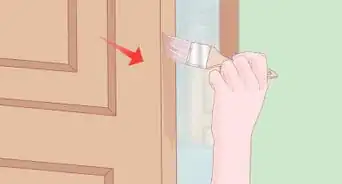
3Check and tighten all hinge screws. With the door open, and starting with the top, see if the hinges and screws are still tightly embedded in the door and jamb. Use a screwdriver, not a drill, to tighten all the screws, but take care not to overtighten them. If the screws give your driver resistance and the hinges are securely in place, they’re tight. Overtightening could strip the holes or push the door further out of alignment.


Replacing and Adjusting Hardware
-
1Look for and fill stripped holes. If you find a stripped hole, place a doorstop under the open door to hold the temporary drop of the weight. Remove the hinge with the stripped hole by removing the screws holding it in place from the door jamb and frame, and if necessary, from the door’s face. Dip an appropriately sized dowel into carpenter's glue and insert it into the hole – you can find these at any large hardware store. When the glue dries, predrill a hole with an appropriately sized bit, then replace the hinge and its screws.
-
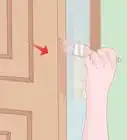
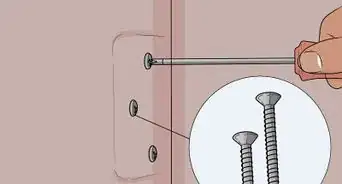
2Replace short hinge screws with longer ones. If you’ve gone through a basic check and tightened hinges, but your door still sags, your screws might not be long enough. Remove a screw from the top hinge. If it’s not 2 1/2 to 3 inches long, the screw won’t be able to reach the wall stud through the jamb and the door’s weight won’t be fully supported. Remove the old screws and pre-drill into the jamb and wall stud before replacing them with longer ones.[3]
- Check the level of the door after replacing each screw.
- When the longer screw catches the wall stud, it should pull the door inward. Make sure not to over-tighten.
-
3Add shims between the hinge and the doorjamb. Make shims with thin pieces of cardboard, wood, or playing cards to fit between the hinge and jamb and help align the hinge and door. Remove the appropriate hinge, often the top hinge, and trace and cut out its shape from your shim material. Use the thinnest materials possible so you can add layers to the hinge mortise one at a time until the door is level again.[4]
- You might have to install shims on more than one hinge. This technique involves some guess and check work. Adding or subtracting shims until the door is square might be necessary after each shim adjustment.
-
4Mortise the door hinge. Alternatively, you can also “mortise” one or more of the hinges. For this, you’ll need to score an outline around your hinge before removing it. Then, once you’ve taken off the hinge, you’ll carve out a deeper new pocket with a chisel.[5]
- First, score the outline of the hinges you want to mortise with a utility knife. Remove the hinges.
- Take the chisel and position it on the scored line perpendicular to the door jamb. Lightly tap the chisel to deepen the scoring a bit. Do the same around the whole perimeter.
- Once you’ve finished the perimeter, use the chisel to make a series of cuts about 1/8 inch apart. The mortise depth will depend in part on how much the door sags. You want to adjust it so the hinge is mounted flush with the door.
- Last, hold the chisel flat and tap it to clear out the waste. Replace the hinge


Sanding or Planing the Door
-
1Scribe the door. If you’ve tightened or replaced screws, filled stripped holes, and tried shims, but the door still sags, you’ll have to plane or sand. Scribing, or marking, the door will give you the line at which you stop removing wood by planing or sanding. First, use a carpenter’s compass to draw a line an 1/8 inch from the edge on the side of the door that rubs against the jamb. Trace the line with masking or painter’s tape to make it more visible.[6]
- A carpenter’s compass is the easiest tool to use, and is inexpensive. If one’s not handy, use a pencil and straightedge.
- Fix the masking tape to inside of the line you marked off: for example, if you scribed the left side of the door, fix the tape to the right side of the line.
-
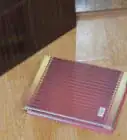
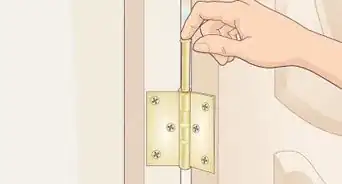
2Remove the door. You don’t need to bother with unscrewing the hinges from the door face. You’ll be sanding or planning the strike edge rather than the hinge, so just pop the hinge pins and remove the door. Take the door to an open area, like a garage, and store it on a level surface, like sawhorses or a worktable.
-
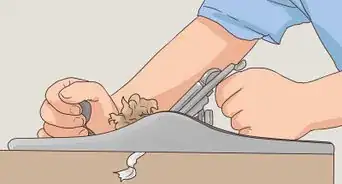
3Sand or plane the scribed edge. Using a belt sander is a great option. For the first 1/16 inch, use an 80-grit sanding belt. Keep the sander moving so you don’t wear a hole in one spot. Switch to 150-grit for the second half, then a 120-grit belt when you’ve gotten to the line in order to smooth it out.[7]
- Remember, the humidity that causes the door to swell and stick at the bottom may disappear and leave the door too short during dry spells. Don’t remove too much of the door.
- You might reattach the door and find you haven’t planed enough, in which case you’ll have to repeat the process one or more times. Remember you can take away more door but you cannot put back what you’ve already removed, so sand carefully.
- The planer works faster than the belt sander. It also will make larger sawdust that you are less likely to breathe and easier to cleanup, because it does not float so far away in the air. You can also use the planer on the door, without removing it, if it sticks on the top side or the side of the knob.
- If you’re sanding the latch edge of the door, be sure to first remove the latch hardware. You may have to use a sharp chisel to dig out the latch hole so it doesn’t protrude from the door after planing. If it sticks out a bit, you can often sand or plane it down in place.[8]
-
4Refinish and repaint the sanded edge. When you’ve determined that the door has been properly planed, remember to refinish and repaint the raw edge. Don’t do so until you’re sure you’ve finished sanding. A coat of varnish and paint will help prevent moisture from penetrating the wood, so you’ll be far less likely to have to fix a sag in the future.


Expert Q&A
Did you know you can get expert answers for this article?
Unlock expert answers by supporting wikiHow
-
QuestionWhy won't my door close?
 Christopher LanierChristopher Lanier is a handyman and the owner and operator of Watson & Company Handiworks, a handyman business in Austin, Texas. With over three years of experience, Christopher specializes in outdoor light installation, furniture assembly, TV mounting, and window treatment installation. Christopher holds a Bachelor’s degree in Business Administration from the University of Texas at Austin. Watson & Company Handiworks is rated as a Top Pro by Thumbtack.
HandymanTry troubleshooting by starting with the simplest causes first and working your way out. You don't want to do an extensive fix if that's not the problem. Check to see that your foundation hasn't shifted. If you've had lots of bad weather recently, humidity can cause things to shift a little bit. You should also check the hinges and make sure all the screws are tightened.
Support wikiHow by unlocking this expert answer.
Warnings
- Be careful when handling power tools and sharp objects.⧼thumbs_response⧽
- Wear protective goggles when using sanding equipment.⧼thumbs_response⧽
Things You'll Need
- Bubble level
- Screwdriver
- Wooden dowels
- Carpenter's glue
- 2 1/2-inch or 3-inch screws
- Drill
- Shims
- Carpenter’s compass
- Sandpaper
- Belt Sander & Belts
- Wood filler
- Varnish
- Paint


References
- ↑ Christopher Lanier. Handyman. Expert Interview. 25 August 2020.
- ↑ http://www.home-repair-central.com/adjusting-entry-doors.html
- ↑ http://www.familyhandyman.com/doors/repair/fix-sagging-or-sticking-doors/step-by-step
- ↑ https://www.thisoldhouse.com/how-to/how-to-repair-skewed-door
- ↑ https://www.todayshomeowner.com/video/how-to-cut-mortises-for-door-hinges-with-a-chisel/
- ↑ http://www.familyhandyman.com/doors/repair/fix-sagging-or-sticking-doors/step-by-step
- ↑ http://www.familyhandyman.com/doors/repair/fix-sagging-or-sticking-doors/step-by-step
- ↑ http://www.familyhandyman.com/doors/repair/fix-sagging-or-sticking-doors/step-by-step
- ↑ Christopher Lanier. Handyman. Expert Interview. 25 August 2020.
About This Article