This article was co-authored by Ryaan Tuttle. Ryaan Tuttle is a Home Improvement Specialist and the CEO of Best Handyman, Inc. in Boston, Massachusetts. With over 17 years of experience, he specializes in building home service businesses, focusing on creating scalable and efficient brands. With the help of his global team, the companies have achieved over 10+ million in sales and received recognition through magazine features, and enjoy partnerships with wikiHow and Jobber field service software. Boston Magazine and LocalBest.com have named Best Handyman Boston the Best Handyman in Boston. Ryaan holds Construction Supervisor and Home Improvement Contractor Licenses.
This article has been viewed 60,770 times.
In addition to being noisy and irritating, a misaligned or broken storm door can wear at the door frame and paint of your house. If your storm door requires pulling to close or won’t close at all, you likely need to adjust the door in some way. Usually, you can solve this problem by realigning the frame or adjusting the pneumatic closer.
Steps
Realigning the Trim and Frame
-
1Open the door from the outside and move it up and down. This will show you if the frame or trim of the door needs to be secured. Focus your attention on the hinge side of the door frame to see if there’s any movement of the wooden trim or frame.[1]
-
2Secure the wooden trim with extra nails. You can use a hammer and nails to secure the top of the trim if it’s sagging. If the sides are lifting, you can also secure them with additional nails after you have addressed the top of the trim. Place nails 2 to 3 inches (5.1 to 7.6 cm) apart and hammer into the trim gently.[2]Advertisement
-
3Place a wooden shim between the door and the frame. This will ensure that the door and the frame will stay in place while you adjust the frame. It’ll also keep the door from swinging open and potentially hitting you while you’re working![3]
-
4Tighten the existing screws in the frame using a screwdriver. These will likely be located all around the door. Make sure you tighten every existing screw, then take the shim out and test if the door is still unsteady. If it is, you will need to replace the shim and add more screws.[4]
-
5Drill additional holes for new screws. Place 2-3 new holes at the top of the frame on each of the sides and in the middle for added support. Start by using a 3/16-in bit to drill into just the metal frame. Then, use a 3/32-in bit to complete the hole by drilling into the wood.[5]
-
6Secure 8 by 1 inches (20.3 cm × 2.5 cm) pan head screws into the new holes. It’s best to use stainless steel screws, which you can find at any home improvement store, because they will hold up best in the weather. Drill the screws into the holes, remove the shim and test the stability of the door again.[6]
- If it still isn’t steady, add additional screws to the sides of the frame, working from top to bottom and testing the door as you work.


Adjusting the Pneumatic Closer
-
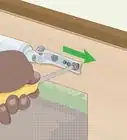
1Turn the closing rate adjustment screw to fix slamming or slow closing. This small screw controls how quickly or slowly the door will close. It’s located on the closing arm near where it is mounted to the door. Turning the screw clockwise will slow down the closing rate to prevent slamming, and turning counterclockwise will increase the closing rate.[7]
-
2Adjust the mounting of the closing arm if the door is not latching. You can add extra force to the door closing mechanism by adjusting where it is mounted to the door. Most brackets will have additional holes on either side to do exactly this. Simply unscrew where the arm is attached to the door. Move the arm away from the hinges and screw it into the next hole.[8]
-
3Check the range of the door. Once you’ve moved the mounting, make sure the door opens far enough on the outside. Sometimes, moving the arm will make the door open slightly less, so you will need to make sure there is enough space to get in and out of the door.[9]
-
4Buy a new pneumatic closer if other adjustments don’t work. Simply unscrew the mounting hardware that holds the broken closer in place. Take the old closer to the home improvement store with you, and ask an employee to help you find a match for it.[10]
-
5Replace the hardware on the door if necessary. If the new closer that you purchased isn’t an exact match and comes with new hardware, you can replace the hardware on the door. Align the new pieces in the same places as the old hardware to avoid drilling new holes.[11]
-
6Slide the “hold-open” washer onto the longer end of the closer. This part allows you to hold the door open if necessary. It shouldn’t need any additional adjustments and will be relative loose around the protruding end of the closer.[12]
-
7Line up the closer with the jamb bracket and insert the anchor pin. This will attach the closing arm to the frame of the door. You might have to tighten nuts on either side of the anchor pin, and you can do this using your hand or a wrench.[13]
-
8Mark where the mounting hardware will be attached to the door. Make sure the door is closed when you do this. If you have an exact match of your previous closer, you will likely be able to use the same holes. If you have a different one, you might need to drill new holes. Mark where the hardware will attach to the door and drill holes in those places.[14]
-
9Tighten the screws to secure the hardware to the door. Make sure the door is closed and locked while you do this to prevent it from swinging open when you press the screwdriver into the door. This is where the closer will attach to the door on the opposite side.[15]
-
10Align the closer with the new hardware and insert the other anchor pin. Again, you may have to tighten nuts on either side of the pin with a wrench or your hand.[16]
-
11Test the door to make sure it opens and closes properly. The door shouldn’t slam or close too quickly or rub against the frame. If the door doesn’t close properly, or is slamming, adjust the closing rate screw and try again.
- If the door is rubbing against its frame after securing the trim and frame, it may be that your house has settled and the doorway is crooked. If this is the case, call a contractor to come check the doorway and estimate the cost of fixing it.


Maintaining Your Storm Door
-
1Check the trim and frame every 2-3 months. If you have previously secured the trim or frame of your storm door, check that it hasn’t come loose. If you catch the problem early, you can avoid having to add new screws to your frame or nails to the trim by tightening and securing the ones that you have in place.
-
2Apply WD-40 or 3-in-1 oil to the hinges to keep the door swinging smoothly. If your storm door creaks while it opens and closes, or is difficult to swing open or closed, applying lubrication to the hinges can help.[17]
- Apply these oils sparingly and wipe off any excess afterwards, as they can attract dirt and dust.
-
3Clean your storm door every 1-2 months. If you live in an area with a lot of wind, rain, snow, or dust, you should clean your storm door often. You can wipe down the door with soap and water, and clean any glass with glass cleaning solution. If you have a screen in your door, you can vacuum the screen clean. Make sure you wipe door dry after cleaning to avoid rusting.[18]
-
4Paint the door if it is aluminum. If your door is looking dull and less than ideal, you can paint it using exterior spray paint. Start by lightly sanding the door with 300-500 grit wet-dry sandpaper, wipe the door with soap and water, and then rinse with water. Once the door is dry, you can spray paint it, using multiple coats to achieve your ideal color.[19]
- Make sure you remove or cover any glass or screen panels before painting.


Things You’ll Need
Realigning the Trim and Frame
- Hammer
- Nails
- Drill
- 3/16-in drill bit
- 3/32-in drill bit
- 8 by 1 inches (20.3 cm × 2.5 cm) pan-head screws
Adjusting the Pneumatic Closer
- Screwdriver
- Drill
- Pneumatic closer and hardware
Maintaining Your Storm Door
- WD-40 or 3-in-1 oil
- Soap
- Water
- Glass cleaner solution
- 300-500 grit wet-dry sandpaper
- Exterior spray paint


Expert Interview
Thanks for reading our article! If you'd like to learn more about door maintenance, check out our in-depth interview with Michiko Takatani.
References
- ↑ https://www.familyhandyman.com/doors/screen-door-repair/how-to-adjust-storm-doors/view-all/
- ↑ https://www.familyhandyman.com/doors/screen-door-repair/how-to-adjust-storm-doors/view-all/
- ↑ https://www.familyhandyman.com/doors/screen-door-repair/how-to-adjust-storm-doors/view-all/
- ↑ https://www.familyhandyman.com/doors/screen-door-repair/how-to-adjust-storm-doors/view-all/
- ↑ https://www.familyhandyman.com/doors/screen-door-repair/how-to-adjust-storm-doors/view-all/
- ↑ https://www.familyhandyman.com/doors/screen-door-repair/how-to-adjust-storm-doors/view-all/
- ↑ https://www.naturalhandyman.com/iip/infxtra/infsto.html
- ↑ https://www.naturalhandyman.com/iip/infxtra/infsto.html
- ↑ https://www.naturalhandyman.com/iip/infxtra/infsto.html
- ↑ https://www.naturalhandyman.com/iip/infxtra/infsto.html
- ↑ https://www.bobvila.com/articles/how-to-replace-a-door-closer/#.Wm9eXWQ-cb0
- ↑ https://www.bobvila.com/articles/how-to-replace-a-door-closer/#.Wm9eXWQ-cb0
- ↑ https://www.bobvila.com/articles/how-to-replace-a-door-closer/#.Wm9eXWQ-cb0
- ↑ https://www.bobvila.com/articles/how-to-replace-a-door-closer/#.Wm9eXWQ-cb0
- ↑ https://www.bobvila.com/articles/how-to-replace-a-door-closer/#.Wm9eXWQ-cb0
- ↑ https://www.bobvila.com/articles/how-to-replace-a-door-closer/#.Wm9eXWQ-cb0
- ↑ https://www.familyhandyman.com/doors/repair/how-to-silence-a-squeaking-hinge/view-all/
- ↑ https://www.4feldco.com/articles/how-to-clean-a-screen-door/
- ↑ https://www.washingtonpost.com/lifestyle/home/how-to-make-an-old-storm-door-look-new-again/2017/11/03/48af1ef4-bb4b-11e7-9e58-e6288544af98_story.html?utm_term=.b6be20ca36a5
About This Article