This article was co-authored by Ed Kuoha. Ed Kuoha is a Chef and the Owner of Kuoha Culinary based in Aiea, Hawaii. He has more than 20 years of experience in various culinary kitchens and settings such as Morimoto Waikiki, where he received hands-on training from Iron Chef Morimoto. Chef Ed specializes in small catering events and private chef requests. He holds an Associate’s degree from The Culinary Institute of the Pacific at Kapiolani Community College.
There are 12 references cited in this article, which can be found at the bottom of the page.
This article has been viewed 21,221 times.
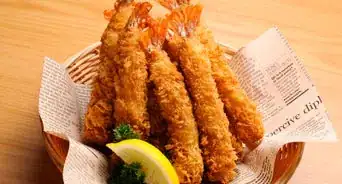
For a quick and easy meal, bake some shrimp in the oven. Frozen shrimp is often cleaned before it is packaged, so you don’t even have to spend time deveining and peeling unless you want to use fresh shrimp. After a short time in the oven, the juicy shrimp can be eaten as is or mixed into a bowl of pasta.
Ingredients
- 1 lb (0.45 kg) of uncooked shrimp
- 1 US tbsp (15 mL) of olive oil
- 0.10 oz (2.8 g) of salt
- 0.10 oz (2.8 g) of pepper
Makes 4 servings
- 1 lb (0.45 kg) of uncooked shrimp
- 1⁄2 c (120 mL) of olive oil
- 2 US tbsp (30 mL) of lemon juice
- 1 US tbsp (15 mL) of honey
- 1 US tbsp (15 mL) of soy sauce
- 1 oz (28 g) of Cajun seasoning
- 0.15 oz (4.3 g) of cayenne pepper
Makes 4 servings
- 2 lb (0.91 kg) of uncooked shrimp
- 2 sticks of butter
- 2 oz (57 g) of fresh parsley
- 4 cloves of garlic, peeled
- 1 lemon, juiced
- 0.10 oz (2.8 g) of salt
Makes 8 servings
Steps
Peeling and Deveining Shrimp
-
1Thaw the shrimp in the refrigerator for a day. Take frozen shrimp out of your freezer a day before you need to cook it. When it is ready to be cooked, it will feel soft and bendable rather than solid and frozen.[1]
- You can also thaw frozen shrimp by placing them in a colander and rinse them with cold water for about 5 minutes.
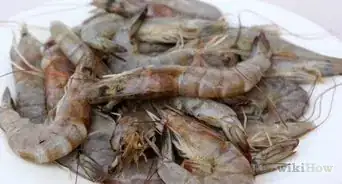
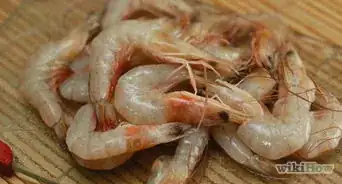
- Frozen shrimp often comes peeled and deveined. For this variety, skip to the cooking process after thawing. Fresh shrimp may have the head, legs, and tail still on, so you will need to do a little extra work.
-
2Tear off the shrimp’s head by pulling and twisting it. Place your fingers near the shrimp’s head, about ⅔ of the way along its body. Position the shrimp so the tail points towards your palm. Use your other fingers to pinch the head, then twist it to the side and pull down to pop it off.[2]
- You can also cut the head off with a sharp knife. Cut right behind the point where the head attaches to the body.
- If you want to prepare the shrimp with the head, go to the back part of the shrimp.
- Take mini kitchen shears and cut along the spine of the shrimp. Leave the tail part.
- Then peel the shrimp without disconnecting the head. Cut off the long antennas.
Advertisement -
3Pull the legs off of the shrimp. The legs are the tiny appendages dangling from the shrimp’s underside. They are easy to spot and remove. Simply grab onto the legs and tug them away from the body.[3]
- Removing the legs and head first makes the shell easier to remove.
-
4Crack and peel the underside of the shell with your thumbs. Place your thumbs where the legs were. Use your other fingers to hold onto the shrimp as you pull your thumbs in opposite directions. The shell should crack down the middle, allowing you to gently peel it off like you would with an egg.[4]
- You can also use a pair of kitchen shears to cut into the shell on the shrimp’s top side. The shell is a little harder there, but after you cut it you can easily peel it off.
-
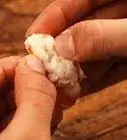
5Use a paring knife to carefully cut out the vein. The vein is the black line running all the way down the shrimp's back. It is typically very noticeable after you remove the shell. Carefully make a small incision all the way along the meat next to the vein. You can then slide the tip of your knife under the vein and lift the whole thing out.[5]
- The vein is actually the shrimp's digestive tract. It sounds gross and is unpleasant to look at, but at worst it makes cooked shrimp slightly gritty. Eating it won’t harm you.
-
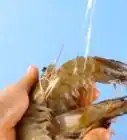
6Pull the tail off of the shrimp. Pinch the shrimp’s tail. Keep a firm grip on the body with your other hand as you pull the tail away from it. It should slide off, revealing a juicy swath of tail meat.[6]
- You can also slice the tail off with a knife. Make the cut right above where the tail ends. You lose a little meat when you do this, but that’s okay.
- Another option is to leave the tail on. Many restaurants do this for presentation purposes. Just remember to remove the tail before eating the shrimp!
-
7Rinse the shrimp off under running water. If you cleaned the shrimp carefully, all of the unpleasant parts are now gone. To make sure, run cold water in your sink. Use it to wash off any shell, leg, or vein fragments still clinging to the meat.[7]
- Another option is to fill your sink with cold water. Drop the shrimp in, then swish it around for a few minutes to knock off any debris.
-
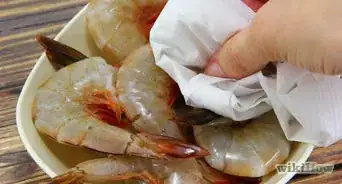
8Pat the shrimp dry with a paper towel. You should remove any moisture on the shrimp before cooking it. Dry shrimp will bake more evenly than wet shrimp. If you have a lot of shrimp to clean, you can throw the peeled shrimp in a colander to begin the drying process as you continue working.


Shrimp with Olive Oil
-
1Preheat an oven to 400 °F (204 °C). Let the oven warm up as you prepare the shrimp. It should have plenty of time to heat thoroughly.[8]
-
2Toss the shrimp in olive oil in a small bowl. The amount of olive oil you need depends on how much shrimp you plan on baking. Plan on using about 1 US tbsp (15 mL) of oil for 1 lb (0.45 kg) of shrimp. Coat the shrimp completely in the oil.[9]
- If you want, you can lay the shrimp on your baking pan first, then drizzle the oil over it. You won’t get your hands dirty, but you may not coat the shrimp evenly either.
- Make sure the shrimp has been cleaned and dried first. You can leave the tails on, but take off the heads, legs, and shells.
-
3Season the shrimp with salt and pepper. Pour about half a teaspoon, or 0.10 oz (2.8 g), of both salt and pepper into the bowl. Give the bowl’s contents another good stir in order to coat the shrimp in the seasonings and any remaining oil. Make sure the shrimp is covered generously in salt and pepper. Add more as needed to suit your taste.[10]
- Remember that this is for 1 lb (0.45 kg) of shrimp. Increase the amount of salt and pepper you use if you will be cooking more shrimp.
-
4Spread the shrimp in a single layer on a baking sheet. You don’t need to prepare the tray but you can treat it with a non-stick cooking spray so the shrimp are easier to remove later. Transfer the shrimp from the bowl, laying them flat against the tray. Try to leave as much space as possible between each shrimp so they all cook evenly.[11]
- Avoid stacking the shrimp. If you run out of space, use another baking sheet.
-
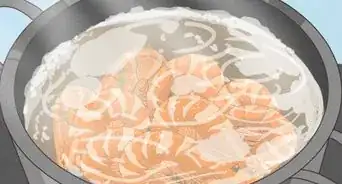
5Bake the shrimp for 6 to 8 minutes until they turn pink. If you have ever had cooked shrimp before, you know how bright it looks. Cooked shrimp kind of resembles marbled beef. It turns a mixture of white and pink. These colors are clear and consistent throughout the shrimp.[12]
- Raw shrimp is gray-blue color. You can often see the white flesh underneath it. Keep cooking the shrimp if it looks pale.
-
6Serve the shrimp over fettuccine or other noodles. The shrimp can always be eaten as is, but it can also be added to a lot of other dishes. Shrimp often goes well with noodle dishes. Since you don’t use a lot of seasoning in this recipe, you can add the shrimp to something like fettuccine alfredo, which has a strong but flavorful sauce.
- For storage, wrap the shrimp up tightly or put it in an airtight container. It will last up to 4 days in the refrigerator and up to 3 months in the freezer.[13]


Spicy Baked Shrimp
-
1Preheat an oven to 400 °F (204 °C). Set the oven’s temperature as you begin preparing the ingredients. Don’t forget to clean the shrimp as needed. This will give the oven more than enough time to warm up.[14]
-
2Mix the seasonings and other ingredients into a sauce. Pour 1⁄2 c (120 mL) of olive oil into your mixing bowl. Add 2 US tbsp (30 mL) of lemon juice and 1 US tbsp (15 mL) each of honey and soy sauce into your mixing bowl. Then, stir in about 1 oz (28 g) of Cajun seasoning, followed by about 0.15 oz (4.3 g) of cayenne pepper.[15]
- Cajun seasoning is a mixture of herbs and spices like cayenne pepper and paprika. You can easily make your own if you can’t buy it pre-made.[16]
-
3Toss the shrimp in the spicy mixture. The easiest way to do this is to set 1 lb (0.45 kg) of cleaned shrimp in the bowl. Stir them around until they are all coated generously in the mixture. If you want, you can set the the shrimp on a baking tray first before pouring the mixture onto them.[17]
- Another way to apply the mixture is by using a basting brush. No matter which method you choose, coat both sides of the shrimp as much as possible.
- Consider refrigerating the shrimp for 1 hour after tossing it so the flavors have more time to sink in.
-
4Arrange the shrimp in a single layer on the baking tray. Avoid stacking the shrimp. Separate each piece of shrimp as much as possible to ensure they all receive plenty of heat. If you run out of space, use another baking sheet or dish.[18]
-
5Cook the shrimp for 15 to 20 minutes. Place the baking sheet on the center rack in your oven, then set your timer. Check the shrimp after about 15 minutes to prevent overcooking. If the shrimp is a bright pink color, take it out of the oven immediately.[19]
- You can garnish the shrimp with lemon wedges and parsley, although this isn’t necessary.
-
6Serve the shrimp over noodles and store leftovers. Spicy shrimp goes well with capellini, spaghetti, or another type of noodle. You don’t have to add any additional flavors to the pasta after cooking it if you don’t want to. Spicy shrimp can also be placed on wooden skewers and eaten as is.
- Place leftovers in an airtight container. The shrimp will last about 4 days in the refrigerator and 3 months in the freezer.


Lemon Garlic Shrimp
-
1Preheat an oven to 375 °F (191 °C). Turn on your oven as you prepare the other ingredients to be used as a topping for the shrimp. For quicker cooking, you can set the oven at a higher temperature.[20]
-
2Add the butter and other topping components to a food processor. Place 2 sticks of butter in the food processor. Also add approximately 2 cups, or 2 oz (57 g), of parsley, 4 peeled cloves of garlic, and the juice from 1 lemon. Pour in about 0.10 oz (2.8 g) of salt as well.[21]
- Slice the butter into smaller chunks so they blend easily. The exact size of the slices isn’t important, but smaller slices are easier to break down.
- You can add 0.5 oz (14 g) of red pepper flakes if you want to make the shrimp spicy.
- Another option for this recipe is to coat the shrimp with bread crumbs. Mix the bread crumbs with white wine and Parmesan cheese by hand, then add the mixture over the shrimp.[22]
-
3Blend the ingredients into a smooth sauce. Use the pulse setting on your food processor to combine the ingredients. Start and stop the processor briefly to avoid any accidents. Continue doing this until the sauce is ready to be added to the shrimp.[23]
-
4Lay the shrimp on a baking sheet and top them with the sauce. A casserole dish is also safe to use. Spread out 2 lb (0.91 kg) of cleaned shrimp, leaving as much space between each pieces as possible. Avoid stacking the shrimp. Once you have them all on the sheet, pour the sauce directly over the shrimp.[24]
- Use your fingers or a rubber spatula as needed to spread out the lemon garlic topping. Make sure you get some on each piece of shrimp.
-
5Bake the shrimp for 10 minutes until they are pink. Set the baking tray on the center rack in your oven. Shrimp turns a clear, solid color when it is finished, so check it as soon as you can to prevent overcooking. Bubbling butter is another sign that your meal can be taken out of the oven and served.[25]
- Depending on your oven and heat setting, the cooking time may vary. It usually takes between 7 to 10 minutes, though.
-
6Serve the shrimp with bread and store leftovers. Since the butter sauce can be heavy, lemon butter shrimp is often eaten as is. Treat it like a baked shrimp scampi. It goes well with a slice of crusty bread. You can use the bread to mop up excess sauce.
- You can always add the shrimp to angel hair pasta and other noodles if you prefer.
- Keep the leftovers in an airtight container. They will last about 4 days in the refrigerator and 3 months in the freezer.


Things You’ll Need
Peeling and Deveining Shrimp
- Paring knife
- Kitchen scissors
- Sink
- Colander
- Paper towels
Shrimp with Olive Oil
- Oven
- Timer
- Mixing bowl
- Baking sheet
Spicy Baked Shrimp
- Oven
- Timer
- Mixing bowl
- Baking sheet
Lemon Garlic Shrimp
- Oven
- Food processor
- Baking sheet
- Knife
References
- ↑ https://tastessence.com/ways-to-thaw-frozen-shrimp
- ↑ https://www.chowhound.com/food-news/186094/how-to-peel-and-devein-shrimp/
- ↑ https://www.thekitchn.com/how-to-peel-amp-devein-shrimp-cooking-lessons-from-the-kitchn-217120
- ↑ https://www.thekitchn.com/how-to-peel-amp-devein-shrimp-cooking-lessons-from-the-kitchn-217120
- ↑ https://www.finecooking.com/article/how-to-peel-and-devein-shrimp
- ↑ https://www.thekitchn.com/how-to-peel-amp-devein-shrimp-cooking-lessons-from-the-kitchn-217120
- ↑ https://www.finecooking.com/article/how-to-peel-and-devein-shrimp
- ↑ https://www.thekitchn.com/how-to-roast-shrimp-in-the-oven-cooking-lessons-from-the-kitchn-204080
- ↑ https://www.thekitchn.com/how-to-roast-shrimp-in-the-oven-cooking-lessons-from-the-kitchn-204080
- ↑ https://www.thekitchn.com/how-to-roast-shrimp-in-the-oven-cooking-lessons-from-the-kitchn-204080
- ↑ https://www.thekitchn.com/how-to-roast-shrimp-in-the-oven-cooking-lessons-from-the-kitchn-204080
- ↑ https://www.thekitchn.com/how-to-roast-shrimp-in-the-oven-cooking-lessons-from-the-kitchn-204080
- ↑ http://www.stilltasty.com/fooditems/index/18320
- ↑ http://www.geniuskitchen.com/recipe/spicy-baked-shrimp-32745#activity-feed
- ↑ https://www.epicurious.com/recipes/food/views/spicy-baked-shrimp-1428
- ↑ https://www.allrecipes.com/recipe/149221/cajun-spice-mix/
- ↑ https://www.epicurious.com/recipes/food/views/spicy-baked-shrimp-1428
- ↑ http://www.myrecipes.com/recipe/baked-shrimp-lemony-garlic-sauce-0
- ↑ http://www.geniuskitchen.com/recipe/spicy-baked-shrimp-32745#activity-feed
- ↑ https://www.foodnetwork.com/recipes/ree-drummond/spicy-lemon-garlic-shrimp-recipe-2109265
- ↑ https://www.foodnetwork.com/recipes/ree-drummond/spicy-lemon-garlic-shrimp-recipe-2109265
- ↑ https://thecookingjar.com/lemon-garlic-butter-baked-shrimp/
- ↑ https://www.foodnetwork.com/recipes/ree-drummond/spicy-lemon-garlic-shrimp-recipe-2109265
- ↑ https://www.foodnetwork.com/recipes/ree-drummond/spicy-lemon-garlic-shrimp-recipe-2109265
- ↑ https://www.foodnetwork.com/recipes/ree-drummond/spicy-lemon-garlic-shrimp-recipe-2109265
About This Article

Before you bake shrimp, make sure they're thawed and you've removed the head, tails, shell, and vein. Then, toss the shrimp in some olive oil in a bowl so they're evenly coated. Next, season the shrimp with salt and pepper and spread them out in a single layer on a baking sheet. Finally, bake the shrimp in the oven at 400 degrees Fahrenheit for 6-8 minutes or until they turn pink. To learn how to make spicy baked shrimp, scroll down!