This article was co-authored by Eric Shipe. Eric Shipe is a Kitchen and Bath Designer and the Owner of Bath + Kitchen based in Washington DC. Eric and his team specialize in cabinetry, design, and remodels. They serve homeowners, interior designers, architects, and contractors with a refined process, creative ideas, 4K photo-realistic renderings, and 360 Panoramic views. Bath + Kitchen was featured in Best of Houzz 2017-2020. Eric holds a BA in Economics and Business Administration from Ursinus College.
There are 8 references cited in this article, which can be found at the bottom of the page.
This article has been viewed 52,787 times.
Formica is a plastic laminate used widely for countertops and cabinet doors. It is made by bonding layers of paper together with a plastic resin under high heat and tremendous pressure to create a single, solid layer. Most tight Formica curves are formed during the manufacturing process since it's difficult to bend and shape manually. However, it is common to make small bends during installation so that you can create neat detail work. For a gentle curve, you won't need to use heat, but for a tighter curve, heat with be necessary.
Steps
Bending Formica Without Heat
-
1Check that the curve has at least a 3 in (7.6 cm) radius. Place a square piece of paper or Formica over the curve you want to cover. Line up the sides of the square with the sides at the end of the curve. If they are lined up correctly, the point of the square will be sticking straight out from the center of the curve. Mark where each side where the curve ends on the square. Measure between each of those points and the point of the square. This measurement is the radius of your curve.[1]
- In order to bend a piece of Formica without heat, the curve needs to be a certain size or the Formica will crack. It is generally agreed upon that a curve that is less 3 inches (7.6 cm) is very likely to crack.
-
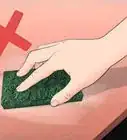
2Smooth out and clean the surface of the curve. Countersink any nails or screws, and fill the holes with wood putty. Allow to dry and sand the entire surface, removing any paint or varnish on it. Clean the surface thoroughly so all dust is removed. This ensures that all imperfections, dents, or high spots are gone and don't show through the Formica after installation.[2]
- Removing all of the dust from the surface is important because it will help the adhesive stick to the surface better.
Advertisement -
3Cut out the piece you will bend. Measure the curved area to be covered using a bendable tape measure that can conform to the curve. Then transfer the measurements to the Formica, making sure that the lines are straight. Put on eye protection and cut the piece out, allowing an extra 1⁄4 inch (0.64 cm) all around for trimming.[3]
- For small jobs, you can cut the Formica with a utility knife and a metal straightedge. Work from the back and score the line deeply. Cut again, and then hit the shorter end of the Formica against a solid surface to break it off.
- For big jobs with lots of cuts, use an electric saw, again working from the back. Use a fine-toothed blade to prevent chipping.[4]
-
4Sand the back of the Formica to make it more flexible. Grab a piece of medium grit sandpaper and run it back and forth along the back side of the Formica. The goal is to just take off enough of the backing so that the Formica will bend easier. This will be a very thin layer of material.
- In order to take off the right amount, check the flexibility of the Formica after every few strokes with the sandpaper. Once the Formica starts bending more easily, stop standing.
- Use a sandpaper that is between 60 and 100 grit to ensure that you can easily get some of the backing removed.
- Do your sanding outside and wear a dust mask while you do it. The dust can irritate your mouth, nose, and lungs if you inhale it.[5]
Tip: Once the Formica begins to bend a little easier, stop sanding. You don't want to take off so much material that you weaken the Formica dramatically.
-
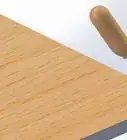
5Apply adhesive to the Formica and the application surface. To apply Formica you will use a contact cement that is specifically labeled for use with laminate. This type of product makes a strong bond between surfaces immediately. To use it, lay the Formica out on a clean surface with the backing facing up. Brush or roll a layer of adhesive on the Formica back and on the curved surface where you will be applying it.[6]
- Follow manufacturer's instructions for the proper adhesive and drying times. In some cases you will need to let the adhesive air cure for a specific amount of time before applying the Formica to the substrate.
-
6Apply the Formica to the curve very slowly and precisely. Begin at one end of the curve and line up the end of the Formica piece exactly where you want it to go. You will not be able to reposition the Formica once it's applied, so it's important to get it in the right position the first time.[7]
-
7Use a J-roller to smooth out the surface. Gradually bend the Formica around the curve. Run the roller along the entire piece of Formica while applying it. It's important to get all air bubbles out from in between the Formica and the curved surface, as areas with air bubbles are more likely to crack.
- Continue attaching the Formica, pulling it taut, and pressing it firmly to the substrate with the roller until you have covered the entire curve.[8]
-
8Clamp the Formica as you go. Place a clamp that will hold the Formica firmly at the beginning of the curve. You can use whatever type of clamps you have on hand, whether it be c-clamps, bar clamps, or spring clamps. Then continue to attach them all along the curve so the Formica will be tight against the surface as the glue dries.
- If your clamps have metal pads on them that will come into contact with the Formica, put a piece of cardboard or thin wood between the clamp pads and the Formica.
-
9Allow the glue to dry completely before trimming off any extra material. Look at the directions that came on the adhesive for drying times. If you have a small amount of excess Formica on any side of the curve, leave it in place and don't cut it off yet. Wait for the adhesive to dry thoroughly before using a utility knife, saw, or router to remove it later.
- With most adhesives you will want to let the Formica sit for at least 24 hours before trimming it. This will ensure that the glue is at maximum strength.


Bending Formica With Heat
-
1Smooth and clean the surface of the curve. Set all nails so that they are flush with the surface. Use sandpaper to smooth out any rough areas. Once the surface is smooth, clean it with a lightly damp rag to remove any dust or debris left over.[9]
- Preparing the surface properly will help ensure that the finished job looks good and that the adhesive attaches properly to the curved surface.
- After you use a damp rag to wipe down the surface, make sure to let it dry thoroughly before moving on to gluing.
-
2Cut out the piece of Formica that you will bend. Measure the curve you want to cover with a flexible measuring tape. Transfer those measurements onto the back of a piece of Formica that is big enough to cover the entire curve. Double check your measurements one more time and then cut out the piece with a utility knife or electric saw, leaving an extra 1⁄4 inch (0.64 cm) on each side to give yourself some wiggle room.[10]
- While cutting out the Formica you should wear eye protection. Also, if you are using an electric saw, consider wearing a dust mask as well.
-
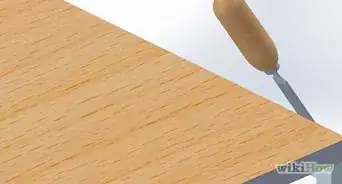
3Apply the adhesive to both surfaces. Put some on the back of the Formica and on to the surface where it will be applied. Place the Formica face down on a clean, solid surface. Use a brush or a roller to apply your adhesive to the entire surface while trying to not get a lot of it dripping over the edges. Also apply the adhesive to the surface of the curve right away.[11]
- In most cases, you can use contact cement as your adhesive, although there are specialty products made specifically for applying laminates like Formica.
Tip: Read and follow the directions on the adhesive packaging before applying it. This will let you know how to properly apply the adhesive and how much time you will have before you need to get it into place.
-
4Put on heat resistant work gloves and get out your heat source. Leather work gloves tend to work great for protecting your hands and having some dexterity while you work. To heat the Formica you can use a heat gun or an iron. Whichever you use, it needs to be able to heat the Formica to a temperature between 315 °F (157 °C) and 325 °F (163 °C). This is the temperature window when the Formica will become pliable.
- If you use an iron, use one that you don't need to use on clothes in the future. There is a risk that the iron will get dirty and that you will get glue on the heating surface while you use it.
-
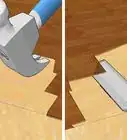
5Clamp one end of the Formica in place. Position the end so that it is in the exact position you would like it in when the project is finished. Use a clamp to attach it to the curved surface so that it won't move as you put tension on it.[12]
- You can use any clamps you have on hand that will fit over the curve and the Formica, including c-clamps, bar clamps, or spring clamps. However, if the pads on the clamp are metal, put something between the pad and the Formica so that it doesn't get scratched. The easiest thing to use is a small piece of cardboard.
-
6Heat small sections and then attach them right away. Run your heat gun or iron over a section of Formica that is 2–3 inches (5.1–7.6 cm) long. Once you can feel that the area is flexible, push it firmly onto the curved surface. Keep working down the curve this way, heating small sections and then attaching them.[13]
- Use your gloved hand or a J-roller to press the Formica firmly onto the curved surface. Run your hand over the surface to ensure that there are no air bubbles underneath, that it is in the right position, and that the piece is securely attached.
- Attach clamps as you go to ensure that the Formica stays securely attached while the adhesive cures.
Tip: Try cutting a scrap piece of Formica and practice using the heat gun or iron on it to see how long it takes to become pliable before starting on the big project.
-
7Allow the adhesive to cure before trimming off any excess. Follow the adhesive manufacturer's directions for drying time. Once enough time has passed, use a router, saw, or utility knife to remove any excess Formica along the edges.[14]


Community Q&A
-
QuestionCan I install Formica over my existing Formica?
 Community AnswerYou have to sand the existing Formica in order for the glue to bond, using 100 or even 80 grit. Another way is to scratch the surface of the existing Formica with a razor, etc. The glue needs a mechanical bond.
Warnings
- Keep the heat gun moving as you use it. If left in one spot too long, the surface will burn and the Formica will warp.⧼thumbs_response⧽
Things You'll Need
Bending Formica Without Heat
- Formica pieces
- Bendable tape measure
- Utility knife or electric saw
- Eye protection
- Sandpaper
- Dust mask
- Adhesive
- Brush or paint roller
- J-roller
- Clamps
Bending Formica With Heat
- Formica pieces
- Bendable tape measure
- Utility knife or electric saw
- Eye protection
- Adhesive
- Brush or paint roller
- Heat gun
- Heat resistant gloves
- J-roller
- Clamps


References
- ↑ https://youtu.be/Qjv33xGRXxs?t=72
- ↑ https://www.thisoldhouse.com/how-to/how-to-laminate-countertop
- ↑ https://www.thisoldhouse.com/how-to/how-to-laminate-countertop
- ↑ Eric Shipe. Home Improvement Specialist. Expert Interview. 11 June 2021.
- ↑ https://tlgcms.co.nz/uploads/Formica_MSDS_Dec_2014.pdf
- ↑ https://www.thisoldhouse.com/how-to/how-to-laminate-countertop
- ↑ https://youtu.be/Qjv33xGRXxs?t=171
- ↑ https://youtu.be/Qjv33xGRXxs?t=191
- ↑ https://www.thisoldhouse.com/how-to/how-to-laminate-countertop
About This Article