This article was co-authored by Alberto DeJesus. Alberto DeJesus is a Construction Specialist and the CEO of DeJesus Industries. With more than four years of experience, he specializes in high-end real estate development and construction. Alberto and DeJesus Industries have been featured on NBC News and have worked with numerous well-known companies, including Mazda, Amazon, and CVS. Alberto holds a Bachelor’s degree from Boston University.
There are 15 references cited in this article, which can be found at the bottom of the page.
This article has been viewed 29,715 times.
A window seat can make a quaint and cozy addition to any room in your home. You can easily build your own unique window seat using ready-made floating cabinet units as a base. Just choose a window with a pleasant view, build a frame for your base, then assemble the cabinets and add cushions, pillows, and other comfortable accessories.[1] As a bonus, your window seat will double as an attractive storage solution!
Steps
Assembling the Base Frame
-
1Select a window in an unobstructed area to use as your window seat. Ideally, the window you choose should be recessed, as this will provide a perfect nook for the seat itself. Any window can work, however, as long as there's ample space in front of it.[2]
- If you go with a non-recessed window, your bench will project outward from the window a couple of feet. Keep this in mind while deciding on a location.
Tip: Pick out a window with a pleasant view, or one that's situated in a central area, such as the living room or beside the kitchen table.
-
2Purchase two 15 in (38 cm) floating cabinet units to use as the seat base. Over-the-refrigerator cabinets will work best, as they're shorter and easier to maneuver than full-sized cabinets. For an average-sized window nook around 6 feet (1.8 m) in length, you'll need a pair of cabinets. Consider buying more units if you think you might want to add more storage.[3]
- Measure your window to the nearest 1⁄2 in (1.3 cm) and, if possible, shop around for cabinets that will fit this space exactly.
- Alternatively, you could find an open-faced bookshelf or vertical cabinet and turn it on its side to function as both base and bench.[4]
Advertisement -
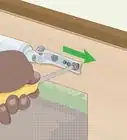
3Remove the baseboards from the wall around the window. Wedge the tip of a crowbar or trim puller into the space between the baseboard and the wall. Pull up gently on the handle of the tool to loosen the baseboard. Finish pulling the baseboard free by hand to avoid damaging the drywall.[5]
- You may also want to remove the molded stools from the bottom of the window if you think they might interfere with your space or clash with the look of your new seat.[6]
-
4Arrange 2x4 or 2x6 boards into a frame around the front of the window. Fit the boards together into a rectangular shape the length and depth of the window space you've chosen. This type of frame is known as a “toekick.” When it comes time to assemble your window seat, you'll simply side your cabinets right inside your frame.[7]
- Use a circular saw to trim your boards to the necessary size.
- If you want, you can extend your frame enough on either side to make room for additional cabinets or bookshelves for extra storage space. Be sure to measure your cabinets or shelves in advance to guarantee a proper fit.[8]
-
5Fasten the toe kick using 3 in (7.6 cm) wood screws. Use 2 screws for each joint where the boards connect to ensure that your frame is secure. Once you've done that, anchor the toe kick to the floor by driving a screw into the floor or wall stud at each corner of the frame.[9]
- To save yourself some time and work more precisely, use a cordless power drill to drive your screws.
- When anchoring a toe kick to a concrete floor, you'll need to use a powder-actuated nailer or plastic screws instead of ordinary screws.[10]


Installing the Cabinets
-
1Fit your cabinets into place beside one another inside the toekick. Assuming you measured correctly, they should slip right inside without difficulty. Take a moment to make sure the units are centered and sitting perfectly flush with both the surrounding walls and one another.[11]
- Use a level to check the orientation of your cabinets before proceeding.
- If necessary, fill in any small gaps between the cabinets and the toe kick with wooden spacers cut from leftover boards.[12]
-
2Attach the cabinets using two 2.5 in (6.4 cm) drywall screws. Sink the first screw through the edge of the face frame at the top of one unit into the neighboring unit. Drive your next screw in the opposite direction through the face frame at the bottom of the other unit.[13]
- By sinking your screws in opposite directions, you'll increase the strength of the connection site, which is a good idea since you'll be putting weight on the cabinets.
- It may help to clamp the face frames of the cabinets together to hold them flush until you're ready to begin drilling.
-
3Install side cabinets or shelves and fasten them to the seat cabinets. As an optional step, you can put in 1-2 more floating cabinet units in the same dimensions on one or both sides of your bench. Fit these cabinets into your frame alongside your seat cabinets, then fasten them to their face frames using 2.5 in (6.4 cm) drywall screws.[14]
- Make sure you've measured and constructed your toe kick to accommodate any other cabinets you want to add on.
Tip: Flanking side cabinets can give your window seat a wider, more luxurious look and provide you with even more storage.


Finishing and Customizing Your Window Seat
-
1Install molding along the bottom of the seat base to hide the toekick. Cut your molding to match the dimensions of the frame, then attach it using 1.5 in (3.8 cm) finishing nails. Space your nails 1–2 feet (0.30–0.61 m) apart and fill the holes with wood putty if desired.[15]
- Consider adding a thinner trim along the contour where your bench meets the wall as well to help the eye transition more easily.
- Once in place, the trim will cover the toekick and lend some decorative flair to the lower edge of your window seat.
Tip: For ease of installation, look for a style of molding that's the same width as the boards you used to fashion the toekick.[16]
-
2Use matching plywood skins to conceal the joints in stacked cabinets. If you opted to incorporate both cabinets and vertical shelves, you may want to cover their outer faces to give them a more seamless appearance. To do this, use a utility knife and straight edge to trim plywood skins so that they'll fit over the entire surface. Glue the skins directly to the cabinet using contact cement.[17]
- Plywood skins are available at any hardware store or home improvement center. You can also get them from the same company who manufactured your cabinet or shelving units to make sure they're a match.
- Contact cement dries and holds fast, so you'll need to work quickly and make sure your skin is lined up properly the first time.
-
3Paint your completed seat base if desired. Brush the bench top, cabinet doors, and surrounding molding with a coat of interior latex primer, then follow that up with 2-3 coats of interior latex paint. Allow each coat to dry completely before applying subsequent coats. When you're done, your new window seat will be one uniform color.[18]
- Most water-based interior latex paints dry to the touch within an hour, and can be painted over in 4-6.[19]
- Use strips of painter's tape to protect any nearby areas you don't paint to get on.
- You may elect not to apply paint if you picked out cabinets and molding with a natural wood finish.
-
4Bring in cushions and pillows to provide the finishing touches. Lay down 1 or 2 long cushions to cover the bench from end to end. Place a few decorative throw pillows on top, along with any other accessories you wish to include.[20] All that's left to do now is sit down, kick your feet up, and enjoy the fruits of your labor![21]
- A cozy blanket or quilt can also be a good to have around for both comfort and presentation.
- If you don't want your bench cushion to slide around, cover it with length of durable fabric and staple the edges to the lip inside the top of the cabinets.[22]


Expert Q&A
-
QuestionWhat height should a bench seat be?
 Alberto DeJesusAlberto DeJesus is a Construction Specialist and the CEO of DeJesus Industries. With more than four years of experience, he specializes in high-end real estate development and construction. Alberto and DeJesus Industries have been featured on NBC News and have worked with numerous well-known companies, including Mazda, Amazon, and CVS. Alberto holds a Bachelor’s degree from Boston University.
Construction SpecialistBase the height of the bench seat on whoever will be using it the most. Some people like to sit lower than others, which is important to keep in mind. -
QuestionHow can I make my window seat look nice?Alberto DeJesusAlberto DeJesus is a Construction Specialist and the CEO of DeJesus Industries. With more than four years of experience, he specializes in high-end real estate development and construction. Alberto and DeJesus Industries have been featured on NBC News and have worked with numerous well-known companies, including Mazda, Amazon, and CVS. Alberto holds a Bachelor’s degree from Boston University.
Construction SpecialistKeep it simple and try to use finer woods. If you're going to use any molding, make sure that it's consistent throughout the seat.
Things You'll Need
Assembling the Base Frame
- Circular saw
- 2x4 or 2x6 boards
- Crowbar or trim puller
- Tape measure or ruler
- Cordless drill
- 3 in (7.6 cm) wood screws
- Powder-actuated nailer or plastic screws (for concrete floors)
Installing the Cabinets
- 2-4 15 in (38 cm) floating cabinet units
- Cordless drill
- 2.5 in (6.4 cm) drywall screws
- Level
- Matching bookshelf units (optional)
- Table clamps (optional)
- Wooden spacers (optional)
Finishing and Customizing Your Window Seat
- Wood molding
- 1.5 in (3.8 cm) finishing nails
- Plywood skins
- Utility knife
- Straight edge
- Water-based interior latex primer and paint
- 3–4 in (7.6–10.2 cm) angled paint brush
- Wood filler putty
- Painter's tape
- Cushions, pillows, and other assorted accessories


References
- ↑ Alberto DeJesus. Construction Specialist. Expert Interview. 15 December 2021.
- ↑ https://www.bhg.com/home-improvement/windows/built-in-window-seat/
- ↑ https://www.thisoldhouse.com/how-to/how-to-build-window-seat
- ↑ https://www.apartmenttherapy.com/window-seat-diy-bench-ideas-257687
- ↑ https://www.blesserhouse.com/diy-window-seat-from-a-kitchen-cabinet/
- ↑ https://www.prettyhandygirl.com/building-a-window-seat-with-storage-in-a-bay-window/
- ↑ https://www.todayshomeowner.com/video/how-to-make-a-window-seat/
- ↑ http://nestingwithgrace.com/how-to-build-a-window-seat-and-built-in-bookcase-tutorial/
- ↑ https://www.prettyhandygirl.com/building-a-window-seat-with-storage-in-a-bay-window/
- ↑ https://www.todayshomeowner.com/video/how-to-make-a-window-seat/
- ↑ https://www.thisoldhouse.com/how-to/how-to-build-window-seat
- ↑ http://blog.jennasuedesign.com/2014/03/kitchen-chronicles-building-window/
- ↑ https://centsationalstyle.com/2012/06/we-have-a-window-seat/
- ↑ https://www.thisoldhouse.com/how-to/how-to-build-window-seat
- ↑ https://www.lowes.com/pdf/DIYBrochure21012.pdf?cm_cr=null_75_DIYBrochure21012.pdf
- ↑ https://www.familyhandyman.com/carpentry/trim-carpentry/buying-guide-interior-wood-trim/view-all/
- ↑ https://www.thisoldhouse.com/how-to/how-to-build-window-seat
- ↑ https://www.prettyhandygirl.com/building-a-window-seat-with-storage-in-a-bay-window/
- ↑ https://www.bobvila.com/articles/how-long-does-it-take-paint-to-dry/
- ↑ Alberto DeJesus. Construction Specialist. Expert Interview. 15 December 2021.
- ↑ https://www.fourgenerationsoneroof.com/how-to-build-window-seat-tutorial/
- ↑ https://www.thisoldhouse.com/ideas/all-about-window-seats
About This Article

To build a window seat, first get 2 floating cabinet units to use as the base. Once you have these, prepare the area by removing the baseboards from the wall section. When that’s done, create a frame around the front of the window using 2 by 4 or 2 by 6 boards. Fit your cabinets inside this frame and screw them in place. After you’ve fastened the cabinets, install molding along the bottom of the seat base to hide the frame. If you want to give your seat base a more attractive finish, you can paint it using interior latex primer and then a couple of coats of interior latex paint. To add some final decorative touches, lay down 1 to 2 long cushions to cover the bench and throw on some pillows. For more help, including how to use plywood skins to hide joints in stacked cabinets for your window seat, scroll down!