This article was co-authored by wikiHow Staff. Our trained team of editors and researchers validate articles for accuracy and comprehensiveness. wikiHow's Content Management Team carefully monitors the work from our editorial staff to ensure that each article is backed by trusted research and meets our high quality standards.
There are 7 references cited in this article, which can be found at the bottom of the page.
The wikiHow Video Team also followed the article's instructions and verified that they work.
This article has been viewed 39,818 times.
Learn more...
It's super easy to make a DIY smartphone projector out of materials you already have around the house. You just need a small cardboard box, like a shoebox, a magnifying glass, and a few other things. Once you get it all put together, your homemade projector will allow you to show your movies and slideshows to friends and family from the comfort of your own home!
Steps
Prepping the Box
-
1Choose a shoebox that is sturdy and that has a lid that fits well. Any size of shoebox will do for this project. Try to pick a shoebox that still has its original lid so that the least amount of light will get through. Also, pick a box that is in good condition—a box with shaky sides or rips and tears won't end up producing the best quality picture.[1]
- It doesn't matter what color the box is. You'll be painting the inside of the box black, and the outside color won't affect the picture.
-
2Reinforce shaky sides with school glue to make the box stable. Every shoebox has flaps that are glued down that help it to hold its shape. Over time, some of these flaps come loose and the box can start to fall apart. Examine your shoebox and reinforce any loose areas with glue.[2]
- Hold the glued sections together until they're dry, or use binder clips or something similar to hold them together while you work on the rest of the project.
Advertisement -
3Paint the inside of the shoebox and lid with black paint. Opt for acrylic paint, as it'll dry much faster than other kinds of paint. Use a paintbrush to apply a thick layer over the entire interior of the box so that the original cardboard is no longer visible. Don't forget to paint the inside of the lid, too![3]
Did You Know? A black interior will ensure that the box doesn't deviate any light, meaning that the light from your phone will shine through the projector rather than getting dimmed because of the lighter interior of the box itself.
-
4Let the paint and glue dry for about 1 hour before you do anything else. When you touch the paint or glue, it should be dry to the touch. If it's still tacky, it needs more time to dry.[4]
- Depending on how thick a layer of paint you applied, you may need to wait for up to 2-3 hours.


Inserting the Magnifying Glass
-
1Detach the handle from the magnifying glass. Choose a magnifying glass with a lens that will fully fit on the side of your shoebox. If the lens is bigger than the side itself, it won't work for this project. You can use something like a hacksaw to remove the handle, or find a magnifying glass with a handle that screws off so you don't have to worry about using a sharp tool.[5]
- If you do use a hacksaw, be very careful. If you're not old enough to use one yourself, ask a parent to do this part for you.
Tip: Make sure your magnifying glass is made of glass. Plastic won't work for your projector.
-
2Trace the lens on the center of one end of the cardboard box. Use one of the shorter ends of the box for the magnifying glass rather than one of the longer sides. Stand the cardboard box on end and place the magnifying glass in the center. Trace around it with a pen or marker.[6]
- Do your best to center the lens in the middle of the box. Use a ruler if you don't want to just eyeball it.
-
3Use an X-ACTO knife to cut out the tracing from the cardboard box. You can do this freehand, or, attach the X-ACTO knife to a compass to make sure your cut is perfect all the way around. Do your best to make the cuts smooth so that there are no ragged edges.[7]
- Use caution when cutting the hole, and never cut toward yourself. Instead, hold the box and the knife in such a way that the blade is moving away from your body when you make the cuts.
-
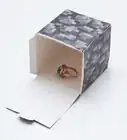
4Insert the magnifying glass into the hole with hot glue. Fit the magnifying glass into the hole you just cut so that half of its width is on the inside of the box, and the other half is on the outside of the box. Apply hot glue around the edges where the box and the magnifying glass meet on both the inside and outside of the box.[8]
- The hot glue will simply ensure that the magnifying glass stays put while you're using the projector. If you skip this step, there's a chance that the lens could fall out.
-
5Cut part of the lid off if it doesn't fit around the magnifying lens. After the lens is in place, try putting the lid on the box. If the lid hits the lens and can't be fully put onto the box, trim away the part that overlaps the lens. Use a marker to trace the part of the lens that intersects with lid, and then cut it away with the X-ACTO knife.[9]
- It's important that the lid fits firmly on the box so that no light can get inside.

Preparing the Phone Stand
-
1Measure a piece of foam board that will be wide enough to fit in the box. This piece of foam will be the base of your phone stand. When you cut it out, make it about 3 to 4 inches (7.6 to 10.2 cm) long. It should fit securely in the bottom of the shoebox, but keep in mind that you may need to slide it back and forth, so don't make it too tight.[10]
Tip: Use black foam board for the best results. If you can't find black foam board, paint white foam board black and let it dry before you do this part of the project.
-
2Cut another piece of foam board that is almost as tall as the box itself. This piece of foam will be the “stand” part of your phone stand; it's what your phone will lean against in the box. Make it as wide as the base, and make it about 1 inch (2.5 cm) shorter than the top of the shoebox.[11]
- Having a phone stand is important so you can play around with the positioning of your phone in the projector. The distance of the phone from the lens can make a really big difference in the quality of the picture.
-
3Glue the 2 pieces of foam board together perpendicularly to create the stand. Use your hot glue gun to attach the “stand” to the “base.” Place the stand close to one edge of the base so that there will be room for your phone to lean on it without falling off. Hold the 2 pieces together firmly until they are completely dry and stuck together.[12]
- Keep your phone away from the stand at this stage—you don't want to accidentally get any hot glue on it!
-
4Put the stand in the box at the far end away from the magnifying glass. Try out your stand before actually moving forward with the rest of the project. You should be able to slide it back and forth in the box with ease.
- You're almost ready to use your projector! There are just a few more simple steps to take to get everything ready.

Using Your Projector
-
1Turn the brightness on your phone up as far as possible. For the best results, the picture on your phone needs to be as bright as it can be. Because this does take a bit more battery than low-light, make sure your phone is fully charged before using it in your projector. You don't want your phone to die in the middle of a movie![13]
- Whether you have an iPhone or an Android, you can adjust the brightness level.
-
2Lock the screen so the image won't flip when the phone is in the box. The magnifying lens is going to invert the image coming from your phone, so you'll need to play the video or content upside-down so that it appears right on the screen. Locking your screen will prevent the image from automatically righting itself.[14]
- To lock the screen on an iPhone, swipe up from your home screen. Click the button that shows a lock with an arrow circling it.
- To lock the screen on an android, go to “settings,” tap “accessibility,” and tap “auto-rotate screen” to disable the function.
-
3Place the box in front of a flat, unobstructed surface, like an empty wall. For the best results, use a wall that doesn't have anything on it. If there are pictures hanging on it, take them down before you use the projector. You could also try hanging up a sheet or making a screen for the image to project onto. If there are things in the way, the picture will end up being distorted and will be hard to see.
- Put the box itself on a flat surface so that it isn't set at a weird angle.
- The distance the projector should be from the “screen” depends on the size of the screen itself. For a bigger screen that is about 7 feet (84 in) squared, place the projector about 9 feet (110 in) away. For a smaller screen that is only 4 feet (48 in) squared, place the projector 5 to 6 feet (60 to 72 in) away. You may need to play with the distance a bit to get the right clarity.
-
4Place your phone at the back of the box and test the clarity. Set your phone on the stand, play the content, and put the lid on the box. Check to see how the image appears on the wall. If it's blurry, you can make adjustments by moving the phone closer to the lens. It may take a few tries to get it exactly right, but you'll be able to use your DIY at-home projector in no time![15]
- You can use your projector to play slide shows, videos, movies, and lots of other great content.


Community Q&A
-
QuestionHow do I insert the Smartphone inside the projector?
 Community AnswerOpen the box and put the phone into it; shoe boxes provide easy access.
 -
QuestionWhat do I do if the picture isn't clear when I use the cardboard projector?
 Community AnswerMake sure that the brightness on your phone is all the way up. Paint the inside of the box black or cover the inside with black paper. If this doesn't help, try using glass cleaner or nail polish remover on the lens.
 -
QuestionHow do you stand your phone up?Community AnswerYou let it lean against the box or get something to hold it up, like a stand.
Things You'll Need
- Shoebox with lid
- School glue
- Black acrylic paint
- Paintbrush
- Hacksaw
- Magnifying glass
- Pencil or marker
- X-ACTO knife
- Hot glue gun
- Foam board
- Ruler


References
- ↑ https://www.makeuseof.com/tag/build-smartphone-projector-from-shoebox/
- ↑ https://diyprojects.com/make-smartphone-projector/
- ↑ https://www.makeuseof.com/tag/build-smartphone-projector-from-shoebox/
- ↑ https://www.makeuseof.com/tag/build-smartphone-projector-from-shoebox/
- ↑ https://diyprojects.com/make-smartphone-projector/
- ↑ https://diyprojects.com/make-smartphone-projector/
- ↑ https://youtu.be/Tx4vPeL9y2g?t=114
- ↑ https://diyprojects.com/make-smartphone-projector/
- ↑ https://youtu.be/Tx4vPeL9y2g?t=139
About This Article