This article was co-authored by wikiHow Staff. Our trained team of editors and researchers validate articles for accuracy and comprehensiveness. wikiHow's Content Management Team carefully monitors the work from our editorial staff to ensure that each article is backed by trusted research and meets our high quality standards.
The wikiHow Video Team also followed the article's instructions and verified that they work.
This article has been viewed 227,957 times.
Learn more...
Vintage popcorn boxes can add a touch of nostalgic charm to parties, events, or family movie nights, even if you're just filling them with microwave popcorn. To create these classic red-and-white boxes, you could use a printable template, freehand your own design, or upcycle another box. Personalize and decorate the popcorn boxes with different colors, papers, and stickers to make them even more special.
Steps
Using a Printable Template
-
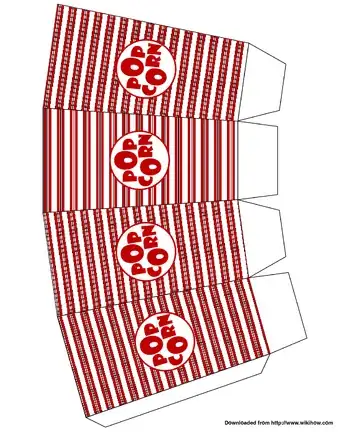
1Choose and print a template. Find a template online by searching for free designs on blogs, or use the linked template at the bottom of this page. Download the image and prepare to print it in the size you need.
-
2Print the design onto cardstock. Make sure to use cardstock, not plain printer paper. Cardstock is thicker and sturdier, which will help hold the box together and keep it together. Printer paper will be too flimsy and may fall apart. Make sure to choose a paper size suitable for the size you want your boxes to be.
- For example, 8.5 in × 11 in (22 cm × 28 cm) paper will make small boxes that are more suitable for children. If you want larger boxes, try printing on 9 in × 12 in (23 cm × 30 cm) sheets or even 11 in × 14 in (28 cm × 36 cm).
- Before hitting print, make sure that your printer can handle the paper size and weight of the cardstock. Select the correct print settings under preferences.
- Cardstock will be somewhere between 50-110 lb.
- For a unique touch, you could print the design on a different color of cardstock, such as light blue or pink.
Advertisement -
3Score the lines of the template. Use a bone folder or paper scoring wheel to score any lines that will need to fold in when you put together the box. Be careful not to cut all the way through the paper.
- Make sure to score the right side—the printed design side—so the paper will fold in the right direction.
-
4Cut the box out with scissors. Carefully cut along the edges of the design, making sure not to cut off any flaps or tabs. Make your cuts straight so your box isn’t lopsided.[1]
-
5Fold the box together. Make folds along the lines you’ve already scored and put the box together to make sure all the sides meet and match up. Check that all the correct flaps are in place.
-
6Glue or tape the sides together with designated flaps or tabs. Your printable should include some flaps or tabs to attach the box’s sides to each other. Locate these extra panels and use non-toxic craft glue or tape to close off the box. Make sure to wipe off any excess glue, then let dry.
- Double-sided tape also works well for this step.
- When gluing or taping, make sure to align the edges carefully. You can bring the opposite side of the box down so that it is flush with the table's surface to ensure you are aligning the two pieces properly.
-
7Line with wax paper and fill with popcorn. Wax paper will keep the butter and oil from soaking into the paper, so you can use the boxes again. Fill the box with your favorite flavor of popcorn and enjoy! When you’re done, throw away the used wax paper and re-line the box the next time you use it.


Freehanding Your Design
-
1Choose your paper material. White cardboard or posterboard are great options for this project because they’re sturdy and thick, but not too thick to cut through.
- You could also use a sheet of cardstock, either white or in the color of your choice.
-
2Find a template or freehand your own. Print out a template and trace it onto your cardboard or posterboard, or simply draw out your own template. To make the lines straight and accurate, use a ruler and measure out each panel as well as tabs to attach the bottom and sides together.
- Include four main panels side by side--these should be tall and rectangular, tapering slightly at the bottom. Along the edge of one of the outer panels, add a long tab to connect the sides together.
- Add a rectangle below one panel for the bottom. The sides of the square should be the lengths of the panels’ bottom edges. Along the sides of the bottom square, add tabs to attach the bottom to the panels you fold it together.
- A standard size for the panels is 4 × 3 × 8 in (10.2 × 7.6 × 20.3 cm).
-
3Cut out the pieces with scissors, an X-acto knife, or a box cutter. Depending on how thick your paper is, choose the correct tool to cut out your design. You may also want to use a ruler with the knife tools to make straight cuts.
- If you’re using cardboard, you should use a box cutter and a ruler.
- If you’re using posterboard, an X-acto knife with a ruler should be sharp enough to cut through the material.
- If you choose to use cardstock, scissors will be sufficient to cut out your design.
-
4Glue or tape the pieces together. If you’re using glue, spread some non-toxic craft glue along the edges and let the box sit for half an hour to dry before filling it with popcorn. If you use tape, place transparent or double-sided tape along the edges or flaps and press to close the box.[2]
-
5Line the box with a sheet of wax paper and fill with popcorn. To reduce mess and re-use the box in the future, line your box with wax paper. Fill the box with warm popcorn and enjoy, then discard the greasy wax paper when you’re done. Line the box with fresh wax paper the next time you use it.[3]


Upcycling Another Box
-
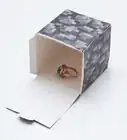
1Find a small, thin box. Look for a thin cardboard packaging box, such as the packaging for ice cream cones. Cut off the tabs and straighten any edges on the top.[4]
- If the box is too tall, cut it down to the right size by trimming the top.
-
2Cover the box in white paper. Use any thin, white paper that will fold and wrap easily. Some easy options include printer paper, wrapping paper, or butcher paper. Wrap the box in white paper and tape or glue it down, then trim off any excess.[5]
-
3Add decorative accents. Use red construction paper or cardstock to cut out some stripes and a circle for a classic red-and-white box. For a unique, personalized popcorn box, decorate with paint, stickers, or markers.[6]
-
4Add letters that spell out “popcorn.” You could cut the letters out of white paper and glue them on or use stickers. If you’re going for a classic look, place a red circle in the middle of the box and center the letters in the circle. Use glue to affix them to the box or, if you’re using stickers, simply peel them off their backing and press them to the box.[7]
-
5Line with wax paper and fill up with popcorn. Use a sheet of wax paper to cover the bottom and sides of the box and protect it from grease and butter. This way, you can re-use your box for another movie night. Fill the box with popcorn, then throw away the used wax paper when you’re done.


Printable Popcorn Box Template
Community Q&A
-
QuestionWhy would someone want popcorn boxes?
 Community AnswerSome people might want to use them for fun or as a decoration for a party. They could also be used as props for a play. There are lots of reasons why someone might want to make popcorn boxes!
Things You’ll Need
- Printable or template
- White cardstock/cardboard/posterboard
- Colored cardstock or construction paper
- White printer paper/wrapping paper/butcher paper
- Scissors/X-acto knife/box cutter
- Ruler
- Glue
- Paint/markers/stickers
- Wax paper


References
- ↑ https://ourpastimes.com/how-to-make-a-popcorn-box-12166813.html
- ↑ https://ourpastimes.com/how-to-make-a-popcorn-box-12166813.html
- ↑ https://ourpastimes.com/how-to-make-a-popcorn-box-12166813.html
- ↑ https://www.jampaper.com/blog/how-to-make-a-classic-popcorn-box/
- ↑ https://www.jampaper.com/blog/how-to-make-a-classic-popcorn-box/
- ↑ https://ourpastimes.com/how-to-make-a-popcorn-box-12166813.html
- ↑ https://www.jampaper.com/blog/how-to-make-a-classic-popcorn-box/
About This Article

To make a popcorn box, start by drawing the template of a popcorn box onto a piece of cardboard or posterboard. You can print out a template from the internet, or you can freehand your own. Your template should have 4 main panels side-by-side that taper in slightly at the bottom. Once you've traced a template onto a piece of cardboard or posterboard, cut out the outline of the box so all of the panels are still connected. Finally, fold the cardboard or posterboard into a box shape along the lines you drew and tape or glue it together. To learn how to decorate a popcorn box, scroll down!