wikiHow is a “wiki,” similar to Wikipedia, which means that many of our articles are co-written by multiple authors. To create this article, 48 people, some anonymous, worked to edit and improve it over time.
wikiHow marks an article as reader-approved once it receives enough positive feedback. In this case, 90% of readers who voted found the article helpful, earning it our reader-approved status.
This article has been viewed 1,518,945 times.
Learn more...
A favorite device for science fiction and action movie writers is the EMP generator. An EMP (or electromagnetic pulse) has the power to knock out all electronic devices within its range. Be careful because this could be dangerous. Supervise your kids if they want to try their hands at this.
Things You Should Know
- Open a disposable camera and look for the black cylinder. Discharge the capacitor with a screwdriver, then remove the board and capacitor.
- Solder the end of a wire to one of the terminals on the capacitor. Attach the other end of the wire to the switch.
- Prepare your coil and solder it to one of the capacitor leads. Attach the other end of the coil to the switch.
Steps
Assembling the Supplies
-
1Understand the EMP. You are not going to be able to create the type of EMP you saw in the Matrix or Ocean’s 11. This type of Electromagnetic Pulse Generator works best for small electronics.
-
2Gather your supplies. For this EMP you are going to take the circuit board and capacitor out of a disposable camera. Other supplies you’ll need are a:
- Soldering iron
- Enamel coated wire
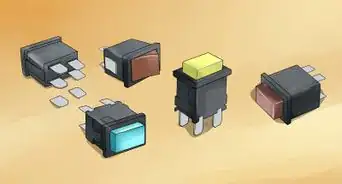
- On/off switch
- Scotch tape
- Flat head screwdriver
- Pliers
- Core wire
- Wire strippers
- Sandpaper
- A circular object about two inches in diameter.[1]
Advertisement -
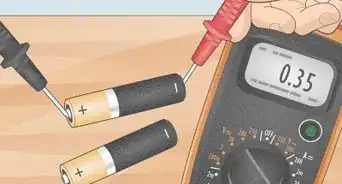
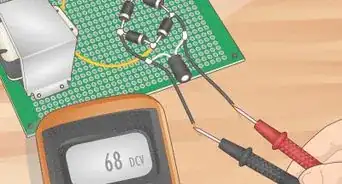
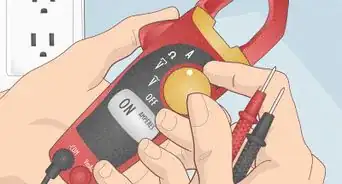
3Practice safety. You are dealing with high voltage equipment and could get shocked. When removing the capacitor in particular, be cautious. It’s also recommended to use a multimeter to gauge the voltage and a battery holder.[2]
- A multimeter is a tool that measures the electric voltage of a circuit. You don’t need one, but it will tell you the voltage of your capacitor.


Isolating a Camera's Circuit Board
-
1Obtain a disposable camera. It doesn't have to be anything fancy, just a cheap point and shoot you can pick up at any convenient store. Make sure the film is all used up before taking apart the camera.
-
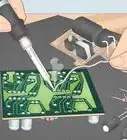
2Open the case. Using the flat edge of a screwdriver, carefully pry the camera apart. Be careful not to touch the printed circuit board or any metal parts inside.
-
3Slip on a pair of rubber gloves. You'll be dealing with the potential of getting a painful shock if you accidentally touch the flash capacitor, which carries about 300 volts.
-
4Locate the capacitor. It is commonly a black cylindrical item, with two leads coming out of the bottom.[3]
-
5Discharge the capacitor. Use an instrument with an insulated end to avoid getting shocked. An insulated tool has a rubber grip that prevents an electric current from shocking you. Slide your screwdriver’s tip against one of the sealants by the flash to discharge the capacitor. You should hear a quick pop followed by a small spray of sparks.
- Once the initial spark has sparked, you shouldn’t need to redo this. As you remove the board, continue checking the soldered sealants on the circuit board by the capacitor.
- You do not need to slide the screwdriver’s tip hard. Don’t damage the rest of the circuit board checking for active energy.[4]
-
6Remove the board and capacitor. After carefully taking apart your disposable camera, remove the board and capacitor. Mark on the battery holder, which side is positive and negative with a marker. You’ll be able to tell because there should already be a battery in the machine.
- Remove the battery from the device before continuing.[5]


Creating the EMP Generator
-
1Prepare your wire. Locate your wire and cut it to the desired length. You don’t want too much slack, so try anywhere from 3 inches to a foot. This wire will connect the switch to the capacitor. You’ll also need to strip the wire from the rubber casing.
-
2Solder the wire. Solder the wire to one of the two terminals of the capacitor. Use a quality soldering gun to avoid a messy circuit board. Solder a blob of lead free rosin core to the surface. Then heat the wire to the blob with your soldering gun. It should dry shortly to create a firm connection. [6]
-
3Attach to the switch. Take the wire you just soldered to the capacitor and attach it to the “off” side of the switch. You might need to solder the wire onto the switch, but most switches you buy have screwable ports for wires.
-
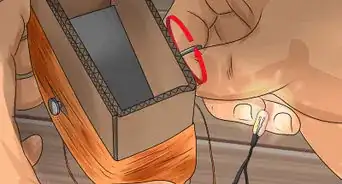
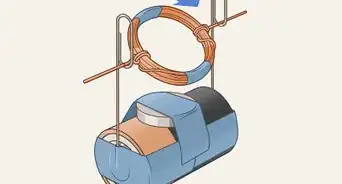
4Prepare your coil. Wrap a strip of tape around your circular object with the adhesive side facing outward until it overlaps. Now take the enamel coated wire and wrap it 7-15 times. Leave some wire out to attach to the terminals. Don’t overlap any of the coil. Take time and be precise. Make sure the wire is snug and that there aren’t any spatial gaps.
- Coat the finished wiring with tape so it’s secure.
- Slide the windings off the object.
- Cut the terminals of the coils to the desired length, but make sure you leave yourself enough room to work with.[7]
-
5Remove the enameled coat. Using sandpaper, file down the tips of the wire to remove the enamel coat. This will create a stronger bond between the components.
-
6Solder the coil to the capacitor. Attach a strand of coil to the other terminal of the capacitor. Use care and don’t create a mess.
- Solder onto the opposite side of the switch.
-
7Attach the coil to the switch. Connect one of the leads of the coil to the other “on” terminal of the switch.[8]
-
8Fire when ready. Make sure your battery for the device is charged and in place. Test the device on a handheld video game. Newer models might not work. Insert the electronic device into the circular coil and flip the switch.


Community Q&A
-
QuestionWhat is the theory behind EMP?
 Community AnswerThe idea is that any conductor passing current creates a magnetic field around it (yes, even a simple wire). Also, a magnetic field near a conductor induces a current through said conductor. The EMP (ElectroMagnetic Pulse) device creates a strong magnetic field in a coil of some sort so the nearby electronics are induced current from that magnetic field. Since all ICs are basically transistors, and the transistor is switched by current, the ICs affected by the EMP stop working, and behave unexpectedly (like resetting, sending signals when they're not supposed to, etc.). If the EMP is strong enough, it can completely fry them.
 -
QuestionAt what distance can you knock out a radio?
 Community AnswerYou will not knock out any radio with this. You will be able to generate a low-power pulse and observe it on a measurement device like an oscilloscope but that's the most interesting thing you can do. This generator does not come close to a human-produced electrostatic discharge in terms of energy. And all electronic devices are shielded against it.
 -
QuestionCan you make an EMP that only causes things to quit working for a while?Community AnswerThe EMP works by creating a surge in the device. Some devices will corrupt/scramble memory by flipping bits without damaging the components, allowing them to be rewritten to work again. Others will damage components, others will flip bits that are not rewritable and ruin those without factory equipment to rewrite them. There is no 'temporary knockout' EMP, only protected and recoverable devices.
Warnings
- Do not operate near medical equipment or computer equipment. Do not use this if you wear a pacemaker.⧼thumbs_response⧽
- May damage RFID systems or tags.⧼thumbs_response⧽
- It is illegal to use this for destruction of property or disruption of services (UK and some other countries).⧼thumbs_response⧽
- Working with high voltages can be, and is very dangerous. Always use the correct safety equipment and procedures to prevent harm to property or beings.⧼thumbs_response⧽


References
- ↑ http://www.instructables.com/id/EMP-generator/?ALLSTEPS
- ↑ http://www.instructables.com/id/EMP-generator/?ALLSTEPS
- ↑ http://www.instructables.com/id/EMP-generator/?ALLSTEPS
- ↑ http://www.instructables.com/id/EMP-generator/?ALLSTEPS
- ↑ https://www.quora.com/How-do-I-make-a-small-EMP-bomb-for-a-college-project
- ↑ https://www.quora.com/How-do-I-make-a-small-EMP-bomb-for-a-college-project
- ↑ https://www.quora.com/How-do-I-make-a-small-EMP-bomb-for-a-college-project
- ↑ https://www.quora.com/How-do-I-make-a-small-EMP-bomb-for-a-college-project
- Videos provided by Cameron Cobb