This article was co-authored by Katie Gohmann. Katherine Gohmann is a Professional Gardener in Texas. She has been a home gardener and professional gardener since 2008.
There are 26 references cited in this article, which can be found at the bottom of the page.
This article has been viewed 59,857 times.
Certain types of daisies, depending on the USDA hardiness zone, are perennial plants that return year after year. They are easy to care for and add beautiful bursts of cheery color to your garden or landscaping. Daisies also attract butterflies and look wonderful as cut flowers for vases or bouquets. To grow and maintain daisies indoors or outdoors, you only need to know a series of simple steps. Don’t get stressed over the details, though – daisies are hardy and tend to grow well in a variety of conditions![1]
Steps
Planting Daisies
-
1
-
2Plan when you will plant. Plant transplants or direct sow seeds in early spring when there is no more risk of frost. To start daisies indoors, plant the seeds 6-8 weeks before the last frost. You can look up the last frost dates in your area online by searching for a frost chart for your country or region.[4]Advertisement
-
3Plant seeds in containers if you’re starting your daisies indoors. Pour a lightweight seed-starting mix into trays or pots. You can purchase a seed-starting mix or make your own with equal parts peat moss, vermiculite and perlite.[5]
- Poke a small hole in the medium with a toothpick. Plant the seeds pointing down. Brush soil over the tops to cover the seeds.
- Keep the mixture moist and above 70° F (21° C) with at least 8 hours of bright light every day, using a grow light or window.
-
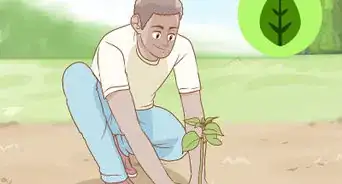
4Choose a spot if planting outside, and clear the area. Daisies love full sun, but partial sun will also work. Pick a planting area with moist, well-drained soil. Remove any existing growth from the ground so that your daisies won’t be crowded.[6]
- Daisies can survive in poor soil. But if you want them to thrive, the soil should be moderate: not too rich and not too poor.
-
5Prepare the soil. Work a moderate amount of organic compost and/or aged manure into the soil for better blooms. Level the soil with a hoe and tamp it down lightly.[7]
-
6Plant your daisies outside if desired. For direct sow, cover the seeds lightly with ⅛ in (0.32 cm) of soil. When seedlings grow 2-3 in (5.1-7.6 cm) tall, thin them to one plant every 12 in (30.5 cm).
- To plant existing seedlings, space the plants 12 to 24 in (30.5 to 60.9 cm) apart on all sides.[8]
-
7Water the seeds or seedlings right away. For seeds that have not yet germinated, water the area regularly to keep it moist.
- Seedlings will need to be watered again only when the soil looks dry.


Caring for Daisies Outdoors
-
1Fertilize two weeks after planting and once a month thereafter. Use all-purpose fertilizer like 10-10-10 in the amount listed on the label. For the best results, switch to a fertilizer high in phosphorous (such as 10-16-10) just before the plant blooms.[9]
- To apply fertilizer: granular fertilizer can be sprinkled on the soil with or without a spreader. Water-soluble fertilizer should be applied using a sprayer or watering can. For either method, always measure your application based on the fertilizer's instruction label.
-
2Water daisies as needed. Daisies don’t require a set watering schedule; in fact, they prefer the soil to dry out somewhat between waterings. Check the top 4-5 in (10.2-12.7 cm) of soil – if it’s dry, water the daisies deeply from underneath so that their leaves don’t get wet. The best time to do this is in the morning.[10]
- Daisies don’t need watering in the winter unless the weather is unseasonably dry. If that is the case, water them 1-2 in (2.5-5.1 cm) every other month.
-
3Mulch around the daisies and/or hand weed as needed. Weeds can attract parasites and starve daisies of nutrients. Make sure to wear gardening gloves and remove weeds by hand or with a short-handled weeding tool regularly. This is especially important when your daisies are still young.[11]
- For less necessary maintenance of weeds, apply 2-3 in (5.1-7.6 cm) of mulch in mid-to-late spring when the ground warms and dries from winter. Keep a 2-3 in (5.1-7.6 cm) circumference around the plant base free from mulch.[12]
-
4Deadhead and prune the daisies as needed. Throughout the growing season, prune away any dead leaves and snip the flower heads off whenever their appearance begins to fade. This encourages regrowth.[13]
- Stop deadheading the daisies near the end of the growing season if you plan to collect the seeds. The end of the growing season will vary based on your location.[14]
-
5Cut down your daisies at the end of the growing season. Trim down your daisies where the stem meets the foliage, approximately 3 in (7.6 cm) above soil level.[15]
- Wait until the last killing frost. You can find the date range of freezes by looking up your gardening zone online. After trimming down, protect the perennials’ root balls with a layer of mulch. You can use straw, hay or leaves.
-
6Divide your daisies when they lack space. Dig deeply into the ground about 6-8 in (15.2-20.3 cm) away from the plants’ centers. Loosen the roots by rocking the shovel, and lift the plants gently out of the ground by the root balls. Carefully pull the clump apart and discard the woody centers. Replant wherever desired, each group of daisies 12 in (30.5 cm) away from other plants.[16]
- Autumn is the preferable time to divide your daisies, however you can divide them in springtime if necessary.
- When dividing your daisies, place them gently in a temporary container to move them, and replant them right away.
-
7Maintain your existing perennials. Use a single application of fertilizer just before the new spring growth appears, or as soon as it pushes up through the ground.[17]
- Side dress with compost or apply no more than 1 pound (0.45 kg) of nitrogen per 1,000 square feet (305 square meters).


Caring for Daisies Indoors
-
1Put your daisies in an appropriate container. Make sure the container is at least 12 in (30.5 cm) with two or more drainage holes. Glazed ceramic or plastic pots prevent wilting and help the soil stay moist.[18]
- The container should be sterilized. Soak it for 10 minutes in a solution of 1 part household bleach to 9 parts water. Afterwards, scrub it with dish detergent and water and let it fully dry before using it.[19]
-
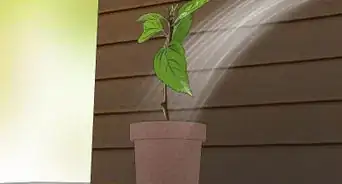
2Set up a light source. Daisies should have sunlight or a grow light all day in the spring, summer and fall seasons. Indirect sunlight for at least 3-5 hours is sufficient for the wintertime.[20]
- House plants need light from all sides. If your light source only hits one side of the plant, make sure to rotate the plant a quarter turn about every week.[21]
-
3Water the daisies and maintain a proper temperature. Check the top 1 in (2.54 cm) of soil – if it feels dry to the touch, water your daisies deeply. Allow the pot to drain completely. If the saucer or drip tray is still waterlogged, pour out the excess water so that the plant doesn’t sit in soggy soil.[22]
- Daisies growing indoors prefer a temperature between 40 and 70 degrees Fahrenheit (4 and 21 degrees Celsius).[23]
- Water plants from underneath and avoid getting the leaves wet.
-
4
-
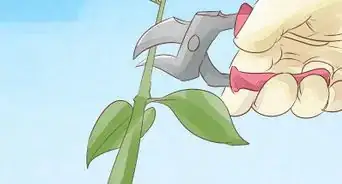
5Deadhead the daisies and prune their leaves as needed. Use sharp, clean shears and trim close to the stem. Whenever the blooms begins to wilt, snip off the flowerheads.[26]
- When the leaves look wilted or damaged, prune them to improve the plant’s health.
-
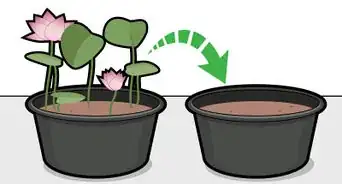
6Move your daisies as they grow. If the plant gets crowded in its container, move it to a larger pot.[27]


Saving Daisy Seeds
-
1Harvest the daisy seeds. The seed head should be completely ripe before you collect any seeds – it should look brown and possibly cracked.[28]
- Cut daisy stems at the base of each plant. Place them in a paper bag tied closed with string.
-
2
-
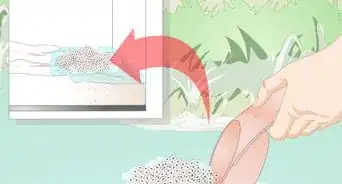
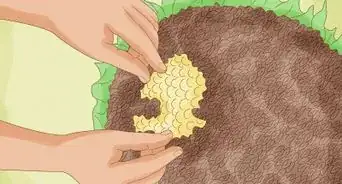
3Collect the seeds. Check the bag to make sure the seed heads are brittle. Squeeze flower heads so that the seeds fall into the bottom of the bag.[31]
- Dump the bag’s contents onto a plate. Separate the golden-brown seeds from any debris. Pour the seeds into a paper envelope and store them in a cool, dry place away from strong light.


Dealing with Growing Problems
-
1Check the pH level of the soil. If you’ve followed proper planting and maintaining methods and your daisies still aren’t thriving, try testing the soil. Daisies prefer slightly acidic soil. Soil test kits should reflect a pH range of 6.0 to 7.0.[32]
- Add limestone if your soil is too acidic. Add sulfur or peat moss if the soil is too alkaline.
-
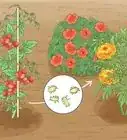
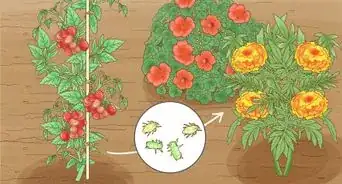
2Treat daisies for pests as needed. Daisies can be affected by the following pests: aphids, mites, leafminers, nematodes, thrips and whiteflies. Most often, you will have to remove the affected leaves, isolate infested plants from healthy ones, apply a narrow-range oil or insecticidal soap, or use a water spray.[33]
- Visit a garden center or shop online to find available products for addressing specific pest problems.
-
3Secure a cleaner, drier environment. You can do this if the daisies show signs of disease. Daisies stricken with fungal or bacterial diseases are likely too moist and/or crowded. Signs of disease problems include leaf spotting, yellowing or death, stunted shoots, and wilting.[34]
- Remove any spent or damaged blooms and leaves, then clear plant debris from the area to keep the plant bases dry.
-
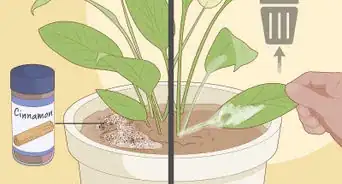
4Deal with mold. Mold may develop on the soil of indoor plants. If you see white mold on the soil's surface, scrape it off using gloves and move the plant to a well-ventilated area to let it dry out.[35]
- If the mold returns, replant the daisies in a clean container with fresh, sterile indoor potting soil.


Community Q&A
-
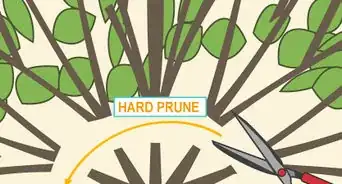
QuestionHow far down do I cut my dead daisies that are planted in pots outside?
 Community AnswerArgyranthemums can be cut back hard by as many as 12 inches.
Warnings
- Always follow the safety instructions on the label of any chemicals.⧼thumbs_response⧽
- Don’t over-fertilize your daisies or they will flop over mid-season.[37]⧼thumbs_response⧽


References
- ↑ http://garden.org/learn/articles/view/2044/
- ↑ http://gardenhobbies.com/flower/daisy.html
- ↑ http://www.almanac.com/plant/shasta-daisies
- ↑ https://davesgarden.com/guides/freeze-frost-dates/#b
- ↑ http://www.todayshomeowner.com/how-to-grow-gerbera-daisies-from-seed/
- ↑ http://www.americanmeadows.com/fall-planting-is-best
- ↑ https://www.planetnatural.com/growing-daisies/
- ↑ https://www.planetnatural.com/growing-daisies/
- ↑ http://homeguides.sfgate.com/harvesting-daisy-seeds-65384.html
- ↑ http://homeguides.sfgate.com/shasta-daisy-diseases-66113.html
- ↑ http://ipm.ucanr.edu/PMG/GARDEN/FLOWERS/WEEDS/flowweedmgt.html
- ↑ http://homeguides.sfgate.com/mulch-small-perennials-36562.html
- ↑ http://www.finegardening.com/their-heads-deadheading-perennials
- ↑ http://homeguides.sfgate.com/harvesting-daisy-seeds-65384.html
- ↑ http://www.silive.com/homegarden/index.ssf/2012/07/shasta_daisies_are_garden_show.html
- ↑ http://homeguides.sfgate.com/split-daisies-42654.html
- ↑ http://msue.anr.msu.edu/news/fertilizing_established_perennial_gardens_feed_em_and_weep
- ↑ http://homeguides.sfgate.com/grow-shasta-daisies-pots-34491.html
- ↑ http://homeguides.sfgate.com/dustylooking-mold-soil-houseplants-41109.html
- ↑ http://homeguides.sfgate.com/care-gerbera-daisies-inside-65627.html
- ↑ http://www.gardeningknowhow.com/houseplants/hpgen/rotating-houseplants.htm
- ↑ http://www.gardeningknowhow.com/ornamental/flowers/gerbera-daisy/gerbera-daisies-indoors.htm
- ↑ http://homeguides.sfgate.com/care-gerbera-daisies-inside-65627.html
- ↑ http://www.gardeningknowhow.com/ornamental/flowers/gerbera-daisy/gerbera-daisies-indoors.htm
- ↑ http://homeguides.sfgate.com/care-gerbera-daisies-inside-65627.html
- ↑ http://homeguides.sfgate.com/care-gerbera-daisies-inside-65627.html
- ↑ http://www.gardeningknowhow.com/ornamental/flowers/gerbera-daisy/gerbera-daisies-indoors.htm
- ↑ http://homeguides.sfgate.com/harvesting-daisy-seeds-65384.html
- ↑ http://homeguides.sfgate.com/harvesting-daisy-seeds-65384.html
- ↑ http://homeguides.sfgate.com/collect-shasta-daisy-seeds-59112.html
- ↑ http://homeguides.sfgate.com/collect-shasta-daisy-seeds-59112.html
- ↑ http://homeguides.sfgate.com/gerbera-daisy-soil-affects-61708.html
- ↑ http://homeguides.sfgate.com/pests-gerbera-daisy-58185.html
- ↑ http://homeguides.sfgate.com/shasta-daisy-diseases-66113.html
- ↑ http://homeguides.sfgate.com/dustylooking-mold-soil-houseplants-41109.html
- ↑ http://www.bbg.org/gardening/article/cut-flower_care
- ↑ http://msue.anr.msu.edu/news/fertilizing_established_perennial_gardens_feed_em_and_weep
About This Article

To care for daisies, fertilize them with all-purpose fertilizer 2 weeks after planting, and water them in the morning whenever the soil looks dry. You'll also want to mulch around the daisies and remove any weeds that grow by hand to prevent parasites from gathering. If you're growing daisies indoors, make sure they have direct sunlight or provide them with a growing light. Additionally, try to keep the temperature between 40 degrees F and 70 degrees F. For tips on how to dead head your daisies and cut them down after the growing season, read on!