This article was co-authored by wikiHow Staff. Our trained team of editors and researchers validate articles for accuracy and comprehensiveness. wikiHow's Content Management Team carefully monitors the work from our editorial staff to ensure that each article is backed by trusted research and meets our high quality standards.
There are 13 references cited in this article, which can be found at the bottom of the page.
This article has been viewed 11,814 times.
Learn more...
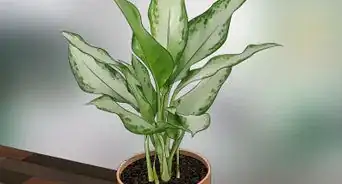
Bromeliads are a family of tropical plants known for their lush, vibrant foliage. Pineapples are the most recognizable type of bromeliad, but there are over 3,000 species in total, including popular varieties like Tillandsia, Guzmania, and Neoregelia. Thanks to their hardy nature and short list of needs, bromeliads make excellent “pet” plants and are easy to raise indoors.
Steps
Potting a Bromeliad
-
1Choose a porous container if you live somewhere with a cool, wet climate. Materials like unglazed clay, terracotta, and concrete are full of tiny holes that help wick excess water. Providing a quick-drying environment for your bromeliad's root system will prevent it from becoming waterlogged, which is a leading cause of root rot and other devastating moisture-related diseases.[1]
- Peat, recycled fiber, and hypertufa (a type of artificial stone that's easy to make at home) containers also tend to be a bit more breathable.[2]
- Most species of bromeliads store moisture extremely well, much like succulents. While this ability is part of the plants' low-maintenance appeal, it also makes them sensitive to overwatering.
-
2Go with a nonporous container if you're in a warm, arid region. Containers made from plastic, treated wood, and other smooth materials help slow evaporation, and can keep your plant from drying up in places where moisture is scarce. Keep in mind that it's still important to use a container that has drainage holes on the bottom, as you want your plant to avoid accumulating standing water at all costs.[3]
- Stay away from metal containers. These can leach compounds that can easily harm or even kill your plant.[4]
Advertisement -
3Fill your container with a light, fast-draining potting soil. Head down to your local gardening store, greenhouse, or plant nursery and pick up a bag of potting mix formulated specifically for use with bromeliads. If you don’t have any luck finding a suitable product, orchid mixes and pine bark are also safe choices.[5]
- Since they're vulnerable to overwatering, bromeliads need a substrate material that’s dry and chunky, with plenty of room for air to circulate.
- Ordinary soils are too dense to provide the kind of drainage that bromeliads need to keep their roots dry.
-
4Plant your bromeliad so that the lower leaves are even with the soil. Create a shallow depression in the center of your potting mix and lower in the plant’s root system gently. Then, push the soil back in around the base of the plant and pat it lightly with the pad of your finger to compact it.[6]
- A container as small as 4–6 inches (10–15 cm) should offer more than enough room to comfortably house most species of bromeliads.
Tip: The positioning of the plant in its container is key to its success. If it sits too low, it could easily become oversaturated. If it sits too high, it may not have enough support to remain upright once it reaches a certain size.
-
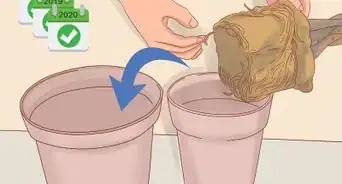
5Repot young bromeliads when they outgrow their original containers. If your bromeliad has already bloomed, it means that its root system is done developing, and you won't ever need to repot it unless you just want to. If you bought your plant while it was still immature, however, you may need to move it into a larger container as it continues to grow. You'll know it's time to say goodbye to your original container when it stops retaining water after regular waterings.[7]
- Bromeliads have small root systems compared to many indoor plants, so it shouldn't generally be necessary to use a container any bigger than about 6 inches (15 cm).
- If your new container has already been used in the past, be sure it wash it out with hot, soapy water or a diluted bleach solution to avoid contaminating the delicate bromeliad pup.[8]


Watering Your Bromeliad
-
1Use fresh, untreated water whenever possible. Rainwater is the ideal source of moisture for bromeliads, as its what they’re used to getting in their natural environment. To harvest your own rainwater, simply set out a few open containers whenever the forecast calls for rain, then consolidate the liquid into a single large container, which you can then use for all of your plant needs.[9]
- If for some reason you’re unable to keep a ready supply of rainwater on hand, stock up on distilled water, or fill a pitcher or watering can with tap water and let it sit uncovered overnight to give the chemicals it's been treated with time to evaporate.[10]
- Never use metal containers to draw or collect water—remember, the compounds found in metals can be highly toxic to bromeliads.
-
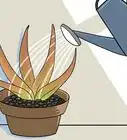
2Water your bromeliad every 3-5 days or as needed. Use enough water to saturate the soil around the plant’s base. Under normal indoor conditions, this should provide enough moisture to last your plant several days. To avoid overwatering, hold off on further waterings until the top layer of soil dries out to a depth of about 2 inches (5.1 cm).[11]
- Don’t forget to empty and replace the drainage tray underneath your container after each watering. It’s not good for your bromeliad to sit in standing water, as this will make it more susceptible to root rot.
-
3Fill up your plant’s water tank rather than watering the soil if you prefer. Certain types of bromeliads have small, cup-like chambers at the center of their foliage that collects water as it runs down the leaves. Watering these species is as easy as emptying and replenishing their tanks once every 1-3 days, or whenever you notice the water level dropping. Some can even get by with less frequent changes.[12]
- To get the most out of each watering, overfill the tank slightly so that the excess water flows over the leaves and down into the soil. Don't hydrate both the tank and the soil, as this will likely be too much total moisture.
Tip: Always pour out the old water before adding the fresh. This will prevent calcium, salts, and other minerals and chemicals from building up inside the tank over time.[13]
-
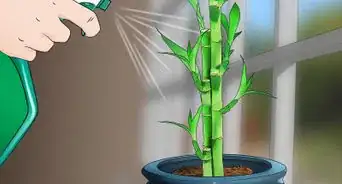
4Mist bromeliads growing on rocks, roots, or other structures 3-5 times a day. Bromeliads that grow outside of the ground are known as "epiphytic" bromeliads. Since there’s no soil to water, the best way to keep them wet is by spraying them a few times throughout the day. Make sure you focus the moisture on the flowers, leaves, and the area around the central tank.[14]
- Leave a spray bottle somewhere near your plant. That way, you’ll be more likely to remember to give it an occasional spritz when you walk by.
- As with normal waterings, it’s recommended that you use rainwater, distilled water, or denatured tap water for the sake of your plant’s health.[15]


Helping Your Bromeliad Thrive
-
1Situate your plant where it can receive bright partial sunlight. Bromeliads have a fairly wide range of preferences when it comes to lighting. As a general rule, however, they tend to favor filtered or dappled sunlight or partial shade. A south-facing window will make an excellent location for most plants, particularly in the wintertime.[16]
- Too much direct sunlight can cause your potting medium to dry out faster, or even damage your plant’s leaves.
- To get a better idea of your bromeliad’s light requirements, take the time to research the exact species you’re raising.[17]
Tip: Yellow or pale green leaves are a sign of overabundant sun, while drooping, dark green leaves often indicate that their surroundings are too dim. Keep a close eye on your plant and aim for the middle ground.[18]
-
2Create a humid environment for your plant. There are several ways you can go about doing this. The simplest solution is to keep a humidifier running near your plant whenever possible. Alternatively, fill a shallow tray with water, then set the potted plant inside the tray. If for some reason neither of these options works for you, you can also fill a spray bottle with clean water and mist your plant every few hours in addition to your regular waterings.[19]
- It’s especially important to make sure your bromeliad has lots of environmental moisture if you live somewhere with a dry climate or often keep your home heated.
- Bromeliads tend to do best in areas with a humidity of 60% or higher.
-
3Fertilize your bromeliad once or twice a year if desired. It isn’t strictly necessary to fertilize most types of bromeliads. If you think your plant might benefit from some extra nourishment, however, just dilute an all-purpose liquid fertilizer to ¼ the recommended concentration and pour the mixture into the soil or the plant’s central tank after one of your regular waterings.[20]
- Another option is to mix a few slow-release plant food pellets into your potting soil, or drop a single pellet into the plant’s tank.[21]
- If you have a robust bromeliad that you want to feed more regularly, it’s okay to give it some fertilizer once a month during its main growing season (which will depend on its individual age rather than the time of year).
- Only feed your bromeliad during the spring and summer months. Fertilizer won’t have any effect in the wintertime while the plant isn’t actively growing, so you’ll just be wasting time and supplies.[22]
-
4Trim damaged or discolored spots from the leaves whenever you find them. Bromeliads don’t need to be pruned or cut back. Every now and then, though, you may come across a few places where the leaves show signs of stress. When this happens, use a sharp pair of scissors or garden shears to snip off the problem area, following the natural shape of the leaf as well as you can.[23]
- In most cases, the modifications you make will be virtually invisible in the thick, layered foliage.


Things You’ll Need
Potting a Bromeliad
- Spacious, well-drained container
- Light, well-drained potting soil mix (bromeliad mix, orchid mix, pine bark, etc.)
Watering Your Bromeliad
- Rainwater
- Pitcher or watering can
- Open containers of various sizes
- Distilled water or denatured tap water (optional)
- Spray bottle (optional)
Meeting Your Bromeliad’s Basic Needs
- Humidifier or shallow tray filled with water (optional)
- All-purpose liquid fertilizer (optional)
- Scissors or garden shears (optional)


References
- ↑ https://www.bromeliads.info/general-indoor-outdoor-bromeliad-care/
- ↑ https://web.extension.illinois.edu/containergardening/choosing_material.cfm
- ↑ https://www.bromeliads.info/general-indoor-outdoor-bromeliad-care/
- ↑ https://www.goodhousekeeping.com/home/gardening/a20707074/container-gardening-tips/
- ↑ https://www.youtube.com/watch?v=M6ecFNjhg0A&feature=youtu.be&t=238
- ↑ https://todayshomeowner.com/how-to-grow-bromeliad-houseplants/
- ↑ https://www.youtube.com/watch?v=XRVSFl-WbA4&feature=youtu.be&t=196
- ↑ https://www.bromeliads.info/bromeliad-potting-soil/
- ↑ https://www.bromeliads.info/best-water-for-plants/
- ↑ https://www.apartmenttherapy.com/bromeliad-plant-tips-for-growing-propagating-and-care-237764
- ↑ https://www.bromeliads.info/general-indoor-outdoor-bromeliad-care/
- ↑ https://edis.ifas.ufl.edu/ep337
- ↑ https://todayshomeowner.com/how-to-grow-bromeliad-houseplants/
- ↑ https://www.bromeliads.info/general-indoor-outdoor-bromeliad-care/
- ↑ https://www.apartmenttherapy.com/bromeliad-plant-tips-for-growing-propagating-and-care-237764
- ↑ https://www.bhg.com.au/growing-bromeliads
- ↑ https://dev.bromeliads.info/caring-for-bromeliads-part-one-light/
- ↑ https://edis.ifas.ufl.edu/ep337
- ↑ https://www.bromeliads.info/general-indoor-outdoor-bromeliad-care/
- ↑ https://www.gardenclinic.com.au/how-to-grow-article/bromeliads
- ↑ https://www.apartmenttherapy.com/bromeliad-plant-tips-for-growing-propagating-and-care-237764
- ↑ https://edis.ifas.ufl.edu/ep337
- ↑ https://www.gardenclinic.com.au/how-to-grow-article/bromeliads
About This Article