This article was co-authored by Tyler Radford. Tyler Radford is a Plant Specialist at Hollie’s Farm & Garden in Tampa, Florida. With over nine years of experience, Tyler specializes in gardening, planting, mulching, and potting. Hollie’s Farm & Garden is a full-service landscape nursery offering landscape supplies including trees, shrubs, mulch, and flagstone.
There are 7 references cited in this article, which can be found at the bottom of the page.
wikiHow marks an article as reader-approved once it receives enough positive feedback. This article received 27 testimonials and 95% of readers who voted found it helpful, earning it our reader-approved status.
This article has been viewed 485,981 times.
The Norfolk Island pine is a type of coniferous tree that's native to Norfolk Island, which is located between Australia and New Zealand in the Pacific Ocean. Although it's not a true pine tree, the Norfolk Island pine does look like one, and is often used as a Christmas tree. In the wild, these trees can grow to 200 feet (61 m). Norfolk Island pines also make great houseplants, and will grow to a height of 5 to 8 feet (1.5 to 2.4 m) indoors. These trees are very drought resistant and don't need a lot of water to thrive.[1] The secret to caring for this type of tree is providing lots of humidity and indirect sunlight, and keeping the right temperature range.
Steps
Providing the Right Nutrients
-
1
-
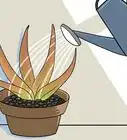
2Keep the soil slightly moist. These trees like soil that's evenly moist, similar to the slight dampness of a wrung-out sponge, but not wet or soggy. Before watering, stick your finger into the soil. When the top inch (2.5 cm) of the soil is dry, water thoroughly with lukewarm water until the water drains through the holes in the bottom of the pot.
- Allow all the excess water to drain through into the saucer below the pot. Empty the saucer when the water stops flowing.[4]
- Even if it only happens once, severe drying can cause needles and branches to dry out, fall off, and never grow back.
Advertisement -
3Make sure the tree gets lots of indirect sunlight. Norfolk Island pines need several hours of sunlight per day, but they do not like direct sunlight. A good location for this plant is in a room with lots of northeast- or northwest-facing windows.
- You can also place these trees in rooms with south- or west-facing windows, but they must be shaded windows to protect the tree from direct sun.
- Other great locations for a Norfolk Island pine include sunrooms and covered patios.[5]
-
4Fertilize during growing phases. In the spring, summer, and early fall, feed the Norfolk Island pine with a balanced fertilizer every two weeks. When the plant needs to be watered, add some liquid fertilizer to the water and feed the tree.
- A balanced fertilizer is one with equal parts nitrogen, phosphorous, and potassium.
- Norfolk Island pines do not need to be fed during dormant periods in late fall and winter.
- To know when the growing phase starts up again, look for light green growth on the tips of the branches in spring.[6]


Growing a Healthy Norfolk Pine
-
1Turn the tree regularly. Like a sunflower that turns to face the light, a Norfolk Island pine will grow or lean toward light sources. To prevent the tree from growing irregularly and becoming lopsided, turn the pot a quarter turn every week.
- Be careful not to jostle the tree too much when you turn the pot, as these trees don't like to be moved.
-
2Maintain the right temperature. These trees do not like temperature extremes, and will not survive temperatures much below 35 F (2 C) or above 85 F (24 C). The ideal daytime temperature is about 65 F (16 C). The perfect nighttime temperature is slightly cooler, around 55 F (13 C).[7]
- While these trees do like cooler nighttime temperatures, they do not like sudden changes. A shady corner in a sunroom is a good spot for this type of tree, since the nighttime temperature will naturally drop when the sun goes down.
-
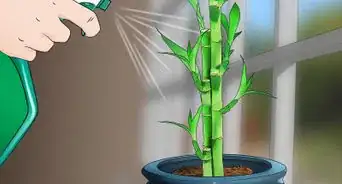
3Provide the tree with additional humidity. In their natural habitat, Norfolk Island pines grow in a tropical location by the ocean, so they like moist air. The ideal humidity for these trees is 50 percent. You can maintain that humidity by misting the tree daily with room-temperature water, or by installing a nearby humidifier.[8]
- It's especially important to provide additional humidity if you live in a cold or dry climate.
-
4Trim only brown or dead foliage. This type of tree doesn't require cosmetic pruning. The only pruning you should do is trimming to remove branches that die or tips that turn brown. Use sharp pruning shears to trim dead foliage.
- When you prune a Norfolk Pine, you prevent the cut point from growing any more. So instead of encouraging new growth, pruning will force growth to occur elsewhere, and this will change the shape of the tree.[9]


Picking the Ideal Location
-
1Keep the tree away from drafts. Both cold and hot drafts can cause the needles to drop, so pick a location for your Norfolk Island pine that's far from air intakes, fans, and heating and cooling vents.
- You should also keep the tree a safe distance from doors and windows that could let in drafts.
-
2Avoid moving the tree. The root system of the Norfolk Island pine is very fragile and can be easily damaged when the tree is moved. Do not move the tree unless you absolutely have to, and once you find an ideal location where the tree thrives, keep it there as long as possible.[10]
- If you do have to move the tree, move it very carefully, and only short distances at a time.
- Find a location for the tree where it won't accidentally be moved, hit, knocked, or jostled.
-
3Repot the tree every few years. Repot the plant in spring every three or four years, when the roots become visible above the soil. Prepare the new pot by filling it halfway with your soil, sand, and peat moss mixture. Carefully dig the tree from the soil in its original pot, and place it into the new soil. Fill the pot the rest of the way and cover the root system with soil.
- Each time you repot, pick a pot that's one size larger than the current pot.
- The pot should have good drainage holes in the bottom to allow excess water to escape.
- While these trees don't like being moved, it is necessary to repot them now and then to provide fresh soil and to accommodate the growing root system.[11]


Troubleshooting Common Problems
-
1Water less if the branches become limp and yellow. Norfolk Island pines like moist soil, but they don't do well with excessive watering.[12] If the branches become limp or start turning yellow, water the tree less often.[13]
- The tree only needs to be watered when the top inch (2.5 cm) of soil becomes dry.
- The yellow needles may also drop if you're overwatering.
-
2Adjust your watering if the needles turn yellow. Yellowing needles (not accompanied by limp branches) can be a sign that you aren't giving the tree enough water. Water the soil thoroughly when it dries out, and provide the tree with additional humidity.[14]
- You can increase the humidity by misting the tree daily.
-
3Give the plant more light if the lower branches become brown. Watch out for the lower branches turning brown and dropping off especially. This is a telltale sign that the tree isn't getting enough light.[15] Move the tree closer to a northeast or northwest window, a shaded south or west window, or to a solarium.
- Norfolk Island pines need lots of indirect sunlight.
- If you cannot provide the tree with enough natural light, consider using a full-spectrum bulb that's designed for plants.
-
4Adjust the moisture levels if the needles drop. Dropping needles that don't change color can be a sign of a few things, including too much or too little moisture. Often, it's an indication of too little moisture. If the soil feels dry and you don't water often, water the tree more frequently. If the soil is damp and you water often, cut back.
- Dropping needles can also indicate that the tree is too close to a draft.


Expert Q&A
Did you know you can get expert answers for this article?
Unlock expert answers by supporting wikiHow
-
QuestionAre outdoor Norfolk pines easy to care for?
 Tyler RadfordTyler Radford is a Plant Specialist at Hollie’s Farm & Garden in Tampa, Florida. With over nine years of experience, Tyler specializes in gardening, planting, mulching, and potting. Hollie’s Farm & Garden is a full-service landscape nursery offering landscape supplies including trees, shrubs, mulch, and flagstone.
Plant SpecialistYes, outdoor Norfolks pretty much take care of themselves. They're drought-resistant so they don't need a lot of water.
Support wikiHow by unlocking this expert answer.
-
QuestionI have 2 Norfolk Island Pines in my dining area that are about 12-14 yrs old. One has reached the ceiling. Must I give away something I've nurtured for so long to someone with a higher ceiling or can I cut or re-direct the top?
 Katie GohmannKatherine Gohmann is a Professional Gardener in Texas. She has been a home gardener and professional gardener since 2008.
Professional GardenerSome people say you can cut the top off (and even root it) without issue, and others say that even if the plant survives the ordeal, it will grow crooked and ugly ever after. So, it's really up to you. You could try topping it, and hope for the best. Or you could try to sell it, or donate it to a church or hospital.Support wikiHow by unlocking this expert answer.
-
QuestionHow can I move a Norfolk pine that has grown too tall to be in the flowerbed it is planted in? And when is the best time to transplant it?Katie GohmannKatherine Gohmann is a Professional Gardener in Texas. She has been a home gardener and professional gardener since 2008.
Professional GardenerYou're going to need to be extremely careful when moving your Norfolk pine. Trees' root systems generally extend horizontally to twice as many feet as the tree is high. Damaging the roots can kill the tree. If the tree is a few feet tall, you could try moving it in the winter. Otherwise, it may be best to consult a tree professional.Support wikiHow by unlocking this expert answer.
wikiHow Video: How to Care for a Norfolk Pine


References
- ↑ Tyler Radford. Plant Specialist. Expert Interview. 6 October 2020.
- ↑ https://www.southernstates.com/articles/norfolk-island-pine-care.aspx
- ↑ Tyler Radford. Plant Specialist. Expert Interview. 6 October 2020.
- ↑ http://www.pennington.com/resources/fertilizer/indoor-gardening/nurturing-norfolk-island-pines-year-round
- ↑ http://www.flowershopnetwork.com/blog/flower-plant-care/plant-care/norfolk-island-pine-plant-care/
- ↑ http://www.pennington.com/resources/fertilizer/indoor-gardening/nurturing-norfolk-island-pines-year-round
- ↑ https://www.southernstates.com/articles/norfolk-island-pine-care.aspx
- ↑ http://www.guide-to-houseplants.com/norfolk-island-pine.html
- ↑ http://www.bigblogofgardening.com/potted-norfolk-pine-christmas-tree/
- ↑ https://www.southernstates.com/articles/norfolk-island-pine-care.aspx
- ↑ http://www.guide-to-houseplants.com/norfolk-island-pine.html
- ↑ Tyler Radford. Plant Specialist. Expert Interview. 6 October 2020.
- ↑ http://www.flowershopnetwork.com/blog/flower-plant-care/plant-care/norfolk-island-pine-plant-care/
- ↑ http://www.guide-to-houseplants.com/norfolk-island-pine.html
- ↑ http://www.walterreeves.com/gardening-q-and-a/norfolk-pine-dont-plant-outdoors/
About This Article

To care for a Norfolk pine, pot it in a soil mixture that’s made up of equal parts potting soil, peat moss, and sand so it has the slightly acidic, sandy soil it needs to thrive. Place your Norfolk pine in a spot that gets several hours of bright, indirect sunlight every day. Keep the soil slightly moist at all times by watering it whenever the top inch (2.5 cm) feels dry. Norfolk pines do best when the humidity is around 50 percent, so consider setting up a humidifier nearby if you live in a cold or dry climate. Fertilize your Norfolk pine every 2 weeks in the spring, summer, and early fall with a balanced fertilizer to promote healthy growth. You should only need to repot your pine every 3-4 years. For tips on how to troubleshoot potential problems with your Norfolk pine, keep reading the advice of our Horticulturist reviewer!