This article was co-authored by Andrew Carberry, MPH. Andrew Carberry is a Food Systems Expert and the Senior Program Associate at the Wallace Centere at Winrock International in Little Rock, Arkansas. He has worked in food systems since 2008 and has experience working on farm-to-school projects, food safety programs, and working with local and state coalitions in Arkansas. He is a graduate of the College of William and Mary and holds a Masters degree in public health and nutrition from the University of Tennessee.
This article has been viewed 90,187 times.
There are many reasons why you may need to collect some worms: You might be using them as fishing bait, using them to help composting natural materials, or using them in bird feed. Whatever reason you need to gather worms, there are a few easy methods for luring worms out of the ground.
Steps
Catching Worms By Digging
-
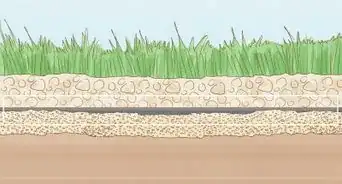
1Find your digging area. Worms prefer living in black, moist, nutrient-rich soil with a covering of mulch or leaves. Small garden spaces, bases of trees, and areas that have decomposing leaves, are all typical sites that worms can be found. The optimal time to catch worms is right after a rainfall.
- It may be helpful to catch worms at dusk or nighttime. Night crawlers particularly like to surface at night.
-
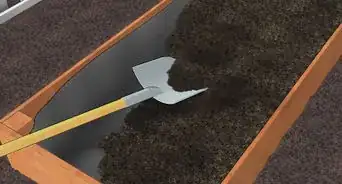
2Dig into the dirt. Softly thrust a shovel into the moist dirt. Push the shovel down until the majority of the blade is in the dirt. You can use your foot to help push the shovel down further. Use leverage to lift the pile of dirt out of the ground, and look for worms in the newly made hole.
- If you don’t immediately see worms wriggling around in the hole, you may have to keep digging a bit. You can also rake the mulch and leaves away from the soil and rake into the soil itself to stir it up and expose the worms. However, keep in mind that you will have to work quickly because they will head deeper underground when once the soil is disturbed.
Advertisement -
3Look under objects. While searching for worms, turn big rocks, pieces of wood, bricks – along with any other relatively big and heavy object making contact with the soil – over, to search for worms underneath.
- You might find more success doing this when it is darker out. Once the object is flipped over, the worms will most likely try to burrow back into the soil when being shone with a light source.
-
4Collect the worms. Use your fingers to pick up any worms you see. Try to pick the worms up by their end side, which will be lighter in color. This is because the end of their body is the last part of the worm to come out from the ground, and the first part to retract back in.[1] You want to prevent the worms from getting the chance to retract back into the dirt.
- If you grab a worm while it’s trying to go back into the dirt, do not yank it out of the ground. This can most definitely break the worm in half. Instead, hold steady pressure, keeping their body taut (don’t pull), and the worm will eventually relax and release their hold from the dirt.[2]
- After grabbing a worm or two, dip your fingers into the apron full of sawdust. This will help dry your fingers from the slime covering the worms, and increase your grip when picking up the worms.[3]
- Depending on what you’re using the worms for, a dozen or two dozen worms should suffice. You don’t want to remove a large number of worms from any given area, because it could have serious negative repercussions for that natural environment.
-
5Preserve the worms for later. As you pluck the worms from the ground, drop them into the plastic container with some dirt, a bit of decomposed leaves, or worm bedding.[4] This will keep the worms alive while giving them an environment to nest in, until you use them later.
-
6Store the worms. The collected worms should be stored in a cool (less than room temperature), dark location. Be sure to put a cover on your plastic container.[5] Worms are capable of crawling out of containers without lids. The lid must have puncture holes (about 5-6 holes a little bigger than the size of a pen tip), so the worms have the opportunity to breathe.
- If you don’t put holes in the container lid, you’ll have a container full of dead worms.
- Consider storing your collected worms in the refrigerator.[6] A refrigerator qualifies as a cool, dark storage location, but just be conscious of the temperature of the refrigerator. You don’t want to accidentally freeze your worms.


Drawing Out Worms With Dish Soap
-
1Mix your soapy solution. Squeeze approximately 10 tsp (40 ml) of dish soap into a watering can.[7] Then, use a hose to add water to the soap in the watering can. Once the watering can is mostly filled with water, turn off the hose, and gently shake the watering can for about 10 seconds.
- Rake the mulch and leaves off of the soil, and then pour the soapy solution over the area you plan to collect worms from. Make sure that you spread out the soapy water, and don’t pour it all in one spot.
- Remember, moist, fertile soil is the ideal environment to find worms.
- Shaking the watering can will mix the soap and water together, and you may have suds falling out of the watering can’s sprinkler.[8]
-
2Collect the worms. Once the soapy solution is poured over the dirt or grassy area, worms should start to wiggle to the surface.[9] It may take a few minutes for most of the worms to surface, but as they do, use your fingers to pick them up and put them in a container until you can rinse them off later.
- Again, try to pick the worms up by the end of their body, which will be lighter in color.
-
3Rinse the worms off. Once you have your collection of worms, use clean, non-chlorinated water to gently rinse the worms from any soap residue.[10] Add a little bit of water to the container holding the worms (completely covering the worms), and softly swish the water around for a few seconds. Then tilt the container with your hand on the edge, to drain out the water and catch any worms that might fall out.
- You can also place a towel or old t-shirt over a bucket, place the worms on it, and then pour cool water over the worms to rinse away the soap.
- Rinsing the worms is very important. Since the soap is irritating, the worms could die if soap residue remains on their bodies for too long.
-
4Store the worms. When your worms are clean, store them in a container with a perforated lit. Add some dirt with bits of leaves, or worm bedding to give the worms something to nest in. Keep the container in a cool, dark place until you need to use them.
- Make sure that you do not repeat the soapy water process in the same area for at least a few weeks. It will make the area unappealing to worms. For this reason, you may also want to avoid using this method near compost piles, plants, or other areas where worms are beneficial.[11]


Luring Worms With a Pitchfork
-
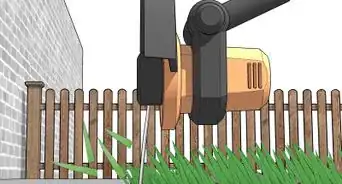
1Stick a pitchfork into the ground. Insert a pitchfork into the soil you are planning to collect your worms from.[12] Again, remember that worms thrive in dirt that is moist, and nutrient-rich, with plants and crops nearby and with mulch covering the soil. Make sure the majority of the fork tenors are in the ground.
-
2Rock the pitchfork back and forth. Rock the pitchfork back and forth in a constant rhythm, almost wiggling the pitchfork in place.[13] Worms will start to surface from the dirt.
- This process may take a few minutes, so patience is key.
-
3Gather the worms. Use your fingers to pick up the surfaced worms. They will be scattered, but be sure to maintain the rocking rhythm of the pitchfork.[14]
-
4Store the worms. Keep your collected worms in a container with a perforated lid. The container should also have some dirt from which the worms can from, or some commercial worm bedding.
- Keep the worms in a dark and cool place until you are ready to use them.


Community Q&A
-
QuestionWhat color should a worm be?
 Community AnswerEarthworms are generally a pink to brown color. An easy way to distinguish between a worm and other bugs is that they have a "ring" around their body, called the clitellum.
 -
QuestionWhy would anyone want to collect worms?
 Community AnswerSome people might want worms as fishing bait, or to start a worm farm to turn their organic waste into fertilizer.
 -
QuestionWouldn't method two be polluting, since it uses dish soap?Community AnswerIt can harm some plants, so it's best to use it only if you must. If bugs get in the solution, they will most likely die.
Things You’ll Need
Catching Worms By Digging
- Worm bedding
- Plastic container (with some type of bedding for storage)
- Carpenter’s apron
- Sawdust (to keep in the apron)
- Headlight (optional)
- Shovel
- Rake
Catching Worms With Dish Soap
- Large watering can
- Dish soap (approximately 40 ml)
- Plastic container (with some type of bedding for storage)
- Rake
Catching Worms With a Pitchfork
- Pitchfork
- Plastic container (with some type of bedding for storage)
Warnings
- Watch out when moving rocks for any potentially dangerous creatures that may be beneath it. These could include spiders, scorpions, venomous snakes, and others.⧼thumbs_response⧽
- Stick to moving smaller rocks, but if you insist on moving larger ones, utilize proper lifting techniques.⧼thumbs_response⧽


References
- ↑ https://www.youtube.com/watch?v=Ss6NfVetd0c
- ↑ https://www.youtube.com/watch?v=Ss6NfVetd0c
- ↑ https://www.youtube.com/watch?v=Ss6NfVetd0c
- ↑ https://www.youtube.com/watch?v=Ss6NfVetd0c
- ↑ https://www.youtube.com/watch?v=Ss6NfVetd0c
- ↑ https://www.youtube.com/watch?v=Ss6NfVetd0c
- ↑ http://www.instructables.com/id/how-to-efficiently-extract-earthworms-from-the-dir/
- ↑ https://www.youtube.com/watch?v=5Itut1LUgwA
- ↑ https://www.youtube.com/watch?v=5Itut1LUgwA
About This Article

To catch worms, start by using a shovel to dig into an area with black, moist dirt like garden spaces and the bases of trees. When you spot a worm, pick up one end with your fingers and avoid pulling, which can break the worm in half. Instead, hold the worm so that its body is taut, and wait for it to relax and release its hold from the dirt. As you pluck the worms from the ground, place them into a plastic container with some dirt and decomposed leaves to keep them alive until you’re ready to use them. For more advice from our Gardening reviewer, including how to draw out worms with dish soap or a pitchfork, keep reading!