This article was written by Luigi Oppido and by wikiHow staff writer, Jack Lloyd. Luigi Oppido is the Owner and Operator of Pleasure Point Computers in Santa Cruz, California. Luigi has over 25 years of experience in general computer repair, data recovery, virus removal, and upgrades. He is also the host of the Computer Man Show! broadcasted on KSQD covering central California for over two years.
The wikiHow Tech Team also followed the article's instructions and verified that they work.
This article has been viewed 48,474 times.
Your personal Apple ID is what enables you to purchase and download apps, music, videos, and so on from the App Store. Your Apple ID also allows you to sign into services such as iCloud and Find My iPhone. You can change your Apple ID from the "iTunes & App Store" section of the "Settings" app. You can also change your Apple ID password from here, or you can reset your password from the Apple ID website if you've forgotten it.
Steps
Changing Your Apple ID Email
-
1Open your iPhone's "Settings" app. This app resembles a grey gear, and should be on your home screen.
- You can tap the "Home" button at any time to return to the home screen from any other page in your iPhone.
-
2Tap the "iTunes & App Store" option. You'll find this under the "iCloud" tab.Advertisement
-
3Tap the "Apple ID" option. This is at the top of the window. Your current Apple ID email address should be displayed here.
-
4Tap the "Sign Out" option in the ensuing window. You'll need to do this for any other Apple products you have if you want to sync all of your devices with the same Apple ID after you change it.
-
5Open the Apple ID account page. You can do this on a computer as well.
-
6Sign in with your Apple ID credentials. These should be the same as the ones for the account you just signed out of.
-
7Tap "Edit" in the "Account" section. This is at the top of the page.[1]
-
8Tap the "Change Email Address" option. This should be beneath your current Apple ID.
-
9Enter your preferred email address. Tap "Continue" when you're done. Apple will send a confirmation email to your provided email address; the Apple ID site should take you to the confirmation code entry page.
-
10Open your new Apple ID email. Remember to keep the Apple ID page in the background; you shouldn't kill it until you've entered your confirmation code.
-
11Open the confirmation email from Apple. The subject line should mention your email change.
- Check your Spam folder (and your "Updates" folder in Gmail) if you don't see the email within a couple minutes of prompting the email. Some email filters will block or recategorize Apple mail.
-
12Enter your verification code on the Apple ID site. If your browser permits it, you can copy the code from Apple's verification email and paste it into the provided field for accuracy's sake.
-
13Sign back into your Apple ID account. You can do this by navigating back to the "iTunes & App Store" menu, tapping the "Apple ID" field at the top of the screen, tapping "Sign In" on the ensuing menu, and entering your new Apple ID credentials.
-
14Update your Apple ID information on any Apple platforms or services you use. This includes phones, tablets, computers, and iTunes and the App Store.[2]


Changing Your Apple ID Password
-
1Open your iPhone's "Settings" app. This app resembles a grey gear, and should be on your home screen.
-
2Tap the "iTunes & App Store" option. You'll find this under the "iCloud" tab.
-
3Tap the "Apple ID" option. This is at the top of the window. Your current Apple ID email address should be displayed here.
-
4Tap the "View Apple ID" option in the ensuing window. This will prompt you to enter your Apple ID password.
-
5Enter your Apple ID password. This should be the same password you use to log into Apple services such as iTunes and the App Store.
-
6Tap the "Apple ID" option. This is at the top of the screen; tapping it will take you to the official Apple ID account page.
-
7Sign into your Apple ID account. You'll need to use your current Apple ID credentials to do so; these should be the same credentials you use for iTunes and the App store.
-
8Tap "Go" on your keypad. This will take you to your account.
-
9Tap the "Security" tab. This will prompt a menu with security questions.
-
10Enter the answers for your security questions. You'll need to answer two of them. This will allow you access to the Security tab, from which you can change your password.
- If you've forgotten your security questions, you can reset them by tapping "Reset Security Questions" at the bottom of the Security menu. You'll need to enter your Apple ID password; Apple will then send a verification code to your registered phone.
-
11Tap the "Change Password" option. This will prompt you to enter your current password and preferred password.
-
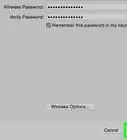
12Enter your current password and new password in the pertinent fields. You will have to confirm your new password by typing it twice.
-
13Tap "Change Password". This will complete the process.
-
14Update your Apple ID information on any Apple platforms or services you use. This includes phones, tablets, computers, and iTunes and the App Store.[3]


Resetting Your Apple ID Password
-
1Open the Apple ID account page. If you can't remember your Apple ID password, you'll need to reset it from the official Apple ID site.
- You can also use your computer for this method.
-
2Tap the "Forgot Apple ID or Password?" text below the login boxes.
-
3Enter your Apple ID email in the field provided. This should be the email address you use to sign into the Apple ID page and new Apple products.
-
4Select the "Get an email" option. This option prompts Apple to send you an email with a password reset link.[4]
- You can also choose to enter your security questions, which you set when you created your Apple ID.
-
5Tap "Continue" to finalize your choice. This will send an email with a password resent link to your Apple email.
-
6Open your Apple ID email. This should be the same email address you use to log into the Apple ID services.
-
7Find and open Apple's password reset email. The subject should say "How to reset your Apple ID password".
- Check your Spam folder (and your "Updates" folder in Gmail) if you don't see the email within a couple minutes of prompting the email. Some email filters will block or recategorize Apple mail.
-
8Tap the "Reset now" link in the email. This will take you to an Apple account password reset page on which you will enter your preferred password.
-
9Type in your new password twice. You'll need to do this to ensure your passwords match.
-
10Tap "Reset password" to finalize the process. Your password has now been changed!
-
11Update your Apple ID information on any Apple platforms or services you use. This includes phones, tablets, computers, and iTunes and the App Store.[5]


Community Q&A
-
QuestionHow do I create a new Apple idea on iPhone?
 Community AnswerFor iOS 10.2 and earlier, settings, iCloud, and create a new apple ID. From there it should be fairly straightforward.
 -
QuestionWhat can I do if I do not remember my Apple ID or password?
 Community AnswerYou can put the answers to your secret questions in the "forgotten password" area and change your password.
Warnings
- Be sure to sign out of your Apple ID on all devices if you ever sell one of them.⧼thumbs_response⧽
- Your security questions and passwords should be memorable to you and completely nonsensical to anyone else. Try using a combination of letters, numbers, and symbols.⧼thumbs_response⧽


References
About This Article