This article was co-authored by Jesse Kuhlman. Jesse Kuhlman is a Master Electrician and the Owner of Kuhlman Electrician Services based in Massachusetts. Jesse specializes in all aspects of home/residential wiring, troubleshooting, generator installation, and WiFi thermostats. Jesse is also the author of four eBooks on home wiring including "Residential Electrical Troubleshooting" which covers basic electrical troubleshooting in residential homes.
There are 20 references cited in this article, which can be found at the bottom of the page.
wikiHow marks an article as reader-approved once it receives enough positive feedback. This article received 14 testimonials and 89% of readers who voted found it helpful, earning it our reader-approved status.
This article has been viewed 726,808 times.
A circuit breaker is designed to stop the power flow through a circuit if there is an excessive amperage drawn on said circuit. Occasionally, these breakers go bad and will need to be changed. It is highly recommended that you hire a licensed, competent, and insured electrician to perform this task, as electricity can be deadly. However, if you choose to replace a circuit breaker yourself, you’ll need to know how to find the breaker box, take note of any issues, and replace a faulty breaker to get your power working again.
Steps
Investigating the Faulty Circuit Breaker
-
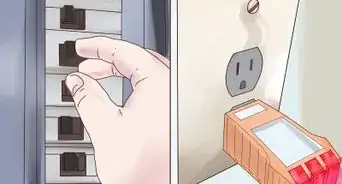
1Find the circuit breaker box. Some homes will have multiple breaker boxes in different places. Find both the main circuit breaker box and the one you need to replace a circuit breaker in.[1] If you’re unsure about the circuit breaker boxes in your home, call an electrician.
-
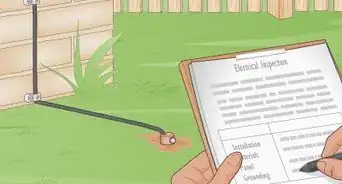
2Inspect the exterior of the breaker panel for damage or discoloration. Before you begin working on any breaker boxes, you should make sure they are still in a safe condition. Any damage or contamination to the box may make it unsafe to work on.
- Look for any signs of rust, discoloration, charring or moisture when you first examine the circuit breaker box and throughout the process. If you see anything that seems dangerous or unexpected, call an electrician.
- Beware of certain types of panels, specifically those bearing one of the following names: Federal Pacific Electric, Federal Pioneer, Zinsco, Kearney, GTE Sylvania, or Stab-lok. The safety of these panels is highly debated.[2] Research the issue and contact an experienced electrician for advice. Decide what to do based on the information you find.
Advertisement -
3Use rubber-insulated tools, gloves, and shoes. Electricity can be incredibly dangerous to work around, so take all precautions when trying to reduce the chance of an electrical shock.[3] Use rubber insulated tools, and wear rubber-soled shoes and insulated gloves when working with electricity.[4]
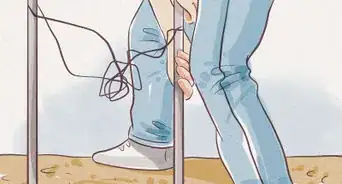
- If you don’t have rubber-soled shoes or if you want to take further precautions, put down a rubber mat below the circuit breaker box. If the area around the breaker box is damp or otherwise unsafe, call an electrician.
-
4Locate the defective breaker. You should only replace a circuit breaker that has broken or been damaged in some way. If a circuit breaker is damaged, it will likely have tripped, cutting power to the section of the home it controls. Look through your breaker box for the circuit breaker which stands out from the others. Generally, a tripped circuit breaker switch will be halfway between the on and off positions.[5]
- Breakers trip because they're over capacity, often because there are too many items plugged into the same circuit at the same time. If this is a recurring problem, you may need to run an additional circuit and install a second circuit breaker.[6]
- If a breaker trips repeatedly over a long period of time, it may become defective, in which case it will need to be replaced.[7]
-
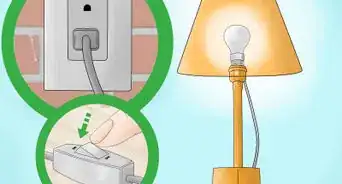
5Test the faulty breaker. Before you replace a circuit breaker, make sure the breaker itself is faulty and not just overloaded. Unplug and switch off all light and electrical devices in the section of your home controlled by the circuit breaker. Then, turn the breaker switch completely off and back on again. Plug one device back in to see if it is powered to indicate if the breaker is allowing any power through or if it is completely broken.[8]
- If the circuit is overloaded and that is causing the breaker to trip, it is working properly. You’ll likely need to reduce the power usage in that section of your home rather than replacing the breaker.[9]
- If you think the breaker is tripping without being overloaded, it may be wearing out and have a reduced capacity for amperage. If you think this is the case, you should check the amperage of your circuit breaker.
-
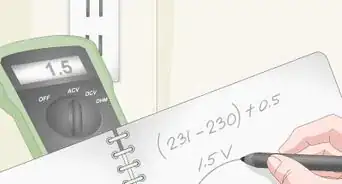
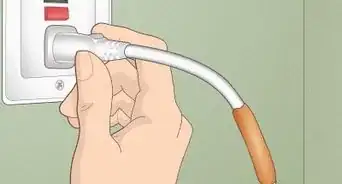
6Test the voltage of the circuit breaker. If you want to test the circuit breaker more specifically, you can do so with a voltage tester. To do so, unscrew and remove the faceplate, and press one lead to the neutral wire in the breaker box. Press the other lead to the screw on the circuit breaker. The voltage tester should display how much power is being allowed through the breaker.[10]
- Keep in mind that if you have a double pole circuit breaker, it pulls from both of the hot wires that are powering the circuit panel, so it will have about twice the voltage.[11]
- Only touch the components you need to touch, and only with the leads on the voltage tester. The power will need to be on for this to work, so be very careful.


Removing the Faulty Circuit Breaker
-
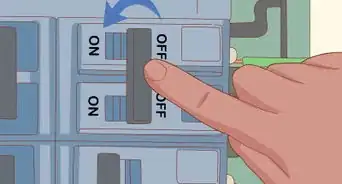
1Turn off all power and all individual breakers. Before doing any work on a circuit breaker or in the breaker box, make sure you have turned off all the power going to it. If you have a main box and other branch boxes around your home, turn off the power to the branch box at the main box first. Otherwise, just turn off the main power followed by all breakers.[12]
- Even once you have turned the power off, you should act as if it’s still on.[13] Only touch the parts of the circuit breaker box you need to touch.
- If you are turning off the main power, or the power to the area around you, the lights will likely turn off as well. Keep an alternative light source nearby so you don’t have to work in the dark.
-
2Unscrew and remove the faceplate. While the circuit breaker box will allow you to switch breakers on and off, this will not give you access to the entire circuit breaker. Find the screws in each corner of the breaker box and carefully remove them to free the faceplate. Holding the edges, lift the faceplate directly away from the breaker box before lowering it.[14]
- Always remove the panel by pulling it towards you and then sliding it down. Don’t let it touch or bump anything inside the circuit breaker box as you are removing it.
- Put the screws and the faceplate somewhere you can easily find them when needed. While the screws can be replaced, it’s much easier to keep them in a safe place while they’re not attached to the breaker box.
-
3Inspect the interior of the panel for damage or discoloration. Before you touch anything inside the panel of the breaker box, look for signs of damage. If you see anything that seems unsafe or out of the ordinary, stop immediately and call a licensed electrician.
- Keep an eye out for any rust, moisture, signs of pests, loose wires, melting, discoloration, charring, heat marking, strange wiring, multiple wires connected to one screw, damaged wiring, debris, or multiple colored wires connected to each other. These can all be dangerous.
-
4Pull out the faulty breaker. When touching items inside the circuit breaker box, always be careful to only touch the components you need to. With a firm grip, grasp the defective circuit breaker. Start lifting the side that faces towards the center of the panel, with the aim of pivoting it up and out from the breaker panel. Once it is free, unhook it from the hinge on the edge of the panel and pull the breaker free.[15]
-
5Disconnect the wire on the circuit breaker. The wire connected to the circuit breaker will be held in by a flathead screw on one side. Use a flat-head screwdriver to loosen this screw slightly, without unscrewing and removing it completely. Separate the wire from the circuit breaker once the screw is loose enough.[16]
- Always keep track of loose wires, as they can be incredibly dangerous. Tuck the wire into the circuit breaker box to keep it out of the way. Make sure you know which wire you have disconnected, as you’ll need to reconnect it when you install a new circuit breaker.
-
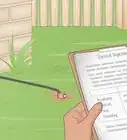
6Note the exact amperage and type of the circuit breaker. The circuit breaker replacement will need to be the exact same type as the faulty one you remove.[17] Take note of the amperage of the fault breaker, as well as any codes or numbers written elsewhere on it.
-
7Dispose of the faulty circuit breaker. While a circuit breaker may feel heavy, there is very little value to any of its components.[18] You can throw circuit breakers away with your regular trash, as they are inert without a power supply.


Installing a New Circuit Breaker
-
1Find a new circuit breaker of the same type as the faulty one. The new circuit breaker will need to be exactly the same type as the one you are replacing.[19] Your local hardware store should have a selection of circuit breakers and may have the exact one you are looking for. If not, feel free to ask the staff if they can get one in for you, or if there is one you may have missed.
- If the circuit breaker you are replacing is a GFCI (Ground Fault Circuit Interrupter) or AFCI (Arc Fault Circuit Interrupter) breaker, as sometimes used for outdoor, bedroom, garage, kitchen or bathroom circuits, be sure that you replace it with another one of the same type.
-
2Clip the new circuit breaker in place. Using the opposite motion to removing the faulty breaker, firmly clip your new circuit breaker into place. Position the end without a screw under the hook on the breaker box panel, and pivot the breaker down until it clicks into place securely.[20]
-
3Reattach the loose wire. Firmly hold your circuit breaker and connect the wire to the loose screw.[21] Keeping it in place, tighten the screw until it securely holds the wire.
- It may help to use a pair of needle-nose pliers to hold the wire in place as you tighten the screw.[22]
- While the screw should be tight, you do not need to over-tighten it. Make sure it is secure, but don’t risk squeezing the wires to the point of damage.[23]
- Make sure the rubber insulation on the wire does not touch the screw or the circuit breaker, as it may be damaged or melt over time.[24]
-
4Reattach the faceplate. Carefully lift the faceplate in line with the breaker box and install it back in place. Using the same screws that came out of the faceplate, tightly secure the faceplate to the rest of the breaker box.[25]
- Always use a screw of the same length and type when reattaching the faceplate. If the screws are too long or have a pointed end like wood screws, they may screw in too deep and damage the wiring.
-
5Turn the power back on. If you have a main breaker box, turn on the power to your branch breaker box first. Turn on the main power in the breaker box, followed by each circuit breaker one by one.[26] You should start getting power back to your home.


Expert Q&A
Did you know you can get expert answers for this article?
Unlock expert answers by supporting wikiHow
-
QuestionHow do I know if a circuit breaker is damaged or defective?
 Jesse KuhlmanJesse Kuhlman is a Master Electrician and the Owner of Kuhlman Electrician Services based in Massachusetts. Jesse specializes in all aspects of home/residential wiring, troubleshooting, generator installation, and WiFi thermostats. Jesse is also the author of four eBooks on home wiring including "Residential Electrical Troubleshooting" which covers basic electrical troubleshooting in residential homes.
Master ElectricianIf your circuit breaker is tripping for no reason, or if it tripped and now it won't reset, it's probably defective. However, that rarely happens unless there's an underlying cause, like water damage or constantly being tripped due to an overloaded circuit.
Support wikiHow by unlocking this expert answer.
Warnings
- If the new breaker does not remain closed and/or behaves similarly to the original breaker, shut off the power and contact a licensed, competent, and insured electrician.⧼thumbs_response⧽
- If you cannot find the main power cut off switch, do not attempt to remove a circuit breaker or work on the circuit panel. Contact an electrician.⧼thumbs_response⧽
- If at ANY point you feel uncomfortable, unsafe, or unsure as to how to proceed, STOP. Call a licensed, competent, insured electrician. It is better to spend a little extra money for professional repairs than to risk death, serious injury, and/or extensive property damage. Remember these phrases-"When in doubt, subcontract it out!" and "Just don't know? Time to call a pro!"⧼thumbs_response⧽
- DO NOT attempt to replace the main breaker yourself. Call a licensed, competent, and insured electrician to handle this situation.⧼thumbs_response⧽
- DO NOT attempt to access the meter box, underground wiring/overhead cable, or any equipment owned and/or maintained by your power company. Call your power company if any of their equipment needs service.⧼thumbs_response⧽
- NEVER work alone. Have someone observe so that they can summon help should an incident occur.⧼thumbs_response⧽
- NEVER touch the lugs adjacent to the main breaker and/or connected to the Service Entry Conductors. These remain life, even if the power is cut to the rest of the buss assembly.⧼thumbs_response⧽
- Do not replace a circuit breaker with one of larger amperage. This may cause a dangerous wiring overload.[27]⧼thumbs_response⧽
Things You'll Need
- Voltage sniffer
- Multimeter
- Lineman's gloves
- A rubber mat
- Insulated lineman's tools
- Rubber-soled shoes
- Safety glasses
- An observer
- Replacement circuit breaker
- Flashlight


-Electric-Shock-Step-8.webp)
-Step-6-Version-2.webp)

References
- ↑ http://www.visionaware.org/info/everyday-living/home-repairs/gils-guide-to-home-repairs/fuses-and-circuit-breakers/1235
- ↑ https://www.washingtonpost.com/lifestyle/home/despite-previous-safety-concerns-this-circuit-breaker-is-still-in-homes/2018/05/08/8927af86-4ef9-11e8-b725-92c89fe3ca4c_story.html?utm_term=.a3fc76014b83
- ↑ https://www.ehs.washington.edu/fire-life/basic-electrical-safety
- ↑ https://youtu.be/k95_Rnjr_DY?t=41s
- ↑ https://brightnest.com/todos/fix-a-blown-fuse-or-reset-a-circuit-breaker
- ↑ Jesse Kuhlman. Master Electrician. Expert Interview. 29 April 2020.
- ↑ Jesse Kuhlman. Master Electrician. Expert Interview. 29 April 2020.
- ↑ https://brightnest.com/todos/fix-a-blown-fuse-or-reset-a-circuit-breaker
- ↑ https://brightnest.com/todos/fix-a-blown-fuse-or-reset-a-circuit-breaker
- ↑ https://youtu.be/jKAPpxK5T2E?t=21s
- ↑ Jesse Kuhlman. Master Electrician. Expert Interview. 29 April 2020.
- ↑ https://youtu.be/jKAPpxK5T2E?t=1m31s
- ↑ https://youtu.be/jKAPpxK5T2E?t=2m16s
- ↑ https://youtu.be/k95_Rnjr_DY?t=1m
- ↑ https://youtu.be/jKAPpxK5T2E?t=2m31s
- ↑ https://youtu.be/jKAPpxK5T2E?t=2m42s
- ↑ https://youtu.be/zqcJFfWYiAI?t=33s
- ↑ http://trustwaymetal.com/can-you-scrap-circuit-breakers/
- ↑ https://youtu.be/zqcJFfWYiAI?t=33s
- ↑ https://youtu.be/jKAPpxK5T2E?t=3m37s
- ↑ https://youtu.be/k95_Rnjr_DY?t=2m37s
- ↑ https://youtu.be/k95_Rnjr_DY?t=2m28s
- ↑ https://youtu.be/jKAPpxK5T2E?t=4m11s
- ↑ https://youtu.be/jKAPpxK5T2E?t=4m11s
- ↑ https://youtu.be/jKAPpxK5T2E?t=4m35s
- ↑ https://youtu.be/jKAPpxK5T2E?t=4m45s
- ↑ https://youtu.be/zqcJFfWYiAI?t=33s
About This Article

To change a circuit breaker, find the main circuit breaker box and locate the defective breaker by looking for a tripped breaker. Next, turn off the branch breaker boxes, the main power, and the individual breakers. Remove the screws holding the circuit panel's face plate, then loosen the screws holding the wires on the defective breaker. Then, remove the old breaker and replace it with a new one with the same amperage. Replace the wires, tighten the screws, and screw the panel's face plate back into place. For more information on replacing the wires correctly, read on!