This article was co-authored by Susan Stocker. Susan Stocker runs and owns Susan’s Green Cleaning, the #1 Green Cleaning Company in Seattle. She is well known in the region for outstanding customer service protocols — winning the 2017 Better Business Torch Award for Ethics & Integrity —and her energetic support of green cleaning practices.
This article has been viewed 23,414 times.
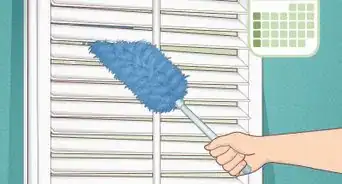
Vinyl shutters should be cleaned regularly to prevent dirt and grime from building up. They can be cleaned with ammonium and water. If oxidation occurs on the shutters, you can clean this off using a commercial vinyl cleaner. Make sure to test any cleaner you use on a small portion of your shutters before applying it all over their surface.
Steps
Providing a Routine Cleaning
-
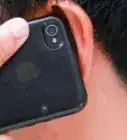
1Put on rubber and cotton gloves. To start cleaning your shutters, put on a pair of rubber gloves. Then, place a pair of cotton gloves over your rubber gloves.[1]
- Make sure the cotton gloves you use are clean. Cleaning shutters with dirty gloves will only create more mess.
-
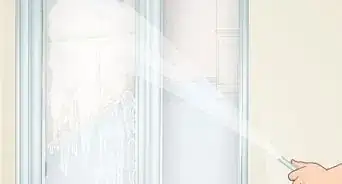
2Mix ammonium and water. Pour a quart of water into a bucket. Mix in a teaspoon of ammonium using a spoon or your gloved hands. This is a safe cleaning solution for most vinyl shutters.[2]Advertisement
-
3Dip your gloves into the solution. Briefly submerge your gloves in the cleaning solution. Shake or wring out your gloves slightly over the bucket. This will prevent the solution from dripping everywhere as you clean.[3]
-
4Wipe down your shutters. Glide your hands along the tops of each shutter. Grab the top shutter between your fingers. Place your fingers on the top of the shutters and your thumb on the bottom of the shutters. Glide your hands along the shutters to remove dirt, debris, and grime. Repeat until you have wiped down each shutter.[4]
- Stop and rub into the shutters with your fingers as needed if you find any stuck on dirt or debris.
- Rinse off your gloves slightly in the cleaning solution periodically to remove built up dirt.
-
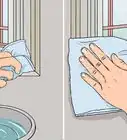
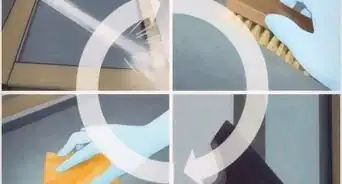
5Rinse your shutters. Use a clean sponge to wipe the shutters down with clean water to rinse them. Wipe the shutters as much as necessary to get the water to run clean. Make sure you remove all the cleaner before leaving your shutters to dry. Cleaning residue can harm your shutters.[5]
- If the rag you're using starts to get soapy, replace it with a new, clean rag. You should also replace any water that becomes diluted with soap.


Cleaning Oxidized Vinyl Shutters
-
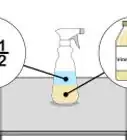
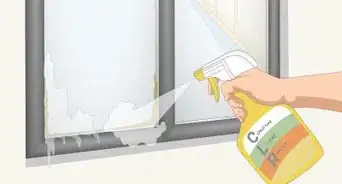
1Mix a solution using commercial cleaner. You can purchase a commercial cleaner online or at a local hardware store. Use a professional grade cleaner designed to renew oxidized shutters. Shutter cleaners vary in terms of preparation, but most should be diluted with water prior to use. Read your shutter cleaner's directions carefully before applying it to your shutters and dilute it accordingly.
-
2Spray down two shutters at a time with the cleaner. Place your cleaner in a spray bottle or pump garden cleaner. Focusing on two shutters at a time, spritz a layer of cleaner over each shutter. Let the cleaner sit on for five minutes before proceeding.
- Do not let the solution dry on your shutters. Be very careful to set a timer for five minutes and watch the solution carefully to make sure it is not drying.
-
3Wipe down each shutter with a scouring pad. Take a non-scratch scouring pad. Working with one shutter at a time, wipe down each side of the shutters to remove the oxidation. Use scrubbing motions to remove mold, dirt, debris, and other stuck-on residue. If you see mild dirt, like mildew, leave this for now. You can target this later during a routine cleaning.
-
4Apply the scratch test. After cleaning your shutters, scratch your shutters gently with your nail. If oxidation has been removed successfully, your nails should leave no visible marks.
-
5Repeat the process if necessary. If your nail left a mark in the shutter, once again wet each shutter with your cleaning solution. Then, scrub down the shutters with a non-scratch scouring pad. From there, apply the nail test again. A second cleaning is usually enough to remove lingering oxidation.
- If the oxidation remains after two cleanings, consider hiring professionals.
-
6Rinse your shutters. Never let cleaning solution sit on your shutters. Use a hose or damp towel to wipe or spray down your shutters. Keep wiping or spraying your shutters until no traces of cleaning solution remain and water runs clear.


Avoiding Common Mistakes
-
1Spot test your cleaner first. Before applying any cleaner to your shutters, apply it to a small spot on your blinds that is not directly visible. Wash the cleaner off and check the shutters in a few hours. If the cleaner does not cause any damage, it should be safe to use. If it causes damage, try another cleaner.
-
2Check your warranty first if you intend to paint your shutters. For many, cleaning vinyl shutters is a step towards painting them. The color on vinyl shutters wears down over time. However, before beginning the painting process, check your warranty. If your color faded, you may be able to get your shutters replaced or restored by the manufacturer.
-
3Do not allow your cleaners to dry on your shutters. Never let a cleaner dry on your shutters. This can cause damage. Always wash your shutter shortly after applying a cleaner. Rinse your shutters completely after the cleaning process.


Expert Q&A
Did you know you can get expert answers for this article?
Unlock expert answers by supporting wikiHow
-
QuestionWhat is the best way to clean vinyl shutters?
 Susan StockerSusan Stocker runs and owns Susan’s Green Cleaning, the #1 Green Cleaning Company in Seattle. She is well known in the region for outstanding customer service protocols — winning the 2017 Better Business Torch Award for Ethics & Integrity —and her energetic support of green cleaning practices.
House Cleaning ProfessionalUse a pH neutral commercial cleaner or deionized water. Biokleen is one option for a pH neutral cleaning agent, but using deionized water alone can also work. After using removing loose dirt, wipe down the shutters with your cleaner. For tough areas, use a food scraper covered by a microfiber cloth to remove stuck-on gunk.
Support wikiHow by unlocking this expert answer.

References
- ↑ http://www.bhg.com/homekeeping/house-cleaning/surface/caring-for-blinds-shutters-and-shades/
- ↑ http://www.bhg.com/homekeeping/house-cleaning/surface/caring-for-blinds-shutters-and-shades/
- ↑ http://www.bhg.com/homekeeping/house-cleaning/surface/caring-for-blinds-shutters-and-shades/
- ↑ http://www.bhg.com/homekeeping/house-cleaning/surface/caring-for-blinds-shutters-and-shades/
- ↑ http://www.bhg.com/homekeeping/house-cleaning/surface/caring-for-blinds-shutters-and-shades/
About This Article