This article was co-authored by Hovig Manouchekian. Hovig Manouchekian is an Auto Repair and Design Specialist and the Manager of Funk Brothers Auto, a family-owned business operated since 1925. With over 30 years of experience in the automotive industry, Hovig specializes in the process of auto repair and maintenance. He is also very knowledgeable in common automotive issues and needs including engine repair, battery replacement, and windshield accessory and maintenance. Hovig's knowledge and hard work have contributed to Funk Brothers Auto winning Angie's List Super Service Award for five consecutive years.
wikiHow marks an article as reader-approved once it receives enough positive feedback. This article received 11 testimonials and 93% of readers who voted found it helpful, earning it our reader-approved status.
This article has been viewed 373,472 times.
The oxygen sensor is an important part of a car engine. This device is part of a car's emissions control system: it's roughly the size of a spark plug, and tests the oxygen levels in a car's exhaust stream. A dirty oxygen sensor can cause your “check engine” light to come on, and can also result in your car burning through extra gasoline.[1] If you suspect that your oxygen sensor may be dirty, you can clean it by first removing the sensor from its housing in the vehicle, and then soaking the sensor in gasoline overnight.
Steps
Locating the Oxygen Sensor
-
1Protect your hands and eyes. Since you'll be dealing with gasoline and various car parts, it's important to protect yourself from potential harm. Before you begin to lift your car and locate the oxygen sensor, put on a sturdy pair of work gloves to protect your hands. You should also wear a pair of protective eyeglasses or goggles in case any WD-40 or gasoline comes near your eyes.[2]
- Both work gloves and protective eyewear can be purchased at your local hardware store, or at a large retail store such as a WalMart.
-
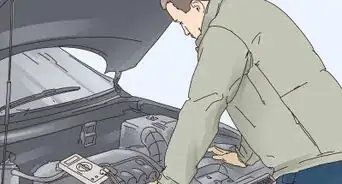
2Elevate the vehicle with a car jack. In order to remove the oxygen sensor, you'll need to have access to the underside of your vehicle. Make sure that the vehicle is on level ground, is in “Park,” and that the emergency break is engaged before lifting the car. Place the jack under part of your vehicle's chassis (including an axis or the side of the car frame) and lift the vehicle.
- You can purchase a car jack at any auto-parts store. Speak with the sales staff and let them know the type and size of vehicle you have, so they can recommend an appropriate jack.
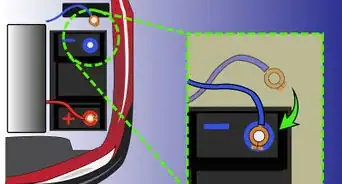
- Consider disconnecting the car's battery before you start working on any electrical sensors, including the oxygen sensor.[3]
Advertisement -
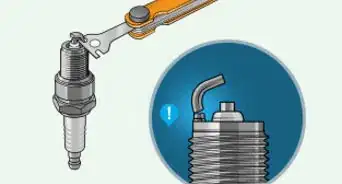
3Identify the oxygen sensor(s). Depending on the make and model of your vehicle, it may have more than one oxygen sensor. Check your vehicle's owner's manual for the exact locations of the sensors. All vehicles have at least two oxygen sensors: one in front of your car's catalytic converter, and one in the car's exhaust manifold.[4] If your vehicle has more than one exhaust manifold, there will likely be an oxygen sensor inside each one.
- The oxygen sensor will look something like a spark plug: roughly 2 inches (5 cm) long. One end will have a hexagon shape—for a wrench to fit over—and the other end will be threaded to screw into your vehicle.
- Make sure to let the vehicle cool off completely before you touch the oxygen sensor—it's attached to the exhaust or muffler pipe, so if the pipe is hot, the sensor will be, too.[5]


Removing the Oxygen Sensor
-
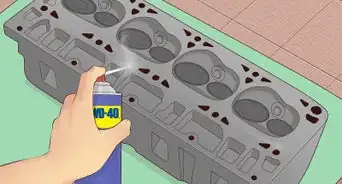
1Spray the sensors with WD-40. As your vehicle's oxygen sensors are seldom removed, they will probably be firmly stuck in place. To loosen them, spray the sensors with a lubricant like WD-40 and let them sit for 10–15 minutes. The WD-40 will lubricate and loosen the sensors, making them easier to remove.[6]
- If you don't already have a can of WD-40 around the house, you can purchase one at any local hardware or auto-supply store.
-
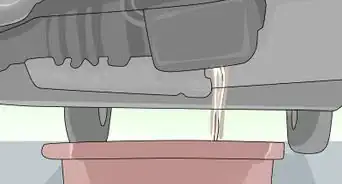
2Fill a bucket or industrial container with gasoline. While you're waiting for the WD-40 to lubricate the screw threads of the oxygen sensor, you can start the next step of the process. Fill a large bucket or industrial plastic container with gasoline, and set this near your vehicle. Once you have removed the oxygen sensors from your car, you'll clean them by soaking them in the gasoline.
- Make sure that the bucket or container that you choose can safely contain gasoline. Not all types of containers will be gasoline resistant.
- If you're purchasing the bucket or container at a hardware store, ask the sales staff to recommend a sealable, gasoline-safe plastic.
-
3Unscrew the oxygen sensors from their housing. You'll need to use a sturdy wrench for this. Each of the oxygen sensors should be well lubricated and loosened at this point; take your wrench and firmly loosen the sensors.[7] As you remove the sensors from your vehicle, do not set them on the ground or allow them to get dirty. Place the sensors somewhere clean, such as in a plastic bowl or on a clean, flat spot on your vehicle.
- If you're not certain of the sensors' wrench size, you can easily determine it by attempting to fit a medium-sized wrench over the head of the oxygen sensor. If the first wrench you try doesn't fit, adjust the wrench size smaller or larger as necessary.
- Alternately, use a wrench with an adjustable opening size.


Cleaning the Oxygen Sensor
-
1Immerse the sensors in a container of gasoline. Once you have removed the oxygen sensors from your vehicle, submerge them in the bucket or industrial container that you've filled with gasoline. Given time, gasoline will clean the oxygen sensors. Make sure that the sensors are fully immersed in the gasoline, and that none of the liquid splashes out of the container or gets on your hands.
- Never smoke, light a candle, or have any other type of open flame when working near gasoline.
-
2Cover the bucket with a lid. Due to the flammable nature of gasoline, it's important that you cover the bucket or industrial container of gasoline. This will prevent the gas from catching fire, and also keep any wandering animals from accessing the gas. If the industrial container came with a lid, you can use this to cover the gas.[8] Make sure to seal the lid tightly.
- If you're soaking the sensors in a bucket or a container that does not have its own lid, you'll need to find something to cover the opening with. Look for an appropriately sized lid among your pots and pans in the kitchen, or simply place a piece of plywood or a large book over the bucket opening.
-
3Allow the sensors to soak overnight. The gas won't clean the oxygen sensors immediately; you'll need to let them soak for at least 8 hours. At some point while the sensors are soaking in the container of gas, pick the container up and swirl it around several times. This will ensure that all parts of the sensors are being cleaned by the gasoline.[9]
-
4Remove and dry the sensors. After the sensors have soaked overnight, you'll need to reach into the bucket or container of gasoline and remove the sensors. Note their appearance: they should be much cleaner than when you put them in. Then, using a clean cotton cloth, wipe the gasoline off of the oxygen sensors and dry them fully.[10]
- In order to avoid getting gasoline on your hands, you can wear a pair of thick rubber gloves while removing the oxygen sensors from the gasoline.
- You can use a pair of gloves similar to those that you would use to wash dishes.
-
5Reinstall the oxygen sensors in your vehicle. Once the oxygen sensors have been wiped dry, use your wrench to insert them back in the exhaust manifold(s) and the other locations from which you originally removed them. Fully tighten the oxygen sensors in place.[11]
- To conclude this process, use the car jack to carefully and slowly lower your vehicle.
- Start your vehicle and check to see if the “check engine” light is still on. It will likely have turned off; you may also notice that the cleaned oxygen sensors result in your car using substantially less gasoline.


Our Most Loved Articles & Quizzes


Expert Q&A
-
QuestionHow do you take off an oxygen sensor?
 Hovig ManouchekianHovig Manouchekian is an Auto Repair and Design Specialist and the Manager of Funk Brothers Auto, a family-owned business operated since 1925. With over 30 years of experience in the automotive industry, Hovig specializes in the process of auto repair and maintenance. He is also very knowledgeable in common automotive issues and needs including engine repair, battery replacement, and windshield accessory and maintenance. Hovig's knowledge and hard work have contributed to Funk Brothers Auto winning Angie's List Super Service Award for five consecutive years.
Auto Repair & Design SpecialistMake sure you don't touch the oxygen sensor when the car is hot—the oxygen sensor is attached to the exhaust pipe. I also recommend disconnecting the battery of the vehicle before removing any sort of electrical sensor. Also, use WD40 or some sort of lubricant to help, because the expansion and contraction of the metal can cause the threading of the sensor to seize, which makes it very difficult to remove. -
QuestionSurely leaving the electrical contacts and wiring in gasoline for 8 hours can't be good?
 Community AnswerDon't put that part in gas. simply tape the wire to outside of bucket so the sensor only is reaching the gas. The bucket is overkill; a 2-cup glass measuring cup would be enough to clean two sensors.
 -
QuestionCan I use any type of gasoline? Does it matter if it is special or regular?
 Community AnswerIt doesn't matter. The octane rating should have nothing to do with it. It's the compounds in the gasoline that do the job.
Things You'll Need
- Car jack (optional but recommended)
- Safety goggles
- Work gloves
- Wrench
- WD-40 and gasoline
- Bucket with a lid


-Beetle-Step-5-Version-3.webp)


References
- ↑ https://www.edmunds.com/car-care/how-to-fix-your-cars-oxygen-sensor.html
- ↑ http://www.ebay.com/gds/How-to-Clean-Oxygen-Sensors-/10000000178258924/g.html
- ↑ Hovig Manouchekian. Auto Repair & Design Specialist. Expert Interview. 23 February 2021.
- ↑ http://www.ebay.com/gds/How-to-Clean-Oxygen-Sensors-/10000000178258924/g.html
- ↑ Hovig Manouchekian. Auto Repair & Design Specialist. Expert Interview. 23 February 2021.
- ↑ Hovig Manouchekian. Auto Repair & Design Specialist. Expert Interview. 23 February 2021.
- ↑ http://www.ebay.com/gds/How-to-Clean-Oxygen-Sensors-/10000000178258924/g.html
- ↑ http://www.ebay.com/gds/How-to-Clean-Oxygen-Sensors-/10000000178258924/g.html
- ↑ http://www.ebay.com/gds/How-to-Clean-Oxygen-Sensors-/10000000178258924/g.html
About This Article
Before you can clean an oxygen sensor, you have to remove it from the exhaust manifold. To make this easier, spray the sensor with WD40 and let it sit for 15 minutes. Once the sensor is loose, unscrew it and let it soak in a container of gasoline for at least 8 hours. When you do this, prevent leaks and fires by making sure the container is gasoline resistant and by covering it with a lid. After they’ve soaked, dry the sensors off and re-install them. Keep reading to learn how to find the oxygen sensors.


-Beetle-Step-5-Version-3.webp)