This article was co-authored by Josh Goldenberg and by wikiHow staff writer, Eric McClure. Josh Goldenberg is a Residential Remodeling Expert and the Co-Founder of 5blox, based in the Greater Los Angeles area. With more than seven years of experience, Josh and his team specialize in luxurious and sustainable home renovations. 5blox is fully licensed and bonded.
There are 13 references cited in this article, which can be found at the bottom of the page.
This article has been viewed 25,972 times.
There are several ways to conceal a closet door. The simplest way is to obscure it with a mirror, drapes, or even a bookshelf. If you want to open your room up a little, remove the door completely and turn the closet into an office space, recessed bookshelf, or open storage area. If you really want to take it to the next level, buy a hidden door kit to convert the door into a bookshelf or mirror.
Steps
Covering Your Door
-
1Put wallpaper over flatter doors to blend them into the room. Get a roll of wallpaper that you like. Either get enough to cover your wall or enough to cover the door and create a border for the room. If you have adhesive wallpaper, pull out a length big enough to cover 4–6 inches (10–15 cm) past the door. Peel the back off and carefully cover the door before cutting the excess portion off with a knife. If you need to glue the paper, cut it to size with scissors or a utility knife and follow the manufacturer’s instructions to cover the door with adhesive or glue.[1]
- This is a great option for sliding doors that don’t have knobs or handles that stick out.
- Get an extra roll or two of wallpaper in case you mess something up and have to redo a section.
- This isn’t the best option for panel doors that have grooves in them. Even if you install the wallpaper perfectly, the recessed sections of your door will influence the appearance of your wallpaper.
-
2Install long drapes over your door to disguise them. Measure the width of your closet door and get a curtain rod that extends 6–12 inches (15–30 cm) past the door on both sides. Use a level and a pencil to mark the location where you want to install the brackets. Use a drill to run screws through each bracket and install it in the wall. Then, slide the loops at the top of your drapes through the curtain rod. Slide the rod through the opening of the brackets to finish installing the drapes.[2]
- Use 2 drapes if you want to be able to open them in the middle to access your door.
- Make sure that you get opaque drapes that aren’t translucent if you want to completely hide the door. Stay away from white unless the material is really thick.
- You cannot hang a curtain rod over a closet door if it’s in the corner of a room.
Advertisement -
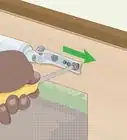
3Hang a mirror over panel doors to minimize the visual impact. There are hanging mirrors that are designed to cover a door to make it more appealing. Buy a hanging door mirror at a home supply or furniture store. Hang the 2 hooks over the top of the door and let the mirror hang down. Then, use a drill or screwdriver to install the 2 anchors at the bottom of the mirror by screwing it into the wood.[3]
- A hanging door mirror will cover the majority of your door and minimize its visual impact in your room.
- This is the cheapest option if you want to cover the closet door—hanging mirrors are typically very inexpensive. You’ll also still be able to use the closet. You won’t be completely covering it though.
-
4Place a tapestry over the door to cover it up. If you don’t want to install drapes, a large tapestry is an easy way to artfully cover your closet with fabric. Get a dark-colored tapestry that’s wider and slightly taller than your door. Hang it over your door with push pins, nails, or Velcro strips to cover your door with a beautiful piece of art.[4]
- You can buy a tapestry online or at a boutique shop that specializes in interior décor.
- Look for thicker materials like jute and wool. Thinner tapestries may not successfully keep light out.
-
5Put a standing bookshelf in front of your door to cover it. The easiest way to obscure a door is to put something in front of it. Use a measuring tape to measure the height and width of the door. Get a large standing bookshelf that is slightly wider and taller than your closet. If your door handle is in the way, remove it by unscrewing the screws on the locking mechanism and handles with a screwdriver. Pull the door knobs out and let the door hang freely against the back of your bookshelf.
Tip: Covering your door by putting something in front of it makes it impossible to use the closet as anything other than long term storage. Only cover your door with a bookshelf if you don’t need the storage space.


Repurposing the Closet
-
1Open your door and slide 2 books underneath to brace the door. Get 2 books that are roughly the same size as the opening between your door and the floor. Open your door 4–6 feet (1.2–1.8 m) so that you have plenty of room to work. Slide the books underneath it to brace the door and hold it up while you’re removing it.[5]
- Removing your door will give you the opportunity to repurpose your closet space to make your room feel bigger. You can repurpose your space to turn the closet into a pantry space, bookshelves, or an office.
- If you can, enlist a friend to help you. They’ll be able to hold the door and keep it from falling over when you remove all of the pins.
-
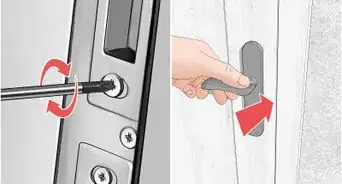
2Place a screwdriver under the pin at the bottom hinge and hammer it out. Look at the bottom of your door to find the bottom hinge. Holding that hinge together is a metal pin with a bulb at the top. Place the tip of your flathead screwdriver into the bottom of the bulb at a 45-degree angle. Carefully and slowly hit the bottom of your screwdriver’s handle with your hammer over and over to pry the pin up. Once you’ve pried the pin up 3–4 inches (7.6–10.2 cm), simply lift it out by hand.[6]
- You can use a stiff putty knife or chisel if you don’t have a flathead screwdriver.
- Don’t hit the bulb so hard that you bend the pin.
-
3Take the top hinge out the same way you removed the bottom. With your bottom hinge completely removed, stand up and repeat the process with the top hinge. Place the flathead screwdriver under the base of the top of the hinge and hammer the back of your screwdriver. Once the pin is mostly removed from the top hinge, lift it out by hand.[7]
- You can use a wrench or channel locks to pull the pin out if it’s really old and you can’t remove it by hand.
Warning: If you don’t leave the middle hinge for last, the pressure from the door may rip the bracket out of the door frame.
-
4Remove the middle pin and lift the door out. Use the same process to remove the middle pin from the hinge and take the door off. Place the flathead against the bottom of the pin and hammer it repeatedly. Put the hammer and flathead screwdriver down when you have 3–4 inches (7.6–10.2 cm) of the pin showing and grip the door frame at the top. Use your nondominant hand to lift the pin out of the hinge and hold the door steady. Once your door is off, set it aside.
- If the brackets on the door frame are unpainted, you can remove them with a screwdriver. If they’ve been painted over though, you may peel the paint off around it. It will also expose the unpainted wood underneath.
- If you’re renting the apartment, store the door somewhere safe until you move out.
-
5Use your closet space as an open storage area to make the room feel bigger. Continue to use your closet as a storage space, storing clothes, boxes, or other textiles in your closet. You can also use it as a pantry space if you’re in a smaller apartment with a tiny kitchen. With the closet door off, your room will feel a lot bigger.[8]
- If you’re a fan of busy walls, this will open your space up and add some color to your room.
-
6Turn the closet into a hidden office by putting a small desk inside. Get a small desk or table with dimensions that are 1–2 inches (2.5–5.1 cm) shorter than your closet’s depth and width. Buy a desk with a hutch in the back if you want to store items on top of your desk. Slide the table or desk into your closet and put a chair underneath it to convert your closet into a miniature office.[9]
- This is an excellent option if you live in a smaller apartment or home and don’t have a dedicated room for your office.
-
7Create more storage space by placing a bookshelf inside. If you can fit a standing bookshelf in the closet, turn the closet into a recessed bookshelf. Place the front of your bookshelf so that it’s flush with the wall. You can also choose to install shelving in the closet instead. Get a closet shelving kit from your local furniture or construction supply shop. Use a level to mark each shelf’s location and install the brackets for your shelves with a drill.[10]


Installing a Hidden Door
-
1Purchase a hidden door kit that matches the dimensions of your door. Hidden doors are typically designed as bookshelves, although you can find doors that are mirrors as well. They work like regular doors, but don’t look like a standard door. Purchase a hidden door kit from a company that specializes in manufacturing hidden doors.[11]
- Unless you’ve got a big walk-in closet, make sure that you get a hidden door that swings out into your room. You can buy hidden doors that swing either inwards or outwards. You can also install a hidden sliding door, but make sure to measure for the frame of the hidden door and the doorway itself. Also, if the wall is load bearing, you will need to install a header above the frame.
- Get a pre-painted door if you don’t want to do the painting yourself.
- These doors come pre assembled, but you’ll have to do some construction to remove the frame and install the brackets.
Tip: Installing a hidden door can be kind of complicated if you don’t have much experience building things. Consider hiring a contractor to install it for you. This process typically costs between $800-1,500.
-
2Remove your door by prying out the pins with a screwdriver and hammer. Open your door and slide 2 books underneath it to brace it. Pry the pins in the hinges out by pressing the tip of a flathead screwdriver under the bulb at a 45-degree angle and hitting the bottom of the handle with a hammer. Pry the bottom pin out first, followed by the top, and leave the middle hinge for last. Hold the door when you’re lifting the middle pin out to keep the door steady as you’re removing it.[12]
- If you can, enlist a friend or family member to hold the door for you as you’re removing the middle pin.
- You don’t need to pop the pins all the way out. You can simply pop them out 3–4 in (7.6–10.2 cm) and lift it out by hand.
- Unscrew the hinge brackets on the door frame with a screwdriver to take them out.
-
3Pry the frame of the door out if your door requires it. Some hidden doors allow you to leave the old frame in place. If you do need to actually remove the frame, use a chisel to dig in between the wood panels and the drywall. Pull it up near the corner to pop the nails out. Carefully remove the panels one piece at a time. This process shouldn’t be too hard once you pry a corner of the wood up.[13]
- The panels will have nails sticking out of them, so work slowly and carefully.
- If you don’t need to install the frame, follow the manufacturer’s instructions to see where you need to install the brackets for your new door.
- You may be able to pull the frame out in a single piece depending on how it was installed.
-
4Set your door jamb panels up and make sure they’re level. Starting at the bottom, place each piece of your door jamb in the corresponding location one at a time. Once a piece is resting against the drywall, check to see if it’s level using a bubble leveler. If there is a gap in the jamb or threshold, use a shim to push the panel into the level position. Place the shim between the wall and the panel, pushing it in until the door is level. Trim the excess portion off with a utility knife and glue the shim to the panel with wood glue.[14]
- You can also use a circular saw to cut a panel at an angle, although this is usually unnecessary.
- You can glue the shim into the wood using wood glue if you’d like.
-
5Use a nail gun to nail your door frame together. Lay your panels out on a level surface. Follow the manufacturer’s instructions regarding the placement of the nails. Nail your frame together at the joints where the panels meet with standard construction nails. With your frame together, lift it up and set it inside your doorway. Make sure that all of your brackets are facing the same direction so that you can hang your door to open the right way.[15]
- Check your frame again with a level before installing it. Apply shims as needed to get frame level.
- If the brackets for your door aren’t facing the same direction, you won’t be able to hang it. Make sure that your door is going to swing in the right direction. If you need to, you can flip your door around if the surrounding drywall isn’t too uneven.
-
6Place shims in between the frame and the wall and drill the frame in. With your frame in the doorway, slide wooden shims into both sides of the door at the bottom, top, and sides to keep it in place. Once the shims are firmly in place, break off the excess portions with your hammer. Screw the frame into the drywall by drilling #10 screws into the frame where the shims rest. Run 6-10 screws through each side of the door to set it in place.[16]
- If possible, have a friend brace the door frame to keep it still while you’re installing it. That way, it won’t move as you’re driving the screws into place.
- Make sure that your brackets are facing the same direction you want to hang your door. Some concealed doors swing inwards and some swing outwards, so double check the brackets before installing the frame.
-
7Hang the door by placing the pins into the brackets. Most hidden doors are designed to make this part easy. Simply lift the bookshelf or mirror door up and slide the slots for the brackets on top of one another. If the pins are preinstalled, slide the door into the brackets. If you need to install the pins yourself, brace the bottom of the door with your foot and dominant hand. Hold the door in place with the brackets on top of one another and slide the pins in place.[17]
- If you need to install the brackets yourself, screw them into the locations where they’re marked to be installed.
- If you're installing a hidden sliding door, you might find it easier to hang the rollers first and then secure them to the door rather than installing on the door first.
-
8Install the frame panels with wood glue and nails. Once your door is hanging, take your trim and apply wood glue to the back of each piece. Place them over the gap where the jamb meets the drywall to hide it. Push each panel into the corresponding location carefully to keep each panel flush with the frame. Once the trim is in place, put small nails in your nail gun and fire 1 nail every 10–20 in (25–51 cm) along the frame to finish your door.[18]
- If you have a hidden bookshelf door that is unpainted, paint it with 2-3 coats of your preferred color if you want to give it some color.


Things You’ll Need
Covering Your Door
- Screwdriver
- Drill
- Hanging mirror
- Screws
- Curtain rod
- Drapes
- Wallpaper
- Tapestry
- Nails, screws, or push pins
Repurposing the Closet
- Book
- Hammer
- Flathead screwdriver
- Drill
Installing a Hidden Door
- Book
- Nail gun
- Drill
- Shims
- Wood glue
- Measuring tape
- Screwdriver
- Level or speed square
- Utility knife
- Screws
- Nails
- Paint (optional)


References
- ↑ https://www.bhg.com/home-improvement/walls/wallpapering/wallpaper-tips/
- ↑ https://www.architecturaldigest.com/story/alternative-to-ugly-closet-doors-curtain
- ↑ https://images.homedepot-static.com/catalog/pdfImages/e0/e00f09b5-9a1f-4b95-b4d9-058a1df9d531.pdf
- ↑ https://www.architecturaldigest.com/story/alternative-to-ugly-closet-doors-curtain
- ↑ https://www.architecturaldigest.com/story/small-space-hack-remove-doors
- ↑ https://www.architecturaldigest.com/story/small-space-hack-remove-doors
- ↑ https://www.architecturaldigest.com/story/small-space-hack-remove-doors
- ↑ https://www.bobvila.com/slideshow/8-other-uses-for-closet-space-48347
- ↑ https://www.decoist.com/2015-07-16/closet-office-nooks/
- ↑ https://www.washingtonpost.com/realestate/doorways-in-cunning-disguises/2018/10/18/c2f2c35a-aae2-11e8-8a0c-70b618c98d3c_story.html
- ↑ https://www.washingtonpost.com/realestate/doorways-in-cunning-disguises/2018/10/18/c2f2c35a-aae2-11e8-8a0c-70b618c98d3c_story.html
- ↑ https://www.architecturaldigest.com/story/small-space-hack-remove-doors
- ↑ https://youtu.be/V11l2sSYOWc?t=48
- ↑ https://www.popularmechanics.com/home/interior-projects/a24888269/how-to-use-shims/
- ↑ https://youtu.be/V11l2sSYOWc?t=200
- ↑ https://youtu.be/V11l2sSYOWc?t=217
- ↑ https://youtu.be/V11l2sSYOWc?t=265
- ↑ https://youtu.be/V11l2sSYOWc?t=291
About This Article