This article was co-authored by wikiHow staff writer, Hunter Rising. Hunter Rising is a wikiHow Staff Writer based in Los Angeles. He has more than three years of experience writing for and working with wikiHow. Hunter holds a BFA in Entertainment Design from the University of Wisconsin - Stout and a Minor in English Writing.
There are 10 references cited in this article, which can be found at the bottom of the page.
The wikiHow Culinary Team also followed the article's instructions and verified that they work.
This article has been viewed 29,908 times.
Learn more...
If you buy a package of dried fish, it may seem a little intimidating to figure out how you’re going to incorporate them into your recipes. While dried fish is popular in Asian and Filipino dishes, you might not even know where to start. Luckily, preparing dried fish is really easy and only takes a few minutes to cook into a delicious meal or snack. Just be sure to soak the fish beforehand to help keep the meat moist and tender!
Ingredients
- 10 pieces of dried fish
- 3 tablespoons (44 ml) of vegetable oil
Makes 2 servings
- 10 pieces of dried fish
Makes 3 servings
Steps
Soaking the Fish
-
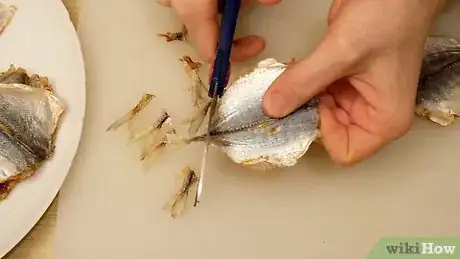
1Cut the fins off of your fish with kitchen scissors. The fins are usually unappetizing, so you want to take them off before you start cooking. Find the fins running along the top and bottom of the fish and trim them off as close to the body as you can. There may also be fins on the side of the fish’s body as well. Keep cutting the fins off the rest of your fish pieces.[1]
- You do not need to remove the heads or bones from the fish before you cook them.
-
2Submerge the fish in water for 30 minutes so the meat stays tender. Fill a large bowl with enough clean water from your sink to completely cover the fish. Put all of the dried fish inside of the bowl and leave it alone for about 30 minutes. The water will moisten the meat and rinse off any excess salt used to dry the fish out.[2]
- If you’re short on time or are working with smaller fish, like anchovies, you can soak the fish for 2 minutes in hot water.[3]
Advertisement -
3Rinse your fish off with fresh water to clean them off. Take the fish out of the bowl and hold it underneath cool running water to rinse off any debris that might still be left on the surface. Gently rub fish’s skin to work out dirt that might be stuck under the scales. Shake the excess water off of your fish so they aren’t dripping wet.[4]
-
4Use paper towels to pat your fish dry. You can either dry the fish individually or put all the pieces on a plate lined with paper towels. Set the fish on the paper towel and gently press down to absorb the water that’s on the surface. It’s okay if the fish feels a little damp as long as it’s not dripping wet by the time you cook it.[5]
- If your fish still looks dirty, try rinsing and drying it again before you cook it.
Pan-Fried Dried Fish
-
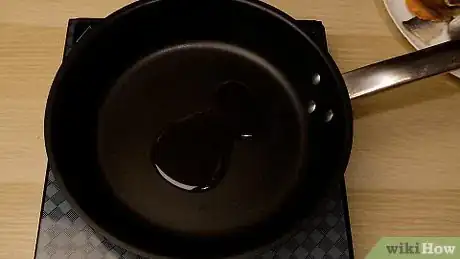
1Warm up vegetable oil in a pan over medium-low heat. Add 3 tablespoons (44 ml) of vegetable oil to a large pan and turn on your stove. Tilt the pan to coat it entirely so the fish doesn’t burn or get stuck to the bottom. Allow the oil to heat up completely until it starts bubbling and sizzling.[6]
- Opt for a pan with a thick bottom since it’s less likely to burn your fish.
-
2Fry the fish in your pan for 5 minutes. Lay a piece of dried fish on its side in the pan, and continue adding the other pieces so they’re evenly spaced. Allow the first side to cook for about 5 minutes, or until the skin looks golden brown.[7]
- If you don’t have room for all of your fish in the pan, cook it in smaller batches.
- Dried fish can be really smelly when you cook it, so run an exhaust fan or open a window to let the odor escape.
-
3Flip the fish to cook the other side until the scales are crisp. Use a spatula or tongs to flip the pieces of fish over so they cook evenly. Keep the fish in the pan until you notice the scales getting crispy and starting to separate from one another. Then you can remove them from heat,[8]
-
4Transfer the fish to a plate lined with paper towels to drain. Let the excess oil drip back into the pan before moving the fish to the plate. The paper towel will absorb any leftover oil so your fish stays crispy. Gently pat the fish without breaking it using another piece of paper towel.[9]
- If you don’t soak up the extra oil, the fish skin may get soggy.
-
5Enjoy your fish while it’s still warm. You can eat your fish on its own or serve it with sides like diced onions, tomatoes, and garlic.[10] To enhance the flavors even more, try dipping your fish in spicy vinegar. You can also mix the fish pieces with rice to make your meal even more filling.[11]
- While you can eat small fish like anchovies bones and all, be careful of solid pin bones in larger fish since they are sharp and could hurt you.
- Store any leftovers you have in the fridge for 3–4 days.[12]
Baked Dried Fish
-
1Preheat your oven to 400 °F (204 °C). Place one of the oven racks in the center position so heat circulates around it evenly. Set your oven to 400 °F (204 °C) and let it heat up while you’re prepping. Wait until it’s reached the proper temperature before cooking your fish to ensure it cooks completely.[13]
-
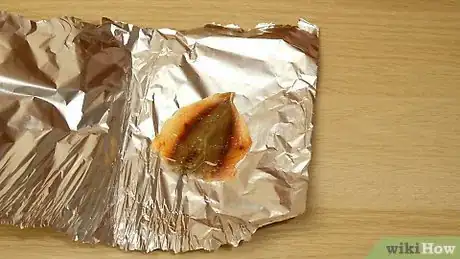
2Arrange the fish in a single layer on a sheet of aluminum foil. Rip off a sheet of aluminum foil that’s large enough to lay your fish in a single layer. Place the fish pieces on their sides along the length of the sheet. Leave a little space between your fish so heat can circulate around it well.[14]
- If you can’t place your fish in a single layer, use multiple sheets of foil.
-
3Spray your fish with cooking spray so it doesn’t stick. Hold a non-stick oil cooking spray just above the pieces of fish and lightly spray them. Coat the exposed side of the fish entirely with the oil before flipping the pieces over and spraying the other sides. That way, the pieces won’t stick to the foil.[15]
- If you don’t have cooking spray, you can use regular vegetable oil. Just be sure to coat all of the fish pieces evenly.
- Dried fish is already very salty, so you don’t need to add extra seasonings unless you want to.
-
4Wrap the fish loosely with another sheet of foil. Rip off another piece of foil that’s about the same size as the first piece. Set the foil on top of the fish so the edges line up with the bottom piece. Crimp the pieces of foil together along the edges to completely seal the fish inside so it cooks more quickly.[16]
- Wrapping the fish also prevents strong fishy odors while you’re cooking.
-
5Cook your fish in the oven for 6–10 minutes. You can place the packet directly in the over or set it on a rimmed baking tray if you’re worried about it ripping. Set the foil packet of fish in your oven and leave the door closed throughout the entire cook time. After 6–10 minutes, take your fish out of the oven and let the packet cool to the touch.[17]
- Open any exhaust vents or windows in your kitchen while you’re cooking just in case there’s still an odor.
-
6
Warnings
- Be careful of fish bones while you’re eating so you don’t hurt yourself.⧼thumbs_response⧽
- Hot oil can lead to severe burns or potentially a fire, so always use caution when using it to cook.⧼thumbs_response⧽
Things You’ll Need
Soaking the Fish
- Scissors
- Bowl
- Sink
- Paper towels
Pan-Fried Dried Fish
- Pan
- Stove
- Spatula
- Plate
- Paper towel
Baked Dried Fish
- Oven
- Aluminum foil
- Cooking spray
References
- ↑ https://youtu.be/9adIQ4kpeLE?t=15
- ↑ https://www.todaysdelight.com/how-to-cook-dried-herring-tunsoy-tuyo-fish/
- ↑ https://youtu.be/XyWmF-jWZzE?t=40
- ↑ https://www.yummytummyaarthi.com/dried-sardine-fry-karuvadu-fry-dry-fish/
- ↑ https://www.todaysdelight.com/how-to-cook-dried-herring-tunsoy-tuyo-fish/
- ↑ https://www.todaysdelight.com/how-to-cook-dried-herring-tunsoy-tuyo-fish/
- ↑ https://www.yummytummyaarthi.com/dried-sardine-fry-karuvadu-fry-dry-fish/
- ↑ https://www.todaysdelight.com/how-to-cook-dried-herring-tunsoy-tuyo-fish/
- ↑ https://www.todaysdelight.com/how-to-cook-dried-herring-tunsoy-tuyo-fish/
- ↑ https://www.yummytummyaarthi.com/dried-sardine-fry-karuvadu-fry-dry-fish/
- ↑ https://www.todaysdelight.com/how-to-cook-dried-herring-tunsoy-tuyo-fish/
- ↑ https://ask.usda.gov/s/article/How-long-can-you-keep-cooked-fish-in-the-refrigerator
- ↑ https://panlasangpinoy.com/tuyo-with-rice-tomato-recipe/
- ↑ http://www.clovegarden.com/ingred/sf_daingz.html
- ↑ https://panlasangpinoy.com/tuyo-with-rice-tomato-recipe/
- ↑ http://www.clovegarden.com/ingred/sf_daingz.html
- ↑ https://panlasangpinoy.com/tuyo-with-rice-tomato-recipe/
- ↑ http://www.clovegarden.com/ingred/sf_daingz.html
- ↑ https://ask.usda.gov/s/article/How-long-can-you-keep-cooked-fish-in-the-refrigerator
