This article was co-authored by wikiHow Staff. Our trained team of editors and researchers validate articles for accuracy and comprehensiveness. wikiHow's Content Management Team carefully monitors the work from our editorial staff to ensure that each article is backed by trusted research and meets our high quality standards.
wikiHow marks an article as reader-approved once it receives enough positive feedback. In this case, 91% of readers who voted found the article helpful, earning it our reader-approved status.
This article has been viewed 147,318 times.
Learn more...
Jack Skellington's look from Tim Burton's 1993 movie, The Nightmare Before Christmas is a fun and simple costume to make. With the right materials, the look can easily be recreated from scratch.
Steps
Making a Pinstriped Tuxedo Jacket and Pants
-
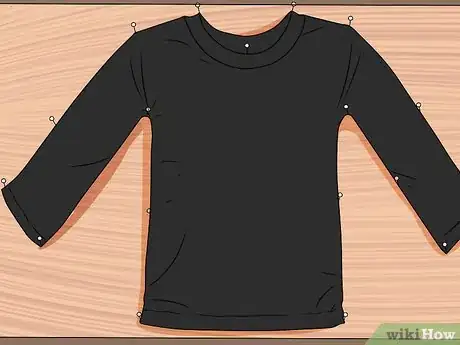
1Pin a solid black, long sleeved t-shirt onto a large foam board.[1] The board can be pinned to the wall or laid onto a table, as long as it is a flat and secure surface.
- Lay the shirt completely flat with the front of the shirt facing upward.
- Secure the sleeves, neck area and bottom of the shirt to the paper using sewing pins. This will keep the shirt nice and flat while you paint.[2]
-
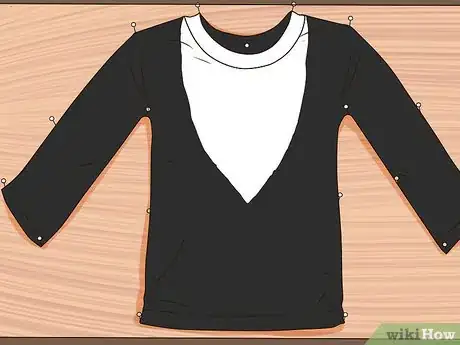
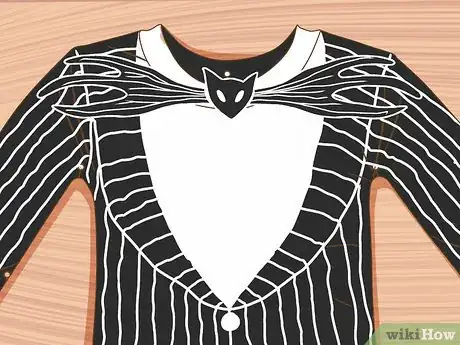
2Outline the lapel area to create a tuxedo jacket look. You will want to outline from the base of the neck down to the middle of the shirt, creating an oval shape.[3]
- Paint the inside the oval area using white fabric paint and a wide paint brush and This will give the appearance of Jack Skellington’s white shirt underneath the jacket.
- You may also cut along the outline of the initial oval area using fabric shears, then simply wear a white t-shirt underneath your costume for the same effect.
Advertisement -
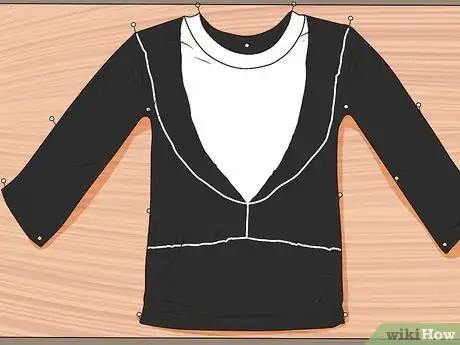
3Create a second outline from the edges of the shoulders to the same center point on the shirt. At this point you should have the appearance of a white shirt with jacket lapels on each side. This should look like an inner ‘U’ shape and an outer ‘U’ shape that both meet in the middle of the shirt.[4]
-
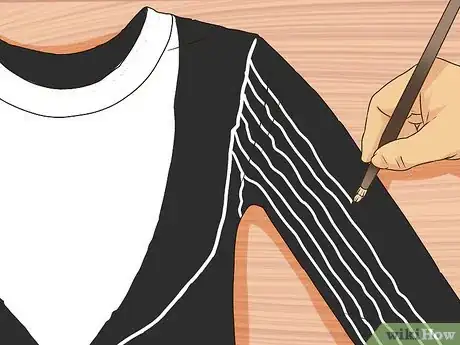
4Paint small pinstripes down the arms and center of the shirt. Using a small paintbrush white fabric paint, start at the ends of the shoulders and paint 6-8 straight, vertical lines all the way down to the bottom of each sleeve.
- Use a ruler to keep your lines straight while painting.
- Paint horizontal lines on the lapel from the tops of the shoulders down to the center of the jacket using a small paintbrush, the lines should be drawn about ½ of an inch apart.
-
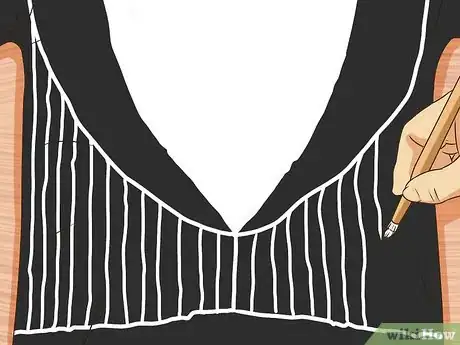
5Draw vertical lines down the body of the jacket. The lines should run down to the bottom of the shirt starting from the left underarm. With the white fabric paint, use a small paintbrush and a ruler to keep the lines straight. These lines should also be approximately ½ inch apart.
- As you move toward the center of the shirt, be sure to start painting your pinstripes from the outer edge of the lapel down to the bottom of the shirt.
- Repeat the same instructions for the right side, painting approximately 8 lines per side.
-
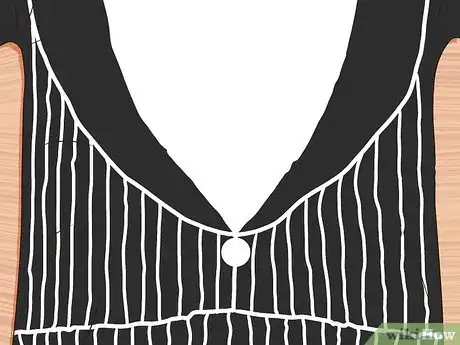
6Draw a straight horizontal line across the navel area. Use your small paintbrush and white fabric paint to from the left side of the shirt to the right.
- In the center of the jacket, directly underneath bottom of the lapel, use your white fabric paint to draw a small, circle about the size of a 50 cent piece to replicate the button on Jack’s tuxedo jacket.[5]
- Set aside to allow all paint to dry.
-
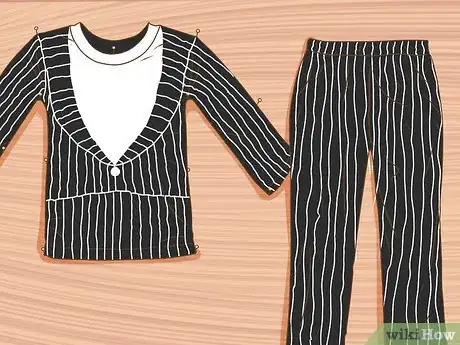
7Pin your solid black pair of cotton or polyester pants to a large foam board. Use sewing pins to clip the waist area and very bottom of the pants to the paper to ensure that the pants remain flat and secure while painting.[6]
- Paint small, vertical lines that run from the left hip area down to the bottom of the left leg. Use a ruler to keep your lines straight and keep them approximately 1 inch apart.
- In the center of the pants, be sure to paint the lines from the top of the waistband to the bottom of the crotch area. Allow the paint to dry and repeat these instructions on the backside. In the end, the pants should have approximately 8 lines per leg on the front and back.
Making the Bat Bow Tie
-
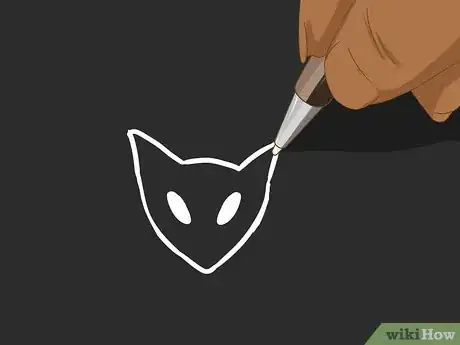
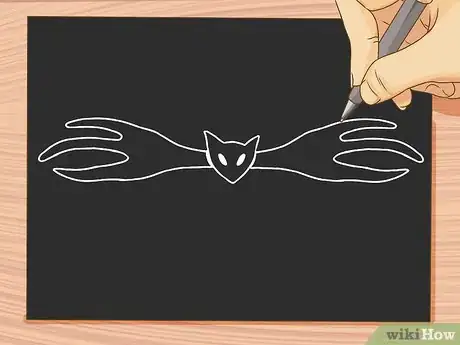
1Draw a bat on black construction paper using a white colored pencil. The bat’s head should be approximately 3 inches wide with winged tipped ears. You can use the construction paper itself as the bat’s head, or black felt by using what you’ve drawn as a stencil and cutting around it.[7]
- Outline both eyes with the white colored pencil and then fill them in with either the pencil, or with whiteout.
-
2Outline 3 large wingtips per side (6 total) using black construction paper. Each wingtip should extend approximately 8 inches outward with pointy ends. Wings should extend approximately 2-3 inches past each shoulder.
- Cut around the outline to create the wings. You can use these construction paper wings or create more life-like wings by using black felt.[8] You can use your outline as a stencil to cut the felt into wings.
- Use white paint or whiteout to draw small horizontal lines within each wingtip. There are no set amount of lines to draw, but shoot for a minimum of 2-3 lines starting at the tip of each wing down to the center.
-
3Pin the bat to the neck area of the costume using two silver safety pins. You can use one pin on either side of the bat’s face, or place one at the top of its head and another at the bottom.
- The wings should be left unpinned and should be sticking straight out about 2-3 inches past the shoulders.
- Pinning the bow tie may be best accomplished once you have already put on the suit.
Applying Makeup and Skull
-
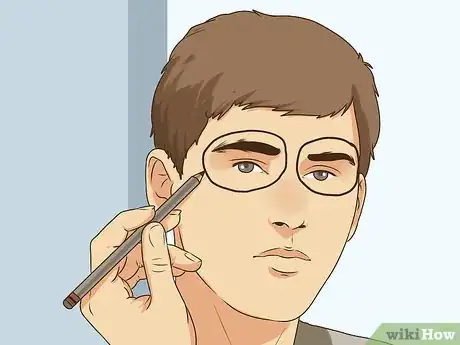
1Draw a circular outline around the eyes. Using black liquid eyeliner or a black eyeliner pencil, the outline should start underneath the eyebrows and continue underneath the eyes, stopping before you reach the bridge of the nose to recreate Jack Skellington’s black, sunken eyes.[9]
- Apply black makeup underneath the eyebrows, completely over the eyelids and underneath the eyes.
-
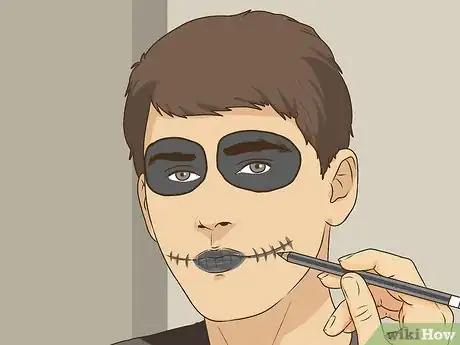
2Draw a ½ inch thick line across the left cheek. Use black liquid eyeliner or black lipstick to create a straight line that extends from the bottom of the ear to the corner of the mouth. [10]
- Apply the liquid eyeliner or lipstick to draw stitches vertically across the horizontal line, then repeat on the right side of the face to recreate Jack Skellington’s stitched mouth.
- Color your lips using black lipstick, then create the same stitch effect from right above the upper lip to right below the bottom lip.
-
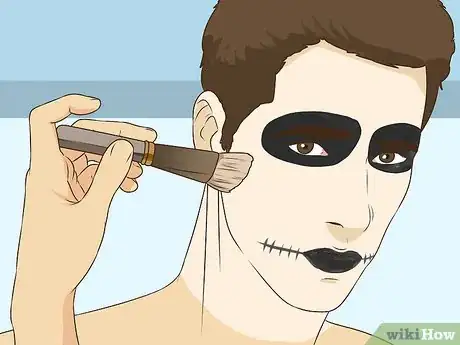
3Cover face and skin with white powder makeup. Include the ears the base of the skull and the front and back of the neck. While adding makeup to the ears, be sure not to get powder inside of the ear canal.
- Be sure to dab both around and inside the stitches so that they remain visible.[11]
-
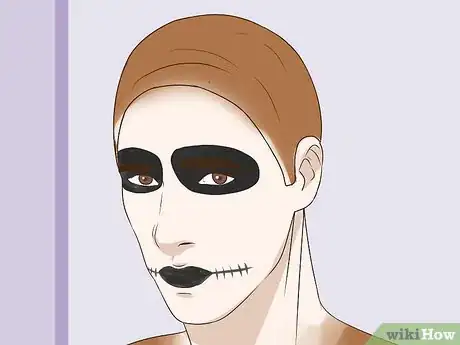
4Wear a plain white or flesh colored latex cap to replicate the bald white skull. The cap should fit snug and tight with few wrinkles.
- Use gel or bobby pins to slick the pair down to create a smooth base for the cap to fit securely.[12] White latex caps can be found online and in costume shops.
- Dab the edges of the cap with a bit of white of flesh colored powder makeup to achieve a blend.
Community Q&A
-
QuestionWhere can I find the shirt and pants?
 Community AnswerAny store that sells clothing should have these basics.
 -
QuestionCan I remove my hair?
 Community AnswerYou can shave your head bald if you so choose, though the bald cap advised in the article would be less drastic.
Warnings
- If using baby powder on your hair, be sure not to get it in your eyes. Another person may be able to help with this stage. If your costume is already on at this point drape yourself in a large towel to avoid getting baby powder all over.⧼thumbs_response⧽
- A white turtleneck underneath can be a great alternative to painting the front of the shirt white and adding makeup to the neck area.⧼thumbs_response⧽
- You can also use a plain, white latex swim cap, though this may not blend with makeup as easily.⧼thumbs_response⧽
Things You'll Need
- A foam board or surface where clothing can be securely clipped to prevent sliding
- Solid black t-shirt and solid cotton or polyester black pants
- Sewing pins
- Small safety pins
- A small paintbrush
- A wide paintbrush
- White fabric paint
- Black construction paper and/or black felt
- Scissors or fabric shears
- White or flesh colored latex cap or solid white swimming cap
- White colored pencils/whiteout
- Black liquid eyeliner or eyeliner pencil
- Black lipstick
- Halloween makeup kit
- White powder makeup
- Baby powder
References
- ↑ http://silverlakemom.com/diy-halloween-costume-tutorial-jack-skellington-nightmare-before-christmas-ashley-fauset/
- ↑ http://silverlakemom.com/diy-halloween-costume-tutorial-jack-skellington-nightmare-before-christmas-ashley-fauset/
- ↑ http://silverlakemom.com/diy-halloween-costume-tutorial-jack-skellington-nightmare-before-christmas-ashley-fauset/
- ↑ http://silverlakemom.com/diy-halloween-costume-tutorial-jack-skellington-nightmare-before-christmas-ashley-fauset/
- ↑ http://silverlakemom.com/diy-halloween-costume-tutorial-jack-skellington-nightmare-before-christmas-ashley-fauset/
- ↑ http://silverlakemom.com/diy-halloween-costume-tutorial-jack-skellington-nightmare-before-christmas-ashley-fauset/
- ↑ https://www.pinterest.com/pin/147281850285866978/
- ↑ https://www.pinterest.com/pin/147281850285866978/
- ↑ http://www.happinessishomemade.net/quick-jack-skellington-halloween-makeup/
- ↑ https://makeupdrshari.wordpress.com/2011/10/05/31-days-of-halloween-makeup-day-5-10-tips-for-applying-a-bald-cap/
- ↑ https://makeupdrshari.wordpress.com/2011/10/05/31-days-of-halloween-makeup-day-5-10-tips-for-applying-a-bald-cap/
- ↑ https://makeupdrshari.wordpress.com/2011/10/05/31-days-of-halloween-makeup-day-5-10-tips-for-applying-a-bald-cap/
