This article was co-authored by wikiHow Staff. Our trained team of editors and researchers validate articles for accuracy and comprehensiveness. wikiHow's Content Management Team carefully monitors the work from our editorial staff to ensure that each article is backed by trusted research and meets our high quality standards.
There are 10 references cited in this article, which can be found at the bottom of the page.
The wikiHow Video Team also followed the article's instructions and verified that they work.
This article has been viewed 471,292 times.
Learn more...
Did you ever think that you could use a vegetable as a battery? Batteries produce electricity by passing electrons back and forth between two metal plates [1] What if you didn’t have a battery around, but had a potato? Well, potatoes contain phosphoric acid which can serve as the chemical solution necessary to transfer electrons back and forth between the metal plates.[2] By adding some metal to a potato, you can make a battery using just a few household items! Let's get started!
Steps
Making a Potato Battery
-
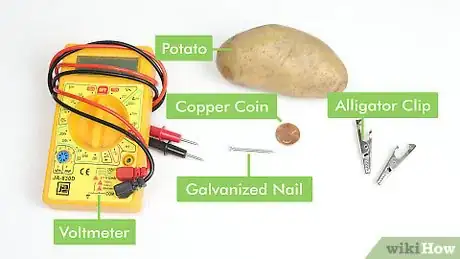
1Gather the necessary materials. To make a single potato battery you will need a potato, a galvanized nail, a copper coin, two alligator clips, and a voltmeter.
-
2Insert the galvanized nail near the middle of the potato. Push the nail into the potato until it is almost to the other side. It’s okay if you push it all the way through, just pull it back until it no longer sticks out of the other end.[5]
- Some juice will come out of the potato during this step, but that’s okay.
- Cover your work surface with plastic or newspaper to avoid getting potato juice everywhere.
Advertisement -
3Insert the copper coin into the potato about an inch away from the galvanized nail. Repeat the previous step with the copper coin. Make sure that the nails are not touching within the potato. If they touch, the circuit will not be complete and the battery will not produce any voltage.[6]
- If the nails do end up touching, simply reposition them so they are no longer touching.
- The distance between the nails does not need to be exactly one inch, but you want them to be close together.
-
4Connect one clip to the copper coin and one lead of the voltmeter. The voltmeter should have a black lead and red lead. Connect the copper coin to the red lead of the voltmeter using the alligator clips.[7]
- Some voltmeters have black and yellow leads instead of black and red. In this case, use the yellow lead for this step.
-
5Connect the second clip to the galvanized nail and the remaining lead of the voltmeter. The galvanized nail should be connected to the black lead of the voltmeter.[8]
- Make sure the alligator clip is securely attached to both the nail and the lead.
-
6Check the reading on the voltmeter. You should see a small increase in voltage on the voltmeter. You may notice that the voltmeter is reading a negative value. If this is the case, simply switch the clips on the voltmeter leads and it should change to a positive voltage.[9]
- If the voltage is very low, try moving the nails closer together. Again, make sure they are not touching within the potato.
Powering a Clock with Multiple Potato Batteries
-
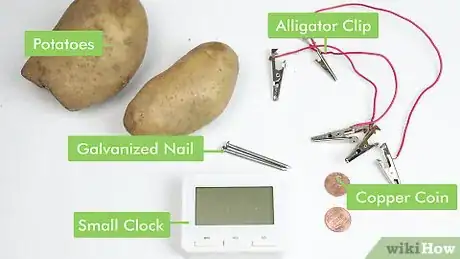
1Gather your materials together. To make a potato battery you will need two galvanized nails, two copper coins, two potatoes, three alligator clip leads with clips on both ends, and a small clock.
- Galvanized nails are regular nails that have a zinc coating that is necessary for this experiment. They can be found at a standard hardware or home improvement store.
- Copper coins, if needed, can also be found at a standard hardware or home improvement store.
- It doesn’t matter what color your alligator clip leads are as long as they have clips on both ends.
- Use firm and fresh potatoes. The liquid in the potatoes is necessary for this experiment, so dried out potatoes will not work.[10]
- Remove the battery from the clock before you begin.
-
2Insert one galvanized nail into the middle of each potato. Using firm pressure, insert the nail into the potato until it almost reaches the other side. If you accidentally push it all the way through, don’t worry! Simply pull the nail back so it is no longer sticking out.[11]
- Some potato juice may leak out while doing this, but it will not affect the experiment.
- To make cleanup easier at the end, cover your work surface with newspaper or a plastic bag.
-
3Push one copper coin into each potato about one inch apart from the galvanized nail. Repeat the previous step with the copper coin, ensuring that it does not touch the galvanized nail.[12]
- At this point, each potato should have one galvanized nail and one copper coin inserted about an inch apart from each other.
- The exact distance between the nails is not important, you just want them to be close together without touching.
-
4Connect the two potatoes with one alligator clip lead. Attach one clip to the galvanized nail in the first potato and the other clip to the copper coin in the second potato. This will complete the circuit for your battery.
- Finishing this step, the two potatoes should be attached to each other and the clock.
- Check to make sure that all of your clips are securely attached.
-
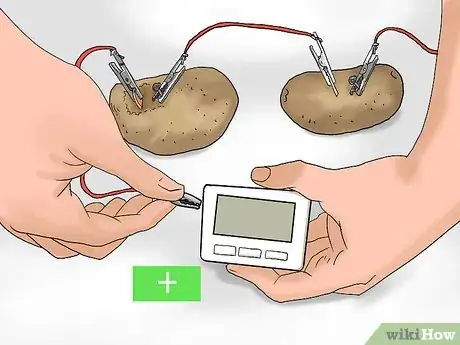
5Attach one clip lead to the copper coin and the other clip to the positive side of the battery box. Look at the battery box and identify the (+) sign on one of the sides. Clip one end of the wire to this positive side. Take the other end and clip it to the copper coin in the first potato.[13]
- Make sure the clip is securely attached to the nail and the battery box.
- This makes the first connection in the circuit for the battery.
-
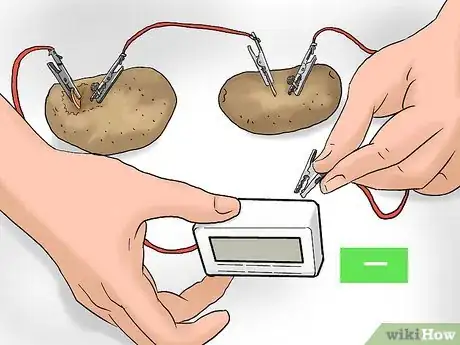
6Attach the second clip lead to the galvanized nail in the second potato and the negative side of the battery box. The other side of the battery box will have a (-) sign on it. Clip a new lead onto this negative end. Clip the other side of the lead onto the galvanized nail in the second potato.[14]
- Again, make sure to clip the leads on securely.
- At this point, each potato should be connected to the clock, but not to each other. One wire should be attached to the copper coin on one potato and a second wire should be attached to the galvanized nail on the second potato.
-
7Check to see if the clock is working. At this point, the second hand on the clock should be moving. It’s powered completely by the potato battery! If the clock isn’t working, check to make sure you have the correct leads attached to the battery box. The copper coin needs to be on the positive terminal and the galvanized nail needs to be on the negative terminal.[15]
- If it still isn’t working, try reversing the leads.
- Make sure you are also using fresh potatoes.
- When you’re finished, remove the leads connecting the potatoes and reinstall the battery into the clock.
Community Q&A
-
QuestionWhy do I have to use galvanized nails and copper nails instead of ordinary nails?
 Community AnswerYou have to use those nails because ordinary nails don't have the metal needed for the electrodes.
 -
QuestionDo I need to use specific colors of wires or can I use only red and black wires?
 Community AnswerAny wire is fine, the only thing that needs to be different is the metals you are inserting into the potato.
 -
QuestionWhat type of potato do I have to use? Is it Irish or sweet potato?
 Community AnswerAny type of potato will do, but the size depends on what you are trying to power.
Warnings
- Young children should be supervised when performing this experiment. Nails and wires can be sharp if handled incorrectly.⧼thumbs_response⧽
Things You'll Need
- Two galvanized nails
- Two copper coins/wires
- Two potatoes
- Three alligator clip leads
- Working Clock
References
- ↑ http://americanhistory.si.edu/fuelcells/basics.htm
- ↑ http://www.doitpoms.ac.uk/tlplib/batteries/potato_battery.php
- ↑ https://stemgeneration.org/potato-power/
- ↑ http://www.sciencebuddies.org/science-fair-projects/project_ideas/Energy_p010.shtml#help
- ↑ http://www.sciencebuddies.org/science-fair-projects/project_ideas/Energy_p010.shtml#procedure
- ↑ https://www.bibalex.org/SCIplanet/en/Article/Details.aspx?id=150
- ↑ http://www.sciencebuddies.org/science-fair-projects/project_ideas/Energy_p010.shtml#procedure
- ↑ http://www.sciencebuddies.org/science-fair-projects/project_ideas/Energy_p010.shtml#procedure
- ↑ https://www.scienceprojects.org/potato-battery/
- ↑ https://stemgeneration.org/potato-power/
- ↑ http://www.sciencebuddies.org/science-fair-projects/project_ideas/Energy_p010.shtml#procedure
- ↑ http://www.sciencebuddies.org/science-fair-projects/project_ideas/Energy_p010.shtml#procedure
- ↑ https://stemgeneration.org/potato-power/
- ↑ https://stemgeneration.org/potato-power/
- ↑ https://stemgeneration.org/potato-power/
- Videos provided by ExpCaseros
About This Article
To create a potato battery, start by inserting a galvanized nail near the middle of the potato and pushing it in until it's almost to the other side. Next, insert a copper coin halfway into the potato about 1 inch away from the nail. Make sure the nail and coin aren't touching each other! Then, using the end clips of a voltmeter, attach one clip to the nail and the other to the penny. You'll see a small increase in voltage on the voltmeter -- you just created a single-cell battery! For more tips, including how to use multiple potatoes for a stronger battery, read on!
