This article was co-authored by Sarah Kosakowski and by wikiHow staff writer, Amber Crain. Sarah Kosakowski is a Professional Hair Stylist and the Owner of Alba Salon and Spa based in Cincinnati, Ohio. With a decade of experience, she specializes in bridal and formal hair, blondes, fine hair, and men’s cuts. Sarah received her training at The Aveda Frederic’s Institute and is proud to be a Kevin Murphy Session stylist amongst other accomplishments.
This article has been viewed 18,121 times.
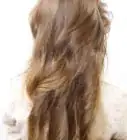
A tucked bun is an updo that can be styled both casually and formally. You can arrange your hair loosely for a casual look or, for a more polished look, you can pull the hair tighter and use bobby pins to secure flyaway strands in place. There are many variations on the tucked bun. Incorporating twists and braids can help you achieve different looks when creating this style.
Steps
Creating a Basic Tucked Bun
-
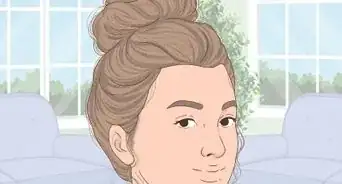
1Tease the top part of your hair lightly. Start with dry hair. Begin by brushing your hair thoroughly with a paddle brush to remove any tangles you may have. Using a comb or pick, lightly tease your hair at the crown of your head. This will add some volume on top.[1]
- If you want additional volume, apply a volumizing powder or dry shampoo to the roots on the top of your head. Then fluff your hair gently with your fingers.
-
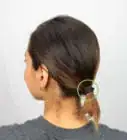
2Pull your hair back into a normal ponytail. Brush all of your hair to the back of your head using the paddle brush. Grasp the hair where you would normally place a regular ponytail.[2] Wrap a hair elastic around it once. Then, when you wrap the elastic around the second time, don’t pull your hair all the way through it. Stop about halfway through and let go of the elastic.[3]
- This will create a messy half-bun, with the remaining ponytail hanging loose right beneath it.
Advertisement -
3Twist the ponytail around 180 degrees. Grasp the ponytail section and twist the hair around so that it is now directly above the bun rather than below it. Use both of your hands to gently pull on either side of the bun, which will flatten it out and loosen it up a bit.[4]
-
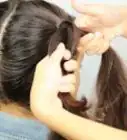
4Create the opening for the bun. Place your index fingers on the hair directly above the bun. Pull your fingers in opposite directions, pulling your hair along with them. Pulling the hair apart will create an opening, which is where you will tuck the bun and the ponytail.[5]
-
5
-
6Set your tucked bun style with your favorite hairspray. Secure the style with bobby pins if you need extra hold or plan to be out in humid weather. Spray with a finishing hairspray.[8] If you’d like to soften the look a bit, pull out a few strands of your hair around your face to frame it. You can use pomade to define these strands.
Creating a Braided Chignon Tucked Bun
-
1Create volume by teasing your hair at the crown. Start with dry hair. Brush through it to ensure it’s tangle-free. Lift the hair at the top of your head and use a pick or comb to lightly tease it at the roots. This will soften up the style and provide a little volume.[9]
- Use a volumizing powder or dry shampoo to create additional volume, if desired.
-
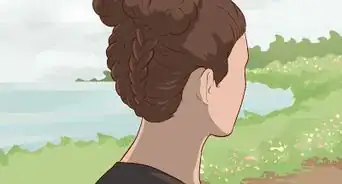
2Braid two sections of hair on each side of your head. Start on the left side. Use your fingers to separate one chunk of your hair at the crown of your head. Then separate another chunk, approximately the same size as the first, right above your ear. Loosely braid both pieces and secure the ends together with a clear hair elastic.[10]
-
3Repeat the exact same actions on the right side. Then secure both sides of double-braids together with a single elastic at the back of your head. Make sure you secure them loosely. The braids should drape rather than pull.
-
4Gather your remaining hair into a loose low ponytail. Hold the low ponytail in place with your hand, but do not secure it with an elastic. Use your other hand to gather the ends together and pull them up. Loop all of your hair around and tuck the ends down between the braids to create a loose bun. Pull the ends through and secure them in place with bobby pins.[11]
- For a slightly different look, create a very loose angled braid with your remaining hair, then loop it around to create the bun.
-
5Set the style with hairspray. If any areas feel loose, use a few more bobby pins underneath the bun to hold everything in place. Pull out a few face-framing pieces to soften up the overall look. Mist your entire head with hairspray.[12]
Creating a Twist-Tuck Bun
-
1Begin with second day hair. This is a great style when you want a soft “undone” look. Second or third day hair will provide your hair with extra grip and texture, both of which compliment this look. If you want to add more texture, mist a texturing hairspray onto your hair. If you want additional body, apply a volumizing powder. Dry shampoo works well for this, too.[13]
- Make sure you begin with dry hair.
-
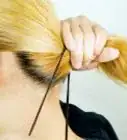
2Separate a section of hair on each side of your head. Gather a healthy chunk of hair on each side of your head, right above your ears. These separated pieces will create the twists in this look. Pin the pieces out of the way for now.[14]
-
3Put the rest of your hair into a low ponytail. Gather all of your remaining hair at the nape of your neck. Secure the hair with an elastic to create a basic low ponytail. Make sure you don’t secure the hair too tightly, since the end result should look slightly messy and softly frame your face.[15]
-
4Twist the hair on the left side. Unpin the sectioned-off hair and twist it all the way to the ends. Pull the twisted section back toward your low ponytail. Pull the end over the ponytail, covering the elastic, and secure everything with bobby pins underneath the ponytail.[16]
-
5Twist the hair on the right side. Repeat the exact same actions with the right section of hair. Make sure both twists are secure. If not, use a few more bobby pins to hold everything in place.[17] You can twist the hair tightly for a polished look or twist it loosely to get an “undone” style.
-
6Tuck the low ponytail and roll it under to create a bun. Take the end of the ponytail and roll it under to create a loop. Then bring the end of the ponytail up, right beneath the area where the twists meet. Pin the ends in place, underneath the twists, to create a loose bun.[18]
-
7Set the style with hairspray. If your bun has any loose pieces falling out, secure them with bobby pins. If you prefer a softer look, feel free to leave the strands out. Pull out a few strands of your hair around your face to frame it. Don’t pull any of your hair too tightly or pin it too precisely, since the style should look slightly messy.[19]
References
- ↑ https://www.youtube.com/watch?v=-1qSrPLV8TY
- ↑ Sarah Kosakowski. Professional Hair Stylist. Expert Interview. 3 September 2021.
- ↑ https://www.youtube.com/watch?v=-1qSrPLV8TY
- ↑ https://www.youtube.com/watch?v=-1qSrPLV8TY
- ↑ https://www.youtube.com/watch?v=-1qSrPLV8TY
- ↑ Sarah Kosakowski. Professional Hair Stylist. Expert Interview. 3 September 2021.
- ↑ https://www.youtube.com/watch?v=-1qSrPLV8TY
- ↑ Sarah Kosakowski. Professional Hair Stylist. Expert Interview. 3 September 2021.
- ↑ http://www.abeautifulmess.com/2013/08/braided-hair-tuck.html
- ↑ http://www.abeautifulmess.com/2013/08/braided-hair-tuck.html
- ↑ http://www.abeautifulmess.com/2013/08/braided-hair-tuck.html
- ↑ http://www.abeautifulmess.com/2013/08/braided-hair-tuck.html
- ↑ http://www.hairromance.com/2014/03/curly-hairstyle-tutorial-the-twist-tuck-bun.html
- ↑ http://www.hairromance.com/2014/03/curly-hairstyle-tutorial-the-twist-tuck-bun.html
- ↑ http://www.hairromance.com/2014/03/curly-hairstyle-tutorial-the-twist-tuck-bun.html
- ↑ http://www.hairromance.com/2014/03/curly-hairstyle-tutorial-the-twist-tuck-bun.html
- ↑ http://www.hairromance.com/2014/03/curly-hairstyle-tutorial-the-twist-tuck-bun.html
- ↑ http://www.hairromance.com/2014/03/curly-hairstyle-tutorial-the-twist-tuck-bun.html
- ↑ http://www.hairromance.com/2014/03/curly-hairstyle-tutorial-the-twist-tuck-bun.html
About This Article