This article was co-authored by Jenny Tran. Jenny Tran is a Hair Stylist and the Founder of JT Hair Lab by Jenny Tran based in the Dallas, Texas metro area. With over seven years of professional hair styling experience, Jenny specializes in hair coloring, haircutting, and hair extensions. JT Hair Lab is an authorized carrier of R+Co and of Milbon and is committed to using products with quality ingredients.
There are 12 references cited in this article, which can be found at the bottom of the page.
This article has been viewed 40,994 times.
Curling your pixie cut is a great way to change your look! Try curling it with a curling iron, or opt for rags or pin curls if you want to minimize heat styling. With practice, these techniques are quick and easy ways to curl your pixie cut. For best results, wash, dry and brush your hair before you begin curling it.
Steps
Creating Waves with a Curling Iron
-
1
-
2Heat up the curling iron. Plug the curling iron into a power outlet that is close to a mirror. Set the iron to the lowest heat setting if you have fine or colored hair. Choose a medium or high setting if you have thick, coarse, or healthy hair.
- To curl a short style like a pixie cut, you will need a small curling iron. Look for a curling iron with a barrel that is .5 to 1 inch (about 1.25 to 2.5 cm) in diameter.
- Experiment with different heat settings. Find the lowest setting that will set your curls, as this will cause the least damage to your hair.[3]
- Curling irons take about 2-3 minutes to heat up.
Advertisement -
3Clamp a 1 in (2.5 cm) section of hair in the curler. Gather a 1 in (2.5 cm) section of hair and position it under the clasp. Hold the curler vertically with the clasp facing forward.[4]
- If you want lots of curls, clamp a smaller section of hair. If you prefer larger curls, clamp more hair in the curler.
-
4Wrap the hair around the curler until you reach the roots. Curl the section of hair from the ends of the hair to the roots. Rotate the curler to wrap the hair around the barrel. Squeeze the hand lever to open the clasp and release the curl.
- Stop just before you reach your scalp to avoid the iron burning you.[5]
-
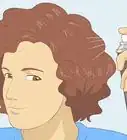
5Repeat on 1 in (2.5 cm) sections to curl the rest of your hair. Curl the back strands of your hair and then work your way towards the front of your head. Use a mirror to help you see the back of your head.[6]
-
6Comb your hair with your fingers if you want looser curls. Run your fingers from the roots of your hair to the ends. Spread your fingers apart and use them like a comb. This will loosen and separate the curls.
- Wait for your hair to cool before combing your hair.[7]
-
7Mist the curls lightly with hairspray. Set the curls in place using hairspray. Spray the curls as evenly as possible to avoid crusty patches forming.[8] Hold the spray can at least 6 inches (15 cm) away from your hair as you spray.
- Use a light-medium hold spray to achieve more natural-looking curls.[9]


Styling Pin Curls
-
1Gather a 1 in (2.5 cm) section of hair. Use a comb to section off approximately 1 in (2.5 cm) of hair. If you have a short pixie cut, you may find that you need to make a smaller section.[10]
- Smaller sections of hair will make tighter ringlets and larger sections will make looser waves.
-
2Spray water over the section. Dampen the section of hair with water from a spray bottle. The water helps to set the curls in place.[11]
- Don’t soak the hair with water as this will prolong the drying time of the curls.
-
3Wrap the section of hair around your thumb and index finger. Start at the ends of your hair and continue wrapping the hair around your fingers until you reach the roots. Wrap the hair around itself to keep the loop from untwisting. Don’t wrap the hair too tightly as you need to be able to remove the loop from your fingers.
- Wrap the section of hair around 1 finger if you want tighter curls.[12]
-
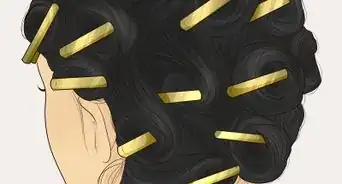
4Clip the roll of hair with an alligator clip. Hold the loop with the opposite hand whilst pulling your finger out of the loop. Pinch the loop with one hand to keep the loop intact. Use your other hand to clip the loop to your scalp using an alligator clip.
- Purchase alligator clips from a pharmacy. These work better than bobby pins because they don’t have ridges, which will leave your hair looking crimped.[13]
- Single-prong clips are also a great option. These small clips don’t have ridges, and are also the perfect size for making pin curls.
-
5Repeat on 1 in (2.5 cm) sections to curl the rest of your hair. Pin the back strands of your hair first and work towards the front of your head. Don't worry if the sections are slightly different sizes as this will help the style to look more natural.
-
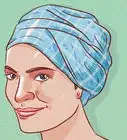
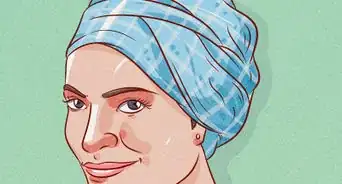
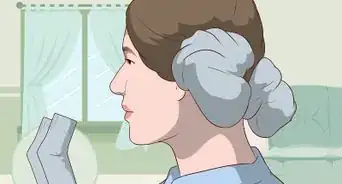
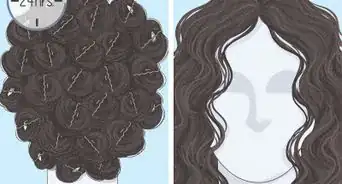
6Wrap a scarf around your head overnight. A scarf will help to stop the curls coming undone or becoming frizzy. Wrap the scarf over your head and knot it at the front. Make sure that all the pin curls are inside the scarf. Leave the curls to set overnight.[14]
- If you don’t have a scarf, wear a beanie instead.
-
7Remove all the clips. Take off the scarf and check that your hair is dry. If your hair is still damp, leave it uncovered for an hour to dry. Remove all the clips from your hair to reveal your pin curls.
- Use a mirror to help you see the clips at the back of your head.[15]
-
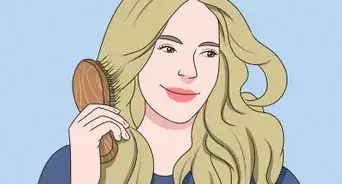
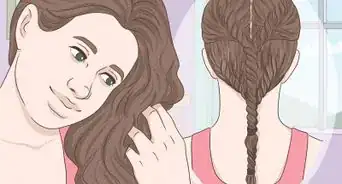
8Brush the curls if you want looser waves. Gently brush your curls with a hairbrush or comb. Continue brushing until they have dropped to form your preferred curl.
- If your hair gets frizzy from the brushing, lightly mist it with hairspray to smooth the curls.[16]


Curling Your Hair with Rags
-
1Cut fabric into 1.5 by 5 inches (3.8 by 12.7 cm) strips. Use fabric scissors to cut a piece of cloth into strips that are approximately 1.5 inches (3.8 cm) wide and 5 inches (13 cm) long. Old shirts, sheets, towels or large pieces of fabric all work well.
-
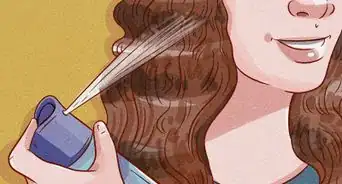
2Spray your hair with a sea salt spray. Sea salt spray will help to set your curls, making them last longer. The salt in the spray will also add texture, making your hair look freshly styled. Lightly spray your hair so that it is damp but not dripping.
- If you accidentally wet your hair too much, allow it to dry before you roll it around the rags.
- If you have very dry hair, use tap water instead of sea salt spray as salt can dry out your hair further.[19]
- Don’t brush your hair when it’s wet as this can damage the strands.
-
3Wrap a 1 by 1 inch (2.5 by 2.5 cm) section of hair around a rag. This will give you medium-sized curls. If you want really tight curls, gather less hair together. Wrap the hair around a rag, starting from the bottom of the hair. Position a rag horizontally at the end of your section of hair. Roll the hair around the rag until you reach your roots. Avoid rolling the rags right to your scalp as this can be painful overnight.
- If you don’t want the curls to go right to your scalp, stop rolling at the midway point of your hair.[20]
-
4
-
5Repeat the rolling process for the rest of your hair. Repeat the wrapping steps until you have rolled all your hair in the rags. Don’t worry about making sure that the sections are the exact same size as slightly thicker or thinner section will make the curls look more natural.
- If you find that your hair is drying out, dampen it with a little more sea salt spray.[22]
-
6Undo the rags in the morning. Sleep in the rags overnight. This can feel uncomfortable at first, but you will get used to the feeling. In the morning, unravel each of the rags to reveal your curls. If you have trouble removing one of the knots, use a pair of scissors to carefully cut the rag out of your hair.
- Make sure your hair is dry before removing the rags. If it is still a little damp, remove the remaining moisture with a hairdryer.[23]
-
7Comb your fingers through your hair to loosen the curls. When you take out the rags, the curls will be very tight. Run your fingers through the hair to separate the curls. This will also help the curls to drop slightly, creating a more relaxed look.[24]
- If you want tight ringlets, skip this step.
-
8Spray your curls lightly with hairspray. Set your curls with a light-medium hold hairspray. Spray your hair as evenly as possible to avoid sticky patches forming in your hair. Depending on your hair type, the curls will stay in for 2-4 days before going limp.[25]
- If you accidentally use too much hairspray, simply brush it out with your fingers.
- Keep your hair out of the rain to prolong the life of your curls.


Community Q&A
-
QuestionIf I use Method 3, should I wash the rags? And if so, how? Putting them in the laundry seems like a pain.
 Community AnswerYou should wash the rags in the laundry or manually unless they are already clean.
-Step-12-Version-4.webp)

References
- ↑ Jenny Tran. Professional Hair Stylist. Expert Interview. 19 May 2020.
- ↑ https://www.glamour.com/story/biggest-curling-iron-mistakes-youre-making
- ↑ https://www.glamour.com/story/biggest-curling-iron-mistakes-youre-making
- ↑ https://youtu.be/9az4kxXmqVk?t=52/
- ↑ https://youtu.be/9az4kxXmqVk?t=52/
- ↑ https://youtu.be/9az4kxXmqVk?t=14
- ↑ http://advicefromatwentysomething.com/how-to-use-a-curling-iron/
- ↑ Jenny Tran. Professional Hair Stylist. Expert Interview. 19 May 2020.
- ↑ http://advicefromatwentysomething.com/how-to-use-a-curling-iron/
- ↑ https://diy.dunnlumber.com/projects/how-to-make-pin-curls-like-rosie-the-riveter
- ↑ https://diy.dunnlumber.com/projects/how-to-make-pin-curls-like-rosie-the-riveter
- ↑ https://diy.dunnlumber.com/projects/how-to-make-pin-curls-like-rosie-the-riveter
- ↑ https://diy.dunnlumber.com/projects/how-to-make-pin-curls-like-rosie-the-riveter
- ↑ https://diy.dunnlumber.com/projects/how-to-make-pin-curls-like-rosie-the-riveter
- ↑ https://diy.dunnlumber.com/projects/how-to-make-pin-curls-like-rosie-the-riveter
- ↑ https://diy.dunnlumber.com/projects/how-to-make-pin-curls-like-rosie-the-riveter
- ↑ https://youtu.be/XI2VOQWw24s?t=66
- ↑ https://www.foodiewithfamily.com/how-to-rag-roll-your-hair-natural-looking-curls-that-dont-damage/
- ↑ https://offbeatbride.com/rag-curls/
- ↑ https://youtu.be/XI2VOQWw24s?t=118
- ↑ https://youtu.be/XI2VOQWw24s?t=118
- ↑ https://youtu.be/XI2VOQWw24s?t=118
- ↑ https://offbeatbride.com/rag-curls/
- ↑ https://youtu.be/XI2VOQWw24s
- ↑ https://youtu.be/XI2VOQWw24s?t=205
About This Article


-Step-12-Version-4.webp)