This article was co-authored by wikiHow Staff. Our trained team of editors and researchers validate articles for accuracy and comprehensiveness. wikiHow's Content Management Team carefully monitors the work from our editorial staff to ensure that each article is backed by trusted research and meets our high quality standards.
There are 7 references cited in this article, which can be found at the bottom of the page.
wikiHow marks an article as reader-approved once it receives enough positive feedback. This article received 11 testimonials and 91% of readers who voted found it helpful, earning it our reader-approved status.
This article has been viewed 1,286,479 times.
Learn more...
If you're tired of the look of your old electric guitar, a custom paint job is a great way to switch things up and revitalize it. However, painting your guitar isn't as easy as just taking a brush with paint to the body of the guitar. Before you start painting your guitar, you'll need to take it apart and remove the old paint. From there, you can apply a coat of sealer, base color, and finally a clear gloss coat that will make the finish shiny. If you do everything correctly, you can transform the old color on your guitar to something new.
Steps
Removing the Old Finish
-
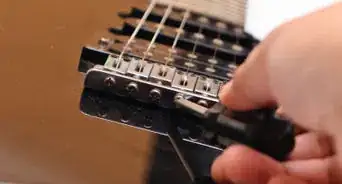
1Remove your guitar strings and the screws in the body of the guitar. Remove the guitar strings and then unscrew the neck of the guitar from the body with a Phillips-Head screwdriver. Once the body is standing alone, unscrew the screws and knobs on the front of the guitar. Remove the screws on the pickups and bridge of the guitar.[1]
- If there is a faceplate over your volume knobs, you'll have to remove the plastic portions of the knobs before you can lift the faceplate off.
-
2Remove the electrical components connecting the bridge and pickups. Once all of the screws are out on the face of the guitar, you can lift up your bridge and pickups, which are connected by wires. Snip these and solder them later when you put your guitar back together. If you feel unsure about taking your guitar apart, take it to a guitar store so that they can safely do it for you. [2]
- Make sure all the electrical wiring is removed from the guitar before you start painting it.
Advertisement -
3Heat the old paint with a hairdryer or heat gun. Set your heat gun or hairdryer to the lowest setting and move it back and forth, across the body of your guitar. The heat from your hairdryer or heat gun will soften the finish on your guitar and make it easier to lift up the paint. Continue heating the paint for five minutes and then use a putty knife to poke at the paint. If the paint feels soft, you can go onto the next step.[3]
- Do not hold the heat gun in one spot for too long or you may burn the wood that's under the paint.
-
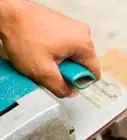
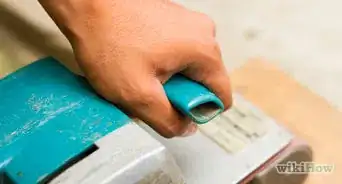
4Lift off the old paint with a putty knife. Start by scoring a small location on the softened paint. Use your putty knife to lift off the old finish and don't worry if it cracks off. Continue to scrape the paint and remove the old finish without damaging the wood under it. If the paint isn't coming off, use the heat gun again to soften it. Once you're done removing the finish, you should see the wood grain under it.[4]
-
5Sand the body of the guitar. Use a 100 grit sandpaper and sand over the surface of the guitar's body in the direction of the grain. Sand down irregularities so that the body of the guitar is as smooth as possible. Follow the contours of the guitar and sand the sides and edges of the guitar as well. Once you've sanded it with the 100 grit sandpaper, you can move to a 200 grit sandpaper to sand out smaller irregularities.
- Use a sanding block if the sandpaper is hurting your hands.
-
6Fill any holes with an automotive filler. As you sand down your guitar, you're likely to find bumps or divots in the body. Purchase an automotive filler online or an auto shop and follow the instructions to create the sticky substance. Use a plastic scraper to scoop up some of the filler and spread it over the divots in the body of the guitar. Once the divots are filled, let the filler dry for at least 20 minutes.
- Bondo is a popular type of automotive filler.[5]
-
7Sand the automotive filler so it lies flush with the guitar's surface. Once you've filled in all divots and the guitar is relatively smooth, you'll have to do one last sanding with the 100 grit sandpaper. Continue to sand until the automotive filler lies flush with the body of the guitar.[6]
-
8Dust the guitar with a dry rag. Don't saturate the wood grain on your guitar to prevent moisture from getting absorbed into the guitar. Take a microfiber cloth or a clean rag and wipe over the surface, making sure to remove any sawdust or debris that might be on the guitar.
- Debris or dust left on the guitar will get sealed into the paint job.


Sealing the Guitar
-
1Lay the guitar down on a flat surface. Lay down drop cloths under the guitar so that the paint doesn't stain the surface that you're painting on. Rest the guitar on top of the drop cloths with the back of the guitar facing up. [7]
-
2Choose a wood sealer. You can purchase wood sealer online or at a hardware store. Purchase a water based wood sealer that has a high gloss. Use a white sealer if you're painting your guitar a lighter color. If you're painting it a dark color, apply a gray sealer.
-
3Apply wood sealer to the guitar. Saturate a dry rag in the sealer. Once the rag is saturated, drag it along the grain on the surface of your guitar. Make long movements and do not scrub in a concentrated area with the sealer. Once the back of the guitar is sealed, allow it to dry for 10 minutes, then turn the guitar over and finish sealing the front and sides.[8]
- Once your rag looks dirty, dispose of it and use another, clean rag. Remove the shielding in the electronics bay, Apply the sealer into all pickup and electronics cavities and neck pocket, being careful not to let it puddle in these areas. These areas are often overlooked and allow moisture to enter the wood.
-
4Allow the guitar to dry and apply three to five coats of sealer. Let the sealer dry for an hour or two and come back and apply another even coat of sealer. The sealer will help the colored coats of paint adhere to the body of the guitar much easier. Continue adding more coats of sealer until you've covered the guitar three to five times in total.[9]
- Remember to let the sealer dry for an hour or two in between each new application.
- Once the guitar is properly sealed, the wood grain will be a much darker color.
-
5Let the sealer dry for three days. Feel over the sealer to make sure that it's no longer wet or sticky. Make sure that the guitar dries in a well-ventilated area so no one gets sick from the sealer's fumes.
-
6Sand off the shiny portions of the sealer. Using a 200 grit sandpaper, carefully sand over the shiny parts of the sealer. Make sure not to sand too hard or you may expose the wood grain underneath. If you do do this, simply reapply more coats of sealer to the guitar and allow it to dry before moving on. When you're done, the guitar should have a dull white or gray color.[10]


Applying Paint to Your Guitar
-
1Choose a paint for your guitar. Typical guitar paint includes polyester, polyurethane, and nitrocellulose. Polyurethane and polyester will result in a harder, more plastic-feeling finish on your guitar while nitrocellulose is lighter and thinner. If you're unsure of what kind of paint to get, look for spray paint that's made specifically for guitars.[11]
-
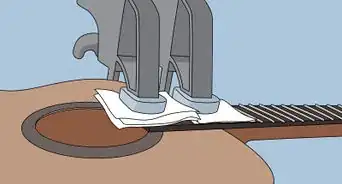
2Mask off the neck pocket keeping 1/16 inch from all of the pocket edges. This is to prevent the paint from building up and making it real hard getting the neck reinstalled. The neck joint is the most critical cut on any guitar. Make sure you tape this off very well.
-
3Spray your base coat onto the guitar. Position the nozzle on the spray can 12 to 18 inches (30.48 to 45.72 cm) away from the body of the guitar. Remember to cover the edges of the guitar. Press down on the button on the spray can and go in long, sweeping back and forth motions across the body of the guitar.
-
4Let the paint dry for ten minutes. Touch the surface of the guitar to make sure that none of the paint transfers to your hand. The paint may still be sticky and you'll still be able to see the sealer under the basecoat that you just sprayed.
-
5Flip the guitar over and spray the other side. Once the guitar is dry, flip it over and spray down the other side of the guitar. You should now have one solid basecoat of paint over the front and back of your guitar.
-
6Apply additional coats of base paint to the guitar. Allow each coat of paint to dry for five minutes before applying the next coat. Continue flipping the guitar over so that the entire guitar gets even coverage. Continue to cover your guitar in coats of paint until the paint gets darker and richer. This could take anywhere from three to seven coats of paint.
-
7Let the paint dry. Once you're done laying down the base color for your guitar, you'll have to let the paint dry for another one or two days in a well-ventilated area. Once it's completely dry, you can move onto the next step. [12]
-
8Sand the paint using 400-grit wet sandpaper. Once the color coat is dry, run your fingers over the surface, sides, and back of the guitar to see if the paint is smooth. If the paint rises too high in some spots or has become bumpy, you should sand it down with a wet sandpaper. Saturate the sandpaper in water overnight, then work it along the rough parts of your guitar while it's still wet.
- Wet sandpaper will not scratch the surface of your guitar.
-
9Spray clear lacquer onto the guitar. Clear lacquer paint will give your guitar a shiny finish over the paint. You can purchase clear lacquer paint at a home improvement store or online. Spray the clear lacquer the same way you sprayed the base coat, putting four separate coats of lacquer on the guitar and letting the paint dry for 90 minutes in between sprays.[13]
-
10Let the guitar dry for three weeks. Don't touch your guitar for three weeks as the paint dries. During this time, the paint will cure and should be a rich solid color, but will be missing the polish that guitars typically have.
-
11Polish the guitar with car polish. Saturate a rag or cloth with car polish and work it on the surface of the guitar using small, circular motions. This should refine the lacquer coat on the guitar, making the shine more reflective. Finish off the guitar by buffing off the remaining polish with a clean rag.
-
12Reassemble your guitar. Reinstall the shielding in the electronics bay. Solder the wires from your bridge and pickups back to the corresponding wires in the body of your guitar. Fit the bridge and pickups back on the front of the guitar and screw in the corresponding screws that you set aside before. Lastly, screw in the neck of your guitar and reattach any knobs that you removed. Your guitar should now be reassembled.[14]


Community Q&A
Did you know you can get answers researched by wikiHow Staff?
Unlock staff-researched answers by supporting wikiHow
-
QuestionCan you paint on a guitar?
 wikiHow Staff EditorThis answer was written by one of our trained team of researchers who validated it for accuracy and comprehensiveness.
Staff AnswerwikiHow Staff EditorStaff AnswerYes, you can paint on a guitar. However, it’s not as simple as painting straight onto the existing surface of the guitar because the guitar is already painted and sealed, so these existing layers need to be removed first. To do this, you’ll need to use heat, a paint scraper and then smooth the whole area to be painted with a light sanding before you can proceed. It’s a big job but worth the effort if you want to customize the look of your guitar. The steps for preparing and then painting your guitar are outlined above.
Support wikiHow by unlocking this staff-researched answer.
-
QuestionWhat is nitrocellulose paint?wikiHow Staff EditorThis answer was written by one of our trained team of researchers who validated it for accuracy and comprehensiveness.
Staff AnswerwikiHow Staff EditorStaff AnswerNitrocellulose paint is known as a lacquer, and it is a hard paint that has long been used on musical instruments. It’s a highly flammable paint, and contains hazardous solvents. And although these toxic ingredients evaporate a month or so after application, they’re active during application of the product, so special care must be taken to protect your health when using this paint. Its use on musical instruments remains popular, however, as it can be polished to a mirror finish, carries color beautifully and is considered by many owners of wooden instruments, including guitar owners, to "breathe." If you plan on using nitrocellulose paint, you’ll need a properly ventilated spray booth and all the safety gear to avoid breathing in the toxins during spraying.Support wikiHow by unlocking this staff-researched answer.
-
QuestionCan I use acrylic paint on a guitar?wikiHow Staff EditorThis answer was written by one of our trained team of researchers who validated it for accuracy and comprehensiveness.
Staff AnswerwikiHow Staff EditorStaff AnswerSome artists have painted guitars with acrylic paint, especially for decorative work like images or designs. The usual guitar paints are lacquer paints (hard paints) made from polyester, polyurethane and nitrocellulose because these continue to cure over time, are durable and enhance the guitar’s sound. If you’re painting with acrylic paint, make sure it’s applied thinly, and add a proper finish, either the poly or nitrocellulose finishes, again nice and thinly. For cheaper guitars, acrylic paint should be fine but if you’re thinking about painting a more valuable guitar, it’s best to stick to the specialist guitar paints, or at least get advice from someone familiar with painting guitars if you want to add an acrylic paint design.Support wikiHow by unlocking this staff-researched answer.
Things You'll Need
- Heat gun or hair dryer
- Wood sealer or primer
- Putty knife
- Spray can of guitar paint
- Rag
- 100, 200, and 400 grit sandpaper
- Sanding block (optional)
- Clear lacquer
- Car polish


-Step-19-Version-2.webp)


References
- ↑ https://www.ifixit.com/Teardown/Squier+Strat+Guitar+Teardown/2070
- ↑ https://www.ifixit.com/Teardown/Squier+Strat+Guitar+Teardown/2070
- ↑ https://www.premierguitar.com/articles/25496-diy-how-to-refinish-your-axe
- ↑ https://www.premierguitar.com/articles/25496-diy-how-to-refinish-your-axe
- ↑ http://bondo.com/tips
- ↑ http://www.stewmac.com/How-To/Online_Resources/Learn_About_Instrument_Finishing_and_Finish_Repair/How_to_strip_a_modern_poly_guitar_finish.html
- ↑ http://edsguitarlounge.com/wordpress/?page_id=84
- ↑ http://www.stewmac.com/How-To/Online_Resources/Learn_About_Instrument_Finishing_and_Finish_Repair/How_to_strip_a_modern_poly_guitar_finish.html
- ↑ http://www.stewmac.com/How-To/Online_Resources/Learn_About_Instrument_Finishing_and_Finish_Repair/How_to_strip_a_modern_poly_guitar_finish.html
- ↑ http://edsguitarlounge.com/wordpress/?page_id=84
- ↑ https://www.premierguitar.com/articles/25496-diy-how-to-refinish-your-axe
- ↑ https://www.premierguitar.com/articles/25496-diy-how-to-refinish-your-axe?page=3
- ↑ https://www.premierguitar.com/articles/25496-diy-how-to-refinish-your-axe?page=2
- ↑ https://www.ifixit.com/Teardown/Squier+Strat+Guitar+Teardown/2070
About This Article
To give your electric guitar a custom paint job, remove the guitar’s strings, neck, and electrical components. Then, heat the old paint with a hairdryer and scrape it off with a putty knife. Sand down any rough spots and give the guitar 5 coats of wood sealer. Let the guitar dry between coats, which takes 1 to 2 hours. After 3 days, sand the shiny parts of the sealer with 200 grit sandpaper and paint your guitar. However, take care not to paint the neck or you won’t be able to reassemble the guitar. Keep reading to learn how to seal the paint!