X
wikiHow is a “wiki,” similar to Wikipedia, which means that many of our articles are co-written by multiple authors. To create this article, 9 people, some anonymous, worked to edit and improve it over time.
This article has been viewed 33,079 times.
Learn more...
A sanding block makes it easier to sand an item of furniture, a wall or other surface prior to painting, varnishing or other resurfacing. The block makes it easier to grip the sandpaper and direct it as needed, as well as helping prevent you from nicking your fingers during usage.

Method 1
Method 1 of 3:
Turning scrap wood into a sanding block
-
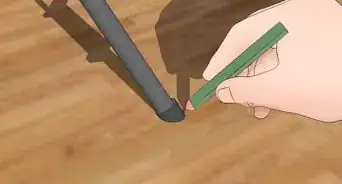
1Select a wood block. You can use a small block of off-cut wood retrieved from the scrap pile, provided it's the right shape. A rectangle is the optimal shape because it's easy to hold and covers a good area when sanding. If needed, cut a piece of ordinary wood into a rectangle of a size suitable to hold in your hand (around 2" x 4").[1]
-
2Fold the piece of sandpaper over the sanding block. Make firm fold line around the block to ensure that the sanding paper sits absolutely flat against the block. Wrap the sanding paper right around as if it were a present, causing the two edges to meet on one side.
- Cut the sandpaper to size, as needed. You may not need to, it will depend on how large the sandpaper piece is to begin with.
-
3Hold the sand block with the edges under your palm. The clean, whole surface of the sandpaper is what you use to sand with on the item or surface. Sand away by holding onto the block firmly at the edges and applying pressure either on the whole flat part of the block or its edges (for tight corner work), as required. Replace the sandpaper when it has worn down and is no longer sanding.[2]
- More details on sanding can be found in How to use sandpaper.


Advertisement
Method 2
Method 2 of 3:
Making a sandpaper block with handle
-
1Select a wood block. You can use a small block of off-cut wood retrieved from the scrap pile, provided it's the right shape. A rectangle is the optimal shape because it's easy to hold and covers a good area when sanding. If needed, cut a piece of ordinary wood into a rectangle of a size suitable to hold in your hand (around 2" x 4").[3]
-
2Make the handle. Cut a piece of foam to the same size as the block. Glue it to one wide side of the block. When dried, cover in duct tape to keep firmly in place and to provide you with a grip.
- Attach the ends of the duct tape to the sides of the wooden block alongside the foam.
-
3Attach the sandpaper with a staple gun, along the sides. You will need to cut the sandpaper to size.[4]
-
4Change the sandpaper as needed by pulling it away from the staples and prying out the staples. Staple on a new piece and start again.


Advertisement
Method 3
Method 3 of 3:
Adding sandpaper to a pre-made sanding block
Sanding blocks can be purchased ready-made from the hardware store. Some have handles, which make it even easier to hold.
-
1Purchase a sanding block from the hardware store, if you don't own one already.
-
2Lay the non-grit side against the underside of the sanding block. If it has a self-adhesive surface, it will grip the paper, otherwise you may need to affix using an appropriate glue (refer to the manufacturer's instructions). Alternatively, it may slide in and attach in place, depending on the manufacturer's design.[5]
- If it needs to be glued in place, allow to air dry in the sun before using.
-
3Use as needed. More details on sanding can be found in How to use sandpaper.[6]


Advertisement
Things You'll Need
- Sandpaper
- Scrap wood block or a commercial sanding block (saw if you need to cut the wood)
- Scissors or cutters if you need to reshape the sandpaper
- Glue
- Foam
- Duct tape


References
- ↑ https://www.bobvila.com/articles/sanding-wood/
- ↑ https://www.bobvila.com/articles/sanding-wood/
- ↑ https://www.youtube.com/watch?v=8vZhih5tYNM
- ↑ https://www.youtube.com/watch?v=8vZhih5tYNM
- ↑ https://www.bhg.com/home-improvement/remodeling/carpentry/how-to-use-a-manual-sander/
- ↑ https://www.bhg.com/home-improvement/remodeling/carpentry/how-to-use-a-manual-sander/
About This Article
Advertisement