This article was co-authored by wikiHow Staff. Our trained team of editors and researchers validate articles for accuracy and comprehensiveness. wikiHow's Content Management Team carefully monitors the work from our editorial staff to ensure that each article is backed by trusted research and meets our high quality standards.
wikiHow marks an article as reader-approved once it receives enough positive feedback. In this case, 89% of readers who voted found the article helpful, earning it our reader-approved status.
This article has been viewed 302,652 times.
Learn more...
Looking for a way to give new life to an old t-shirt? Create a cute new design with a t-shirt you don’t wear as much anymore with just a few simple cuts with scissors. You can create a huge variety of cutout designs on the back, sleeves, and neckline of any common t-shirt. Learn a few of these cutting methods to do easily yourself!
Steps
Making Cute Hem, Neck, and Arm Cuts
-
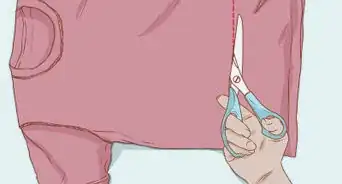
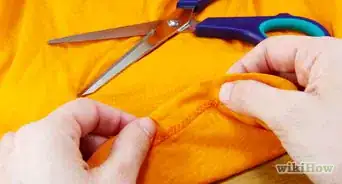
1Cut your t-shirt into a crop top. Simply cut off the bottom of a t-shirt to make it shorter if it is too long, or make it into a crop top length. Cut evenly all the way around the bottom of the shirt to accomplish this.
- Each t-shirt will be different depending on the size and how it fits on your own body. Cut away a smaller amount than you think you want, then try it on. Make additional cuts if you want it shorter, and keep trying it on to check the length.
- You can also create a pattern at the hem of your t-shirt, whether or not you cut it shorter for a crop top. Try cutting strips for a fringe hemline, or cut shapes like diamonds just above the hemline for a cute cutout look.[1]
-
2Make a tank top or muscle tee. Convert a t-shirt to a tank top or muscle tee. Cut along the armhole seams for a regular tank top, or further down the sides of the shirt for a wide-armed muscle tee look.
- You may also want to cut a wider neckline for a classic tank, but this is not necessary.
- For a muscle tee, you can cut in a straight or slightly angled line down from the shoulder to the side of the shirt. Try it on between cuts to make sure you like how much of the side is open.
- You can also cut all the way down through the bottom hemline of the shirt and tie the ends together at the bottom for a cute side-tie look.[2]
Advertisement -
3Create a wider neckline. Cut off the collar of any t-shirt to make it wider or just get rid of the typical crew neckband. Remember to cut less at first, then try it on to check the neckline before cutting any more.
- To make sure the front and back of your neckline are symmetrical, fold the shirt so that the shoulder seams line up and the neckband is folded evenly on itself. Then cut below the band, following the original curve of it.[3]
- Create a v-neck neckline by folding the shirt in the same way with the shoulder seams lined up. Then use a diagonal cut for the front part of the shirt so that it ends in a point instead of a curve.
-
4Cut slits into the sides or back. Make “fish gills” in the sides of a shirt by simply cutting even horizontal strips down each side. Or create the same effect by making the strips down the back of the shirt instead.
- Stretch out the slits after cutting to make the fabric relax and roll up slightly. Anywhere you create slits will provide some extra stretch in the fabric, which is a great way to make a too-small t-shirt fit a little better.
- You can also make slits vertically just to the inside of the front or back of your neckline to create more interest and stretch in those areas as well.
-
5Make shoulder cutouts. Create an easy peek-a-boo shoulder by simply cutting a half-circle out of each arm of the t-shirt. This will create a round cutout shape on the shoulders when worn.
- Lay the t-shirt flat and find where the shoulder seams meet with the armhole seams. This is where you will make a cut on each side.
- Cut a piece out of one shoulder, then save the piece you cut away and lay it on the other shoulder to use as a guide. This will ensure both sides look even.


Creating a Cute Woven T-Shirt
-
1Cut vertical slits along the collar for a neckline weave. Cut small slits all the way around below the collar band of a t-shirt to create a woven pattern. Make sure the cuts are evenly spaced and perpendicular to the neckline.
- The slits should be about 2 inches (5 cm) long. Make the first slit where you want to start half as long as the rest, as it will begin to open up into a hole during this process.
- The slits should be about 1 inch (2.5 cm) away from one another, but this measurement does not need to be exact.
- When you’re done cutting, stretch out the fabric on either side of where you cut to make it easier to manipulate.
-
2Pull the second piece of fabric through the first. Pick up the piece of fabric between the first two cuts you made. Pull the second piece of fabric under and over the first piece, creating a loop.
- Start where you made your smaller cut. Your first slit will be pulled open into more of a hole by the weaving process, so it’s best to start with a smaller slit if possible.
- To create more of a braided look, pull the second piece of fabric under the first, then twist it once before moving onto the next step.[4]
-
3Weave each piece through the loop before it. Take the third piece of fabric and pull it under and up over the loop you created with the first two pieces. Continue pulling the next piece through the current loop until you’ve reached the end.
- Remember to twist each loop once before you pull the next piece through it to create more of a braided look if you choose to do so.
- When you reach the end and you have a final loop with nothing to pull through it, cut the loop in half. Tie the pieces securely to the end of your weaved fabric to secure it. Trim the ends carefully if they are too long.[5]
-
4Weave the sides or back of your t-shirt. Choose to create a woven pattern on the sides or back of your t-shirt. Cut slits and use the same method of pulling one piece under and over the previous piece to create the pattern.
- If you weave the sides, make sure you lay the t-shirt flat, with the fabric folded evenly along each side before cutting. If you weave the back, pick up the t-shirt and fold it in the opposite way, so that the armholes line up and the side seams meet before you cut the back.
- You can create a more open back with several lines of weaving by cutting longer slits all the way across the back.[6] Or, create two different "strips" of slits down the back.


Making a Cute Bow on the Sleeves or Back
-
1Cut a slit in each shoulder for bow sleeves. Cut a 2.5-inch slit in each shoulder of your t-shirt. Lay the shirt flat and cut down from the shoulder along each arm seam to create a 5 inch total cut when unfolded.
- Cut away the arm seam if you find that the inside of it shows after making your slit cut.
- You may also cut a wider V-shape instead of just a slit if you want more skin to show on the shoulder. However, the more fabric you leave, the more gathered and pronounced the final bow shape will be.
-
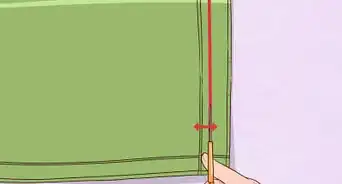
2Cut pieces from the bottom of the shirt for ties. Cut all the way around the bottom of the t-shirt to create one long strip. Cut this strip into smaller pieces and tie the end of each sleeve to create a bow shape.
- Cut two 2.5 inch pieces from your long bottom strip to use as ties. You can make the strips longer if you wish to wrap them around several times to create a thicker middle to your bow.
- Gather together the fabric at the end of your sleeve below the slit you made. Tie tightly with one of your fabric strips.
- Make sure you tie the piece in the middle of each sleeve, so it makes an even fanned-out bow shape from the fabric on either side of your shoulder slits.
-
3Cut out the neck first for a bow-back shirt. Cut away from the neckline at the back of your shirt, about 4 inches from the top to create a wider U-shape. Then cut out about a 4 by 2-inch strip from the excess material to use as a tie later.
- The lower you cut the back of the neckline, the lower on your back the bow will be. You can always adjust this cut to be lower later, so cut less to begin.
-
4Make a slit across the back and gather towards the top. Make a cut all the way across the back of the shirt, 6 inches down from each armpit. Gather the fabric between this cut and the neckline and tie with your fabric strip to create the bow.
- Make sure to start and end your back cut just inside the side seams of your shirt. Otherwise, the cut can grow wider around the sides of the shirt.
- Tie the bow together securely at the center of the gathered fabric with the scrap that you cut from the neckline piece. Wrap the piece around several times if the fabric allows.


Community Q&A
-
QuestionI need to know how to make a cute crop top
 Community AnswerFirst you need to figure out how short you want your crop top to be. I like to cut mine at a slant so it is longer on one side, or with it shorter in the front and longer in the back. Sometimes it is a good idea to cut a little off the sleeves or cut them into cap sleeves or just go sleeveless. I usually don't hem the bottom, but it might be a good idea to hem the sleeves if you cut them.
 -
QuestionWhat can I do if I cut the sleeves too short and don't want a tank top?Community AnswerYou can either wear it as-is, or partially cut down the shoulder seam and wear it as a cold-shouldered top.
-
QuestionHow do I make sure I don't cut my t-shirt crooked?Community AnswerUse a ruler and a piece of chalk. Lay out your shirt flat (ironing it will help with this) and turn it inside out. Then use the ruler and chalk to draw a straight line access it. This is what I have always done and it works really well for me. Don't use liquid chalk it colored chalk!
Things You'll Need
- T-shirt
- Sharp sewing scissors

References
- ↑ http://www.brit.co/white-t-shirt-hacks/
- ↑ https://www.buzzfeed.com/peggy/30-diy-ways-to-get-your-t-shirts-ready-for-summer?utm_term=.npbLG6mpw#.kevZWRD4r
- ↑ https://www.youtube.com/watch?v=oHR8lpxly80
- ↑ https://www.youtube.com/watch?v=7oHiYHaVovw
- ↑ https://www.youtube.com/watch?v=N2AQ9iF62o4
- ↑ https://www.youtube.com/watch?v=N2AQ9iF62o4
About This Article

If you're looking to add some style to an old T-shirt, try cutting off the bottom part with a pair of scissors to turn the shirt into a crop top. If you want to add a fun pattern to your new crop top, you could cut shapes out above the hemline for a unique pattern. If crop tops aren't your style, you can also turn your T-shirt into a tank top just by cutting along the arm hole seam. If you want a more classic tank look, cut out a wider neckline along the top. For more creative ideas, like how to give your t-shirt a cute bow, scroll down!