This article was co-authored by wikiHow Staff. Our trained team of editors and researchers validate articles for accuracy and comprehensiveness. wikiHow's Content Management Team carefully monitors the work from our editorial staff to ensure that each article is backed by trusted research and meets our high quality standards.
There are 7 references cited in this article, which can be found at the bottom of the page.
wikiHow marks an article as reader-approved once it receives enough positive feedback. In this case, 86% of readers who voted found the article helpful, earning it our reader-approved status.
This article has been viewed 281,498 times.
Learn more...
There’s nothing better than delicious, fresh fish, but how do you go about preparing the day’s catch for the grill? Deboning a medium-sized fish like a trout is a fairly simple process, and can be done prior to or after cooking. The most important thing to remember is that the skeletal structure of a fish is simplistic, and that by using delicate movements, you should be able to remove all or most of the bones with a couple small cuts.
Steps
Filleting and Deboning
-
1Remove the head of the trout. Filleting should be done when you wish to serve only the finest cut of the fish, rather than cooking it whole. Start by cutting through the neck of the trout at the groove of the gills. Angle the blade of your knife so that you’re cutting toward the head rather than the body to preserve the meat.[1]
- Always use a filleting knife or other sharp blade when preparing fish. This results in much neater, more economical cuts.[2]
-
2Cut the first fillet along the top of the backbone. Place the trout on its side with the belly facing away from you. Start a small cut on the top side of the backbone at the opening where you removed the head. Insert your filleting knife into this groove and run the knife down the length of the fish, staying just above the backbone. Finish by slicing through the section at the base of the tail. You now have a clean, meaty fillet.
- If you’re staying close enough to the backbone, you should be able to hear an audible clicking as you slice through the rib bones.
Advertisement -
3Flip the trout over and cut the second fillet. Turn the trout over on its opposite side and repeat the filleting process. Start the cut at the head and slice smoothly along the upper edge of the backbone until the entire fillet has been cut away.
-
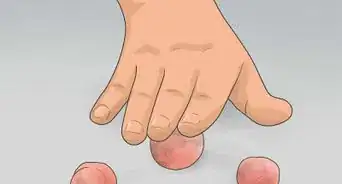
4Remove the pin bones. Place each fillet skin side down and pick out each and every pin bone you find. Scrape along the flesh with your knife or pick up each fillet and flex it to expose bones that are lodged deep. Nothing ruins a fresh fish dinner like a mouthful of crunchy bones![3] [4]
- It’s alright if you don’t get every last tiny bone—even professional chefs sometimes miss a few.
-
5Get rid of the skin. Now that the trout has been filleted and deboned, you only need to make one more cut to remove the skin. Take hold of the fillet on the tail end and use your filleting knife to cut into the flesh at an angle until you reach the outer layer of skin. Run the knife edge along the bottom of the fillet while tugging the skin lightly in the opposite direction. The skin should come away clean. Repeat with the second fillet and you’re ready to grill, bake or fry![5]
- Again, while it is not necessary to remove the skin prior to cooking, it is commonly done when filleting fish and makes it easier to eat.


Deboning a Trout Using Scissors
-
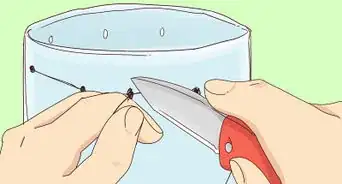
1Snip away the outer anatomy of the trout. If you intend to serve the trout whole, deboning it with scissors will allow you to keep the fish intact. Start by using the scissors to cut away the fins, the tail and any loose flaps of skin that might get in your way while you’re cutting. If the head has not already been removed, use a sharp knife to cut into the upper area of the gills just below the trout’s head; there are natural grooves here that serve as vents to the gills and make the perfect place to cut to remove the head.[6]
- It’s not necessary to remove the skin prior to cooking.
- When removing the head, bear down on the knife and use a quick chopping strike on the back of the blade to sever the backbone without making a mess.[7]
-
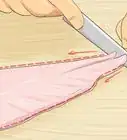
2Cut along the length of the belly. Make a small incision in the uppermost part of the trout’s belly where you removed the head. Slowly cut down the length of the belly. Use long, smooth motions with the scissors to keep the cut neat and prevent mangling the fish. Keep cutting until you’ve covered the length of the belly, ending where the tail was.
- Raw fish sometimes contains small parasites and harmful bacteria. Remember to wash the scissors after using them.
-
3Loosen the backbone. Open up the body of the trout by separating the fish at the cut you just made. Place the trout flesh side down against the cutting board. Run a narrow, blunt surface, such as the knife’s handle or the tip of your finger, along the backside of the trout where the backbone sits. Apply a moderate amount of pressure and make a few quick passes. This will help loosen the backbone so that it can be extracted with less difficulty.[8]
- Be careful not to apply so much pressure that you damage the meat. The idea is just to start coaxing the backbone and ribcage away from the body of the fish.
-
4Remove the backbone and ribcage. Turn the trout back over, skin side down. Take hold of the backbone nearest the tail section and pull it up and away from the flesh to remove it. Pull slowly and gradually, taking care not to tear away flesh or break any bones. When done correctly, the ribcage should come away effortlessly with the backbone.
- You can also score alongside the edges of the backbone with your filleting knife if you’re having a hard time getting it out in one piece.
- Don’t worry if the ribcage doesn’t come out as smoothly as you’d life. You’ll be picking out leftover bones anyway.
-
5Pull out any remaining bones. With the backbone and ribcage gone, you’re left with a nice piece of fish that has been cut down the center and opened up; this is what’s known as “butterflying.” Keep the trout skin side down and run the blade of the knife along the length of the fish at an angle. This will dislodge any of the small, delicate rib bones (also called “pin bones”) remaining in the flesh so that they can be removed by hand or with tweezers.
- Most of the remaining pin bones will be found in the darker meat around the center of the trout.
- Remove as many of the pin bones as you can to avoid any unpleasant surprises while eating.


Deboning After Cooking
-
1Cook the trout. For this method, you’ll start by cooking the trout completely before removing the bones. The heat from the cooking process will loosen up the connective tissues around the backbone, making it easy to simply peel away. Cooking the fish before deboning allows it to retain more of its natural flavor; the bones can then be quickly and effortlessly discarded.[9]
- Whatever method you prefer should work just fine for cooking a whole fish, as long as the heat is not so intense that it causes it to fall apart (be careful with deep frying, for instance).
-
2Make a small cut at the base of the tail. If you’ve cooked the fish whole, lift the tail and find the place just below it where the fillet begins—otherwise, start at the already cut tail section of the trout. Make a cut here with a knife, or by inserting a fork. This will create a path to pull the bones away from the meat.
- You should be able to locate the best place begin separating the backbone by following the cut used to gut the trout to where it ends at the tail section.
-
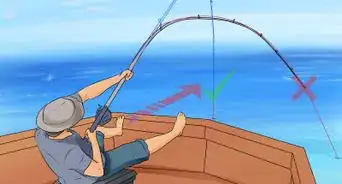
3Lift the tail portion while pulling down on the flesh. Using the knife or fork to anchor the trout, lift the tail or tail flap up and away from the meat. By doing this, you should be able to strip the bones away in one clean movement.[10]
-
4Turn the fish over and strip the other side. Still holding the tail, turn the piece of fish over. Cut into the meat on the opposite side and peel the tail away to extract the backbone. You’re now left with all of the meat to enjoy and none of the bones.
- While it shouldn’t be difficult to remove the backbone and ribcage intact after cooking, make sure to keep an eye out for stray pin bones while eating.


Community Q&A
-
QuestionI think I need a how no how to cook/eat a trout. What can I do?
 Community AnswerCheck out the helpful tips in this article about how to how to prepare trout on wikiHow.
 -
QuestionWill there be other internal organs when cooking the trout and deboning the trout?
 Isaac JimenezCommunity AnswerWhen deboning, yes there will be internal organs. But you have to take them out or buy trouts without organs if you don't wish to do this.
Warnings
- Fish should be refrigerated as soon as it is caught or purchased.⧼thumbs_response⧽
- When gutting fish, take particular care to remove all parasites and clots that may be contained in the intestinal tract. You don't want these finding their way into the dish you're preparing.⧼thumbs_response⧽
- Always prepare seafood on a sterile surface to prevent bacterial contamination.⧼thumbs_response⧽
- Be extremely cautious when handling sharp kitchen utensils such as filleting knives.⧼thumbs_response⧽


References
- ↑ http://www.jamieoliver.com/videos/how-to-fillet-a-salmon-or-trout-jamie-oliver/#2zA0FR8ATvyc7rxx.97
- ↑ https://www.youtube.com/watch?v=m6ocRCMGpmc
- ↑ http://www.jamieoliver.com/videos/how-to-fillet-a-salmon-or-trout-jamie-oliver/#2zA0FR8ATvyc7rxx.97
- ↑ https://www.thekitchn.com/how-to-remove-pin-bones-from-fish-fillets-169839
- ↑ http://www.cookinglight.com/cooking-101/techniques/how-to-fillet-fish/how-to-remove-skin-fish
- ↑ http://www.deliaonline.com/how-to-cook/fish-and-shellfish/how-to-bone-a-herring-trout-or-mackerel
- ↑ http://www.jamieoliver.com/videos/how-to-fillet-a-salmon-or-trout-jamie-oliver/#2zA0FR8ATvyc7rxx.97
- ↑ http://www.deliaonline.com/how-to-cook/fish-and-shellfish/how-to-bone-a-herring-trout-or-mackerel
- ↑ https://www.youtube.com/watch?v=LEgSBfHjoU8
About This Article

To debone a trout, first cook it completely, which loosens the connective tissues and makes it easier to debone. Then, use a knife to make a small cut at the base of the trout's tail, where the filet begins. Next, hold the flesh down while you pull the tail up and away from the trout to strip away the bones. Finally, turn the trout over, cut into the base of the tail on this side, and pull the tail away to remove the trout's backbone. Be sure to keep an eye out for any small "pin" bones that remain, and pull them out before you enjoy your trout. For information on deboning uncooked trout, keep reading!