This article was co-authored by Ben Barkan. Ben Barkan is a Garden and Landscape Designer and the Owner and Founder of HomeHarvest LLC, an edible landscapes and construction business based in Boston, Massachusetts. Ben has over 12 years of experience working with organic gardening and specializes in designing and building beautiful landscapes with custom construction and creative plant integration. He is a Certified Permaculture Designer, is licensed Construction Supervisor in Massachusetts, and is a Licensed Home Improvement Contractor. He holds an associates degree in Sustainable Agriculture from the University of Massachusetts Amherst.
This article has been viewed 32,444 times.
Rock gardens come in all different shapes and sizes. They can be made up of small pebbles, large rocks, hardy succulents, bright flowers, and any other rock and plant combinations you can think of. With endless possibilities, how do you know where to start when designing one? Don’t worry—the steps below will walk you through the fundamentals of mapping out your own rock garden, from choosing a space to picking the rocks and plants to arranging everything on the ground.
Steps
Designing Your Garden
-
1Pick a small spot to try your first rock garden. If you're a beginner to rock gardens, aim to start small. Pick out a corner of your garden or yard that could act as testing-grounds. If you want to expand later on, you won't have any problem! If this isn't your first rock rodeo, look at transforming an existing hill in your yard or even create one (known as a berm)![1]
- For beginners, try out a 5 by 10 feet (1.5 by 3.0 m) section to start with. If you intend to expand should things go well, make sure it is next to a space that can be taken up later on!
- Select an area that already has a grade to it to help with drainage. Especially make sure the flowerbeds between rocks will get proper drainage.
- Avoid working around trees if you can. Digging the flowerbeds and holes to bed the rocks into will be more difficult with root systems. This will also hurt the tree in the long run.
-
2Reference existing rock gardens for inspiration. A great way to help design the layout or details of your rock garden is by looking at existing ones. Whether you check online, in magazines, or visit some local gardens, take notes on what you like or want to avoid.
- Talk to local nurseries or gardeners who tend to rock gardens. You can pick their brains about the experience of building or maintaining the garden. This will help you figure out any pitfalls to avoid that may be specific to your local climate or soil.
Advertisement -
3Draw your design ideas out before starting. Getting the idea right in your head and on paper is the best way to make sure your plans don't go astray once you begin work. Since rocks aren't the most fun to move, get the placement planned and right the first time.
- Simple sketches allow you to try out different placements and arrangements without committing too much more than some pencil lead.
- Find out about and plan around any utilities before you begin work. Call your local utility-finder or providers to have utility lines located as soon as possible before breaking ground.


Picking the Right Supplies
-
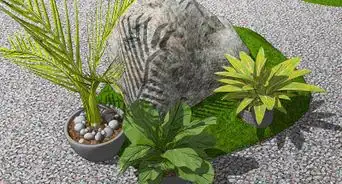
1Choose your larger rocks first. Since they are harder to transport, place, and even afford, they deserve priority in your selection process. Pick out a few different colors and textures of rock that you can reasonably get.
- Consult with local suppliers or nurseries to see what is available nearby. You don't want to set your heart on a specific stone if it isn't available.
- Tend to keep your larger rocks on the lighter-colored side. Being strong focal points in the garden, you don't want to make them especially dark.
-
2Choose a variety of smaller rocks to complement your larger ones. One of the principle rules of rock gardens is rock variety. Pick out stones and pebbles that will complement the larger rocks they are to surround.[2]
- Take into account your color combinations. Mix darker pebbles and stones into the areas near your lighter large rocks and boulders.
- If certain sections are feeling like they might be too dark, find another small, light-colored rock that has a different texture from the larger rock.
- Lava rock makes for a great filler between larger light-colored rocks. It drains well, and the darkness makes surround colored flowers really pop.
-
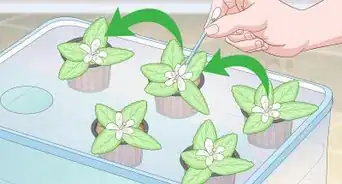
3Pick the right plants to go in your garden. Most rock gardens are complemented best with smaller, alpine flowers. They should be drought-tolerant assuming the rock garden is being built in an area with little rainfall. The idea is to place flowers that will draw you to come in closer.[3]
- Small daffodils, local wildflowers, succulents, and brodiaea all make for good additions to a rock garden.
- Add in some mosses or short grasses around rougher rock edges to blend and soften the landscape slightly.


Placing and Planting Your Rock Garden
-
1Place your rocks before anything else. Since the rocks are the hardest to adjust pieces of a rock garden, you want to get them right first. Dig out some of the earth for big rocks to nestle into if they aren't particularly flat.[4]
- Space out your larger rocks and boulders, leaving room for smaller collections between. Avoid clumping the bigger rocks in one place, leaving the smaller ones to a side of their own.
- Work on smoothing out your drainage plan as you lay the rocks. The sloping and earthwork will need to be done before planting begins.
-
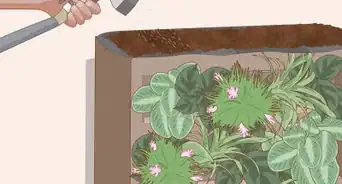
2Plant your flowers in a bedding with pebbles, sand, and topsoil. For each flower bed, create a pebble base of about 1 in (2.5 cm) covered with sand that is about 2 to 3 in (5.1 to 7.6 cm) thick. Top the base with topsoil suitable to the plants you have selected.[5]
- If you are planting in the cracks and crevices of a stretch of rock, you can probably get by with just providing the sand and topsoil as a base. The rocks themselves can serve to drain some underneath.
- Put plants that need more watch and care in easier-to-access spaces. The succulents and hardy wildflowers that don't need maintenance will be better on slopes or hard-to-access parts of the garden.
- Pebbles work great for making paths and preventing weeds from sprouting.[6]
-
3Maintain the garden in small sections once it is complete. The great thing about rock gardens are the small ecosystems they create. You can sit down in one area and have a picturesque bundle that you can tidy up or move around in a weekend.[7]
- Details will make a rock garden all the more enjoyable. As time goes on, find little holes or bare spots to fill in with more rock or plants.
- Once you have everything in place, enjoy your labor. Add some outdoor seating to relax on while your garden settles in.


Expert Q&A
-
QuestionWhat can I put in my rock garden?
 Ben BarkanBen Barkan is a Garden and Landscape Designer and the Owner and Founder of HomeHarvest LLC, an edible landscapes and construction business based in Boston, Massachusetts. Ben has over 12 years of experience working with organic gardening and specializes in designing and building beautiful landscapes with custom construction and creative plant integration. He is a Certified Permaculture Designer, is licensed Construction Supervisor in Massachusetts, and is a Licensed Home Improvement Contractor. He holds an associates degree in Sustainable Agriculture from the University of Massachusetts Amherst.
Garden & Landscape DesignerIf you want an easy way to walk through your rock garden, try making a path with small pebbles. They also work great for keeping weeds out.


References
- ↑ https://www.countryliving.com/gardening/garden-ideas/g3592/rock-garden-ideas/
- ↑ https://www.countryliving.com/gardening/garden-ideas/g3592/rock-garden-ideas/
- ↑ https://www.countryliving.com/gardening/garden-ideas/g3592/rock-garden-ideas/
- ↑ https://www.finegardening.com/article/rock-garden-primer
- ↑ https://www.countryliving.com/gardening/garden-ideas/g3592/rock-garden-ideas/
- ↑ Ben Barkan. Garden & Landscape Designer. Expert Interview. 14 April 2020.
- ↑ https://www.finegardening.com/article/rock-garden-primer
About This Article