This article was co-authored by wikiHow Staff. Our trained team of editors and researchers validate articles for accuracy and comprehensiveness. wikiHow's Content Management Team carefully monitors the work from our editorial staff to ensure that each article is backed by trusted research and meets our high quality standards.
This article has been viewed 83,355 times.
Learn more...
If you're visiting or live near a shoreline, clam digging is an enjoyable way to find ingredients for a meal. To search for clams on the shore, look for coin-sized depressions and water spurting out of the hole. Once you've found a potential spot, dig directly below the depression, pull out the clam, and place it in a sealable bucket. After properly storing your clams, you'll be able to make a fresh and delicious seafood meal.
Steps
Getting Ready to Dig
-
1Obtain a clam digging license, if necessary. In some cases, you may need a license to dig for clams. Contact your local wildlife department to determine whether, and how, to get a clam digging license.
- Most areas in the United States require that you to obtain a clam digging licenses.
-
2Put on clothes you're fine getting dirty in. Clam digging is hard work, and your clothes may get wet or stained with dirt. Keep your favorite pairs of clothes at home and, instead, wear things you wouldn't mind getting dirty in.[1]Advertisement
-
3Wear a pair of sturdy shoes. Many beaches have sharp shells or debris on the beach. To prevent injuries, never go barefoot while clam digging.[2]
- A pair of rain boots, rubber clogs, or sneakers are all excellent choices.
- Avoid flip-flops or sandals, both of which may get stuck in the mud while you walk.
-
4Gather your clam digging equipment. The right pieces of equipment can help you dig clams faster and store them efficiently. Before you clam dig, buy or gather together the following tools:
- Shovel
- Bucket
- Rake (optional)
-
5Bring a complete change of clothes. After clam digging, your clothes may become dirty or wet. Pack a change of clothes for each person so that, if desired, they can change into dry clothes before they leave.[3]


Spotting the Clams
-
1Look for clams during low tide. The best time to dig is during low tide, when you can walk further out on the shore and find burrowed clams. Check your beach's high and low tide times, and plan your clam digging trip around this time.[4]
- You can find your location's updated tide forecast at https://www.tide-forecast.com/.
-
2Check for coin-sized depressions in the sand. When a clam burrows into the sand, it makes small holes or depressions through which it has withdrawn its neck. While looking for places to dig, look for any of the following coin-sized depressions:[5]
- Dimple: a small, flat depression in the sand
- Doughnut: a hole with raised sides
- Keyhole: a hole with distinct edges, but no raised sides
-
3Pound the shore with your feet to check depressions in the sand. If you see any holes or depressions in the sand, thump the ground next to it with your feet or a shovel. You have most likely found a clam if you noticed sand or water squirting out of the hole several seconds afterward.[6]
- Even if the depression or hole does not squirt out water, you may still have found a clam.
-
4Dig at holes with sand or water squirting out. In some cases, the clam may not have withdrawn its neck through the hole. If you notice sand or water squirting up, you most likely have located a clam.[7]


Harvesting Clams
-
1Dig a hole about 7–8 inches (18–20 cm) into the ground. Most clams burrow into the ground around 4–8 inches (10–20 cm) inches into the sand. Using a shovel, dig at least 7 inches (18 cm) into the ground to make sure you upturn the clam.[8]
- Although you can dig with your hands, it is much less time-consuming to use a shovel.
-
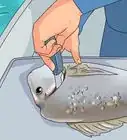
2Rake the upturned dirt and the hole. To find the clam, sift through the dirt as well as the hole with your fingers or a rake. Keep an eye out for any hard, circular objects with your fingers.[9]
- If you don't find any clams, you have not have dug in the right spot. Refill the hole with dirt and move on to a new hole or depression.
-
3Grab the clam gently and pull it out of the dirt. Once you've found the clam, grab it carefully to prevent accidentally damaging it. Pull it up and out of the dirt, and place it in a bucket along with the rest of the clams you find.[10]
- Clams look like 2 seashells stuck together and are hard and smooth to the touch.
-
4Refill each hole after digging up the clam. After pulling out the clam, use your shovel to refill the hole and press the sand back into it. This will keep the shoreline even and keep people from tripping on the holes.[11]
- Do not wait until you're done digging to refill each hole. After you've finished digging a hole, refill it before moving to the next one.
-
5Check your location's limit for clam digging. Some locations have a daily limit for harvesting clams, which is usually between 20-40. Contact your local wildlife department and ask about any potential limits for the beach you're digging on.[12]
- Digging for more clams than the location's limit can result in fines or other legal prosecutions.


Cleaning and Storing Clams
-
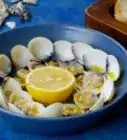
1Rinse all of the clams with the shore water. Move your bucket near the shoreline and dunk a clam in the water one by one. Rinse off any dirt or debris from the clam, then place it back in the bucket until you've rinsed each clam.[13]
- If you prefer, you can also rinse the clams over running water at home. Rinsing them at the beach, however, is generally less messy.
- Avoid tipping your bucket over to prevent losing any of your harvested clams.
-
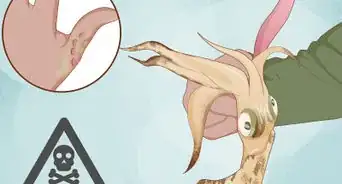
2Throw away any broken or dead clams. Sick or dead clams can cause food poisoning. Discard any clams with broken or loose shells as well as clams that emit a foul odor.[14]
- Clams begin to decompose rapidly after they die and, much like crabs, must be cooked immediately after they've died.
-
3Seal the bucket with a lid and bring your harvest home. After you've finished digging for clams, seal the bucket with a lid. Place the bucket in your car and bring it home immediately to store the clams.
-
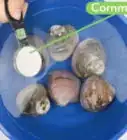
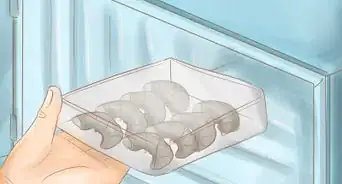
4Place the clams in the fridge with a damp cloth. Transfer your clams to a bowl and cover them with damp cloths. Store the bowl in your refrigerator for 1-2 days until you're ready to cook them, as clams will only stay alive for several days out of water.[15]
- Do not fill the bowl with tap water, as this can kill your clams. The damp cloths are enough to keep them alive.
- Cooked clams can stay fresh in the fridge for 3-4 days and the freezer for 4 months.


Warnings
- Broken or dead clams can cause food poisoning or kill the rest of the clams you've harvested. Throw away any clams with broken shells or that emit a foul odor before storing your clams.⧼thumbs_response⧽
Things You'll Need
- Sturdy shoes
- Complete change of clothes
- Shovel
- Bucket
- Bowl
- Washcloth
- Rake (optional)
- Clam digging license (if needed)


References
- ↑ https://www.parentmap.com/article/northwest-family-clamming-guide
- ↑ https://www.travelandleisure.com/food-drink/where-to-go-clamming
- ↑ https://www.parentmap.com/article/northwest-family-clamming-guide
- ↑ https://www.travelandleisure.com/food-drink/where-to-go-clamming
- ↑ https://wdfw.wa.gov/fishing/shellfish/razorclams/howto_dig.html
- ↑ https://wdfw.wa.gov/fishing/shellfish/razorclams/howto_dig.html
- ↑ https://www.parentmap.com/article/northwest-family-clamming-guide
- ↑ https://www.parentmap.com/article/northwest-family-clamming-guide
- ↑ https://myodfw.com/articles/how-bay-clam
- ↑ https://myodfw.com/articles/how-bay-clam
- ↑ https://www.parentmap.com/article/northwest-family-clamming-guide
- ↑ https://www.parentmap.com/article/northwest-family-clamming-guide
- ↑ https://www.parentmap.com/article/northwest-family-clamming-guide
- ↑ https://www.oregon.gov/oha/PH/HealthyEnvironments/Recreation/Documents/Shellfish-safety.pdf
- ↑ http://www.stilltasty.com/Fooditems/index/16893
About This Article