This article was co-authored by Mark LoBiondo. Mark LoBiondo is a Licensed Cosmetologist and the Owner of Markdaniel Barbershop. With more than nine years of experience, Mark specializes in providing barber services reminiscent of classic neighborhood barbershop experiences. Markdaniel Barbershop has been featured in Jersey's Best. Mark and his team all hold Barber or Cosmetology Licenses in New Jersey.
There are 14 references cited in this article, which can be found at the bottom of the page.
This article has been viewed 52,967 times.
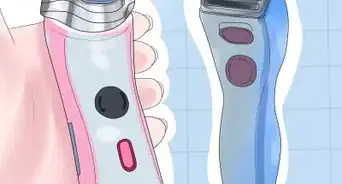
If your electric shaver has stopped working, you may want to take it apart to see if you can fix it. Keep in mind, this may void the warranty on some shavers, but if it's already dead and out of warranty, you might as well try it! To take an electric shaver apart, it's simply a matter of removing the blades and head, then finding the screws that hold the body together. You may also want to remove the blades to clean the shaver more easily. If you have a safety razor, you need to gently loosen the head to clean it, too, which is different from taking it apart to repair it.
Steps
Dismantling an Electric Shaver for Repairs
-
1Check the manual for disassembly instructions first. Your instruction manual can give you tips on how to take the shaver apart if it's meant to be disassembled for cleaning. Each shaver will be different, so getting an inkling of how yours works is a good idea. On the other hand, the manual may have warnings against taking it apart, so peruse it first.
- If you don't have your manual anymore, you may be able to find it online with the brand and model number of your shaver.
- Be aware that taking apart your shaver could void your warranty. If you plan on using your warranty later, you may not want to disassemble it.
-
2Discharge the battery completely if yours has one. With a battery-powered shaver, you don't want to open it while the battery is still charged, as it could shock you. Take the shaver off the charger, and then turn it on. Leave it on until the battery runs out.[1]
- If you have a shaver with a cord, just unplug it.
Advertisement -
3Take the cap off the head of the shaver. The cap is just the plastic or metal part that fits over the blades. It's what you'd normally remove to shave. It will usually just pull off easily, though in some cases, it may have a button that pops it off.[2]
-
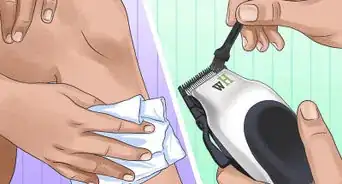
4Remove the blades from the head of the shaver. These parts usually come off easily for cleaning, as you have to remove them to clean the blades well. Pull off the outer frame first by gently pulling on it. If it won't come off, try prying it off gently with a flat-head screwdriver. Then, take off the outer foil parts and the inner blade by pulling them out. To avoid cutting yourself, you may need to use tweezers to pull the actual blade out. In some cases, you may need to take out small screws to pull the blades out. Otherwise, they should just come out if you tug on them.[3]
- If you have a rotary shaver, the process is much the same; you typically just pull the rotary blades off the head. Some might have a small button to pop the head assembly off.[4]
- Most electric razors have a button on both sides of the head of the razor.
- You have to squeeze the buttons together simultaneously to remove the head for cleaning.
-
5Remove any screws and covers on the handle. If your handle has a rubber grip, take it off. Look for any screws along the case on the handle. If you see any, use a small screwdriver to unscrew them to the left. Put these in a small bag so you don't lose them.[5]
- Screws may be up near the blades or down at the base of the handle.
- If you only see one screw, lift the mustache trimmer up to see if there is another one under that.
-
6Pop or pry open the case with a flat-head screwdriver. How you open the shaver depends on the model. You may need to slide the case off that's on the underside of the handle, for instance.[6] Alternatively, you may need to insert a screwdriver between the seam on the casing to pop it apart. This is where reading the manual will come in handy.[7]
- Play around with the shaver for a bit, and you will likely figure out how to pop it open.
- Some shavers may have a second cover inside. Remove the screws to take it off.[8]
-
7Work on your disassembled shaver. At this point, your shaver is essentially disassembled, and you can replace the battery or attempt to repair it as needed. Keep in mind, when you put the shaver back together, it may not be waterproof anymore.[9]
- Many shavers aren't meant to be disassembled, so if you break it open to make repairs, you may break the waterproof seal.


Disassembling and Cleaning an Electric Shaver
-
1Check your instruction manual first for instructions on how to clean it. Every shaver is a little bit different, so it's always a good idea to read the instructions that come with your shaver. That way, you won't make a mistake when trying to clean your shaver.[10]
- Pay special attention to whether your shaver is waterproof or not.
-
2Unplug the shaver from the wall to make it safer. If you have a shaver with a cord, simply unplug it from the wall. If yours has a battery and a charging station, take it off the charging station and make sure the shaver is turned off.
- Usually, you don't need to discharge the battery completely to clean the head.
-
3Pull the cap off the head of the shaver. The cap is the plastic or metal part the fits over the blades to protect the shaver. You pull this off to shave. Typically, it just yanks right off, but it might have a small button or tab to pop it up.[11]
-
4Take the blades off the shaver. Pull out the foil frame first, which surrounds the blades. Then, tug on the blades to pull them out. Try to avoid touching the actual blade part. If it won't come out, try gently prying it out with a flat-head screwdriver. You may need to take out screws on a few models.[12]
- For a rotary head razor, which is the kind that has a triangular head, look for a button to pop the assembly head off.[13]
-
5Remove extra hairs on the blade with a shaver-cleaning brush. Your razor likely came with a cleaning brush you can use for this purpose. If yours didn't, you can use a new paintbrush or toothbrush. Run it over the blades to gently brush off the hairs and dead skin cells.[14]
- You can gently tap the blades on a soft surface. Don't hit it too hard, though, as you could hurt the shaver.
-
6Clean the shaver with water and dish soap if it's waterproof and cordless. Snap the blades back into place and drip water into the top using the faucet. Add a few drops of dishwashing liquid to the blades. Flip the shaver on for 10 seconds, adding a little more water as needed. The heads will suds up as they push the soap through. Rinse the shaver under running water, and then turn it off. Take the head off again to rinse out the blades and shake off the extra water. Let the blades air dry for at least an hour before putting the parts back together.
- You can also use body wash, hand soap, or even shampoo.
- Some shavers have a "cleaning mode," which you can activate by holding down the power button for 10 seconds instead of just pressing it on.
-
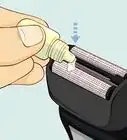
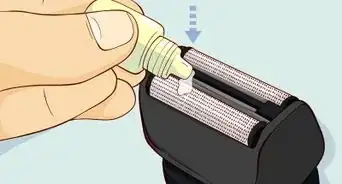
7Use an oil spray lubricant if the shaver isn't waterproof or it's corded. Place the head or blades on a paper towel. Spritz the top of them 2-3 times, and then flip them over. Spray the underside as well. Put the blades back in the shaver, and then turn it on, letting it run for 5-10 seconds to thoroughly clean and lubricate the blades.
- Let the shaver air dry for at least an hour before using it.


Taking Apart and Cleaning a Safety Razor
-
1Turn the handle to the left to loosen the blade. The handle turns independently of the head, and it's what holds the blade in place. By turning it to the left, you lessen the hold on the blade. Don't twist it so far the blade falls out. You just want it a bit looser.[15]
- For deep cleaning, you can take the blade out to make the shaver easier to clean. However, don't try to clean the blade itself, as you'll likely end up cutting yourself.[16]
-
2Clean the head with hot, running water. Hold the head under the running water with the opening toward the stream. Let it sit there for 20 seconds or so to clean out any hairs, dead skin cells, or other grime.[17]
- You can also let it soak in a sink with warm, soapy water for 1-2 minutes, then use a soft-bristled toothbrush or cotton swab to clean out the inside. Rinse it thoroughly when you're done.[18]
-
3Dunk the head of the razor in rubbing alcohol. Once you've gotten the head clean, the alcohol will disinfect it. Put it in the alcohol and swish it around a bit. That will get any remaining gunk out and help remove the water on the razor.[19]
- Keep alcohol in a small canning jar to make it easy for dipping. You don't want to contaminate a jar that other people are using.
-
4Shake the alcohol off the razor. Take it out of the alcohol and give it a good shake. Leave the blade open and set it somewhere to air dry, like on top of a towel. Never put the razor away wet, as it could rust.[20]
- After it's had time to air dry for an hour, remember to tighten the handle before you use it next.


Community Q&A
-
QuestionWhat if I have a disposable razor?
 Community AnswerA disposable razor can be used more then once -- simply throw it away when it is no longer sharp enough to cut cleanly.
 -
QuestionIs it sharp enough to cut me?
 RubyTop AnswererYes, it can be. Be very careful when handling it, and do not directly touch the blades.
Warnings
- When prying, always point the head of the screwdriver away from you. This way, if the screwdriver slips, it will not slip towards you.⧼thumbs_response⧽
- If the shaver won't come apart, don't force it. You could hurt yourself or the shaver, and it might be time to give up.⧼thumbs_response⧽
- Once you remove a used blade or have new ones, handle them carefully. Do not recycle them; throw them in the garbage.⧼thumbs_response⧽
Things You'll Need
Dismantling an Electric Shaver
- Shaver manual
- Flat-head screwdriver
- Small Philips head screwdriver
Cleaning an Electric Shaver
- Shaver manual
- Flat-head screwdriver
- Blade-cleaning brush
- Small Philips head screwdriver
- Dishwashing soap or oil spray lubricant
- Paintbrush or toothbrush
Taking Apart and Cleaning a Safety Razor
- Rubbing alcohol
- Container
- Towel
You Might Also Like
This is a modal window.

This is a modal window.

References
- ↑ http://www.shaverinsider.com/wp-content/uploads/2016/05/es-lv9n_Panasonic_shaver-user_instruction_manual.pdf
- ↑ https://www.manualslib.com/manual/1118478/Panasonic-Es-Lv95.html?page=8
- ↑ https://www.manualslib.com/manual/1118478/Panasonic-Es-Lv95.html?page=8
- ↑ https://www.youtube.com/watch?v=rGD84BfKxAE&feature=youtu.be&t=24
- ↑ https://www.ifixit.com/Guide/Disassembling+of+Wahl+Lithium+Ion+Trimmer/19849
- ↑ http://www.shaverinsider.com/wp-content/uploads/2016/05/es-lv9n_Panasonic_shaver-user_instruction_manual.pdf
- ↑ https://www.ifixit.com/Guide/Disassembling+of+Wahl+Lithium+Ion+Trimmer/19849
- ↑ https://www.youtube.com/watch?v=rGD84BfKxAE&feature=youtu.be&t=76
- ↑ http://www.shaverinsider.com/wp-content/uploads/2016/05/es-lv9n_Panasonic_shaver-user_instruction_manual.pdf
- ↑ https://groomandstyle.com/clean-electric-shaver/
- ↑ https://www.manualslib.com/manual/1118478/Panasonic-Es-Lv95.html?page=8
- ↑ https://www.manualslib.com/manual/1118478/Panasonic-Es-Lv95.html?page=8
- ↑ https://www.youtube.com/watch?v=rGD84BfKxAE&feature=youtu.be&t=24
- ↑ https://groomandstyle.com/clean-electric-shaver/
- ↑ https://www.asuperiorshave.com/safety-razors/how-to-clean-your-safety-razor/
- ↑ https://sharpologist.com/2017/03/clean-care-favorite-double-edged-safety-razor.html
- ↑ https://www.asuperiorshave.com/safety-razors/how-to-clean-your-safety-razor/
- ↑ https://sharpologist.com/2017/03/clean-care-favorite-double-edged-safety-razor.html
- ↑ https://www.asuperiorshave.com/safety-razors/how-to-clean-your-safety-razor/
- ↑ https://www.asuperiorshave.com/safety-razors/how-to-clean-your-safety-razor/
About This Article