This article was co-authored by wikiHow staff writer, Jessica Gibson. Jessica Gibson is a Writer and Editor who's been with wikiHow since 2014. After completing a year of art studies at the Emily Carr University in Vancouver, she graduated from Columbia College with a BA in History. Jessica also completed an MA in History from The University of Oregon in 2013.
There are 10 references cited in this article, which can be found at the bottom of the page.
The wikiHow Video Team also followed the article's instructions and verified that they work.
This article has been viewed 45,707 times.
Learn more...
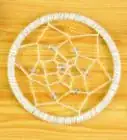
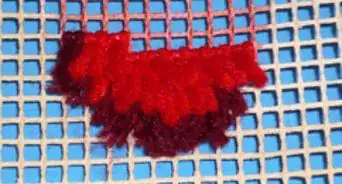
When it comes to displaying your embroidery, think outside the hoop! Sure, it's easy to hang hoop embroidery right on the wall, but there are lots of unique ways to showcase your beautiful handiwork. Putting the embroidery into a frame is a popular option—all you need is a hook and a frame! If you don't want to frame your work, read on for some creative display options.
Steps
Framing Your Embroidery
-
1Iron your embroidered piece so it's completely flat. You don't want pesky wrinkles on display! Heat your iron to the lowest setting that works with your fabric and lay your embroidered piece wrong side up on an ironing board. Then, iron the fabric smooth.[1]
- If you're working with a linen-cotton blend, set your iron to medium heat with steam.
-
2Choose a metal or wooden picture frame and take the back off of it. There are so many styles you can choose from! Pick a wooden or metal frame, for instance, that's large enough to hold the embroidery. Then, take the back off of the frame so you can lift out the backing. Leave the glass in the frame, but clean it if you see smudges.[2]
- Don't want to frame your embroidery under glass? No problem! Some people think it's harder to see the detail of the stitches when they're pressed behind the glass, so it's totally fine to leave the glass out.
Advertisement -
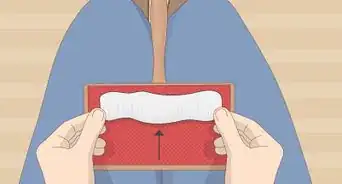
3Thread a needle and center the embroidery on the backing board. Pull at least 1 foot (12 in) of sturdy cotton thread away from the spool and cut it. Thread the needle and tie a knot at the end of the thread so you're all set. Then, lay the frame's backing piece flat and center the embroidery piece on it. Hold the sides and flip the board and embroidery over.[3]
- Want a little extra support? Pull the fabric tight around the backing board and stick sewing pins through the fabric into the edge of the board. The pins just help hold the fabric in place while you sew the back.
-
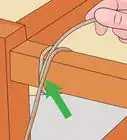
4Sew a wide zig-zag between the edges to create tension. Since you're not stretching the embroidery in a hoop, you've got to keep the fabric stretched another way. Push your needle through the fabric on 1 of the long edges near the corner of the backing. Bring the needle over to the other fabric edge and sew into it. Then, sew back across at a diagonal about 1⁄2 inch (1.3 cm) from where you started. When you work this zig-zag back and forth it looks like the thread laces the back and it creates tension.[4]
- Keep the short ends of your fabric unfolded at this point—you'll sew them next!
-
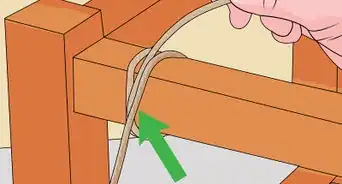
5Stitch between the 2 short edges. Now that you've got the hang of it, sew the short ends in place. Tuck the short ends of the fabric towards the middle of the backing and sew in a zigzag pattern between the 2 edges. Tie off the thread and cut it once you've reached a short end.[5]
- It might feel strange sewing between pieces of fabric, but this is what makes the tension and holds the embroidery in place.
-
6Put the backing piece with the embroidery into the frame and secure the clasps. You've done the hardest part! Now, just stick the embroidery with the backing into your frame. Put the back of the frame in place and slide the clasps or closures so the backing doesn't fall out![6]
- To finish displaying your embroidery, set the frame onto a side table or hang it on the wall. For a really striking display, frame several pieces of embroidery and hang them together in an artistic grouping.

Alternative Display Options
-
1Hang your embroidery from a wall or ladder for an eye-catching display. Keep things simple! Clip the top of your embroidered piece to wall hooks or a quilt hanger so you can hang the piece on any wall in your home. For a more rustic look, prop a ladder against the wall and drape the top of your embroidery over a rung.[7]
- This looks really great with large embroidery pieces that would be difficult to frame.
-
2Stretch the embroidery around a canvas frame for a modern display option. Work the embroidery on canvas fabric and buy a wooden frame that's as big as you like. Lay the embroidery face down and center the frame on it. Wrap the sides of the embroidery onto the sides of the frame and put binder clips every few inches along the edges to pull the canvas tight. Fold the shorter ends over and tuck the fabric in so it doesn't stick out of the corners. Then, use a staple gun to staple the piece to the back of the frame.[8]
- Unlike embroidery fabric, canvas fabric is thicker and won't wrinkle as easily.
- This is an even easier way to frame embroidery! You don't have to mess with glass or backing since you're just pulling the embroidered piece around the wooden frame.
-
3Work embroidery onto a pillowcase and stuff it for an easy throw pillow. Don't buy throw pillows when you can make beautiful ones yourself! Buy a plain pillowcase from your craft supply store and embroider your design onto it. Then, stick a pillow into the pillowcase or fill it with stuffing and stitch the pillow closed.[9]
- Feel like sewing your own pillow? No problem! Make your embroidery piece on any type of fabric you like and cut a matching piece of fabric for the back of your pillow. Then, stack the wrong sides so they're touching and sew around 3 sides. Turn the pillowcase right side out and stuff it with your pillow!
-
4Put the embroidery into a shadow box if you want your piece to really stand out. Buy a shadow box from a craft store and lift away the glass lid top. Then, keep your embroidery in its hoop and trim around the edges to leave a 1 inch (2.5 cm) overhang. Squeeze craft glue around the edge of the fabric and fold it onto the back of the hoop. Let your embroidery dry before you take off the outer hoop. Since the embroidery is now secured to the inner hoop, glue the bottom of the hoop and stick it onto the shadow box's backing piece. Put the lid on the shadow box so you can display it.[10]
- Hang the shadow box for a simple, but bold display style or fill the box with small decorations. For example, put a few dried flowers in the bottom of the box if you showcased embroidered flowers.
-
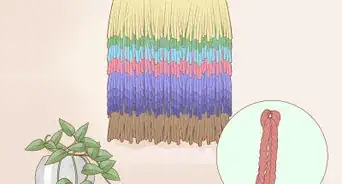
5Turn your embroidery into an ornament that you can hang for the holidays. Make custom ornaments for everyone on your list! Cut out your embroidery in a simple shape like a circle, diamond, or oval. Then, cut a matching piece of cardboard that's about 1 to 2 inches (2.5 to 5.1 cm) smaller than the embroidery piece. Wrap the embroidery around the cardboard and sew the back edges of the fabric together. Then, glue a fabric loop to the top so you can hang your ornament.[11]
- Want a puffy ornament with a bit more texture? Just stuff fiberfill between the cardboard and the embroidery before you sew it together. You can also hot glue a strip of lacy ribbon around the edge of the ornament for a bit more decoration.
- Don't wait for a holiday to display your embroidered ornament! Treat the ornaments as decorations you can hang from hooks on your walls.
Things You'll Need
Framed Embroidery
- Iron
- Ironing board
- Embroidery project
- Picture frame with backing board
- Scissors
- Sturdy cotton thread
- Sewing needle
- Sewing pins, optional
Alternative Display Options
- Embroidery project
- Canvas fabric
- Canvas frame
- Staple gun
- Binder clips
- Pillowcase
- Pillow or stuffing
- Shadowbox
- Embroidery hoop
- Quilt hanger or ladder
- Cardboard
- Glue
- Ribbon
- Scissors
- Decorative wall hooks


References
- ↑ https://www.bethcolletti.com/blog/how-to-display-your-embroidery-project-in-a-frame
- ↑ https://sewguide.com/how-to-frame-and-display-your-embroidery-work/#method_4_use_ready-made_frame
- ↑ https://www.wanderingthreadsembroidery.com/how-to-frame-embroidery/
- ↑ https://youtu.be/B5aiqNLbM8c?t=46
- ↑ https://www.wanderingthreadsembroidery.com/how-to-frame-embroidery/
- ↑ https://youtu.be/B5aiqNLbM8c?t=135
- ↑ https://www.inspirationsstudios.com/creative-ways-to-finish-display-stitched-art/
- ↑ https://youtu.be/-KpMtd6bUDo?t=40
- ↑ https://youtu.be/3LQ3Tf0tHJ4?t=131
About This Article